Internet, Socket Programming in
C#.Net
The primary programming mechanism by which
two programs communicate is a socket. Even though all communication
between two programs located on two different machines takes place in terms of
IP packets at the lowest level, every operating system provides an API called sockets
to facilitate the exchange of data between two programs. For example on a
Windows operating system, there is WinSock API for low level socket
programming, and in Unix, you can use the socket library via the –lsocket
option when compiling C programs.
.Net library makes socket programming fairly simple. There are two levels of types available in .Net, one at a higher level (easier to accomplish socket related tasks) and the other at the conventional low level of detailed socket programming. The namespaces for socket programming are “System.Net” and “System.Net.Sockets”.
C# provides several useful types for simplifying internet and socket programming. These include IPAddress for IP addresses, IPHostEntry for containing a collection of IPAddresses and a corresponding HostName. Note that one host name (e.g., www.cnn.com) can have multiple IP addresses assigned to it. There is a Dns class for obtaining IP addresses from domain names (GetHostByname method), and doing a reverse DNS lookup by the Reverse method. WebClient, HttpWebRequest and HttpWebResponse classes for communicating with web servers, and TcpClient and TcpServer classes for creating general client server programs. We will examine the above Network programming capabilities through several examples.
Internet
Programming:
Example 1: Obtaining IP addresses from domain names and reverse DNS lookup.
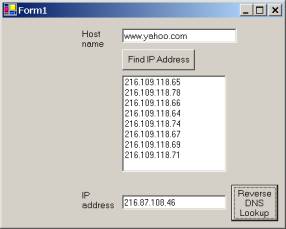
Create a C# windows application. Name the project SocketEx1. Add a label, a text box, a button and a list box as shown below. Name the button as “btnFindIPAddress”, the text box ss “txtDomainName” and the listbox as “lbIP”. Add the following declaration in the top of the form.
using System.Net;
Type the following code in the button handler.
private void
btnFindIPAddress_Click(object sender,
System.EventArgs e)
{
string hname = txtDomainName.Text;
IPAddress
ipadd = (Dns.GetHostByName(hname)).AddressList[0];
// MessageBox.Show(ipadd.ToString());
//
there can be multiple addresses for one host
// fill the list box with all IP addresses for a given
domain name
lbIP.Items.Clear();
IPAddress
[] ipAddrList = (Dns.GetHostByName(hname)).AddressList;
foreach (IPAddress ip in
ipAddrList)
lbIP.Items.Add(ip.ToString());
}
Add another label, a text box and a button to the bottom of the form as shown below. Name the text box “txtIP” and the button as “btnReverseDnsLookup”. Type the following code in the button handler.
private void
btnReverseDnsLookup_Click(object sender,
System.EventArgs e)
{
//---reverse DNS lookup can be done by the Resolve
method---
MessageBox.Show(Dns.Resolve(txtIP.Text).HostName);
}
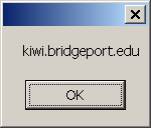
Build and run the above program. If you are connected to the internet, you will see an output like:
AsynchCallback:
Since the reverse DNS lookup can take considerable amount of time, it makes sense to use an asynchronous approach in making the “Dns.reverse()” call. .Net provides an excellent mechanism for asynchronous (non-blocking) calls so that the calling code does not have to block and can continue to do useful things. Once the call has been completed, the delegate passed to the asynchronous call can trigger the call to the callback function. Many socket related methods have the asynchronous capabilities built into them via the BeginMethodName and the EndMethodName calls.
Example: Add another button
next to the “Reverse DNSLookup” button. Name this button “btnReverseDnsAsynch” and give it a Text
property of “Reverse DNS Asynch”.
Add
the following declaration to the top of the form.
private AsyncCallback
MyResolveDel;
Type the following code in the form’s constructor.
MyResolveDel = new
AsyncCallback(MyResolveCallback);
Type the following code in the “reverse DNS Asynch” button’s handler.
private void btnReverseDnsAsynch_Click(object sender, System.EventArgs e)
{
object obj = new object();
Dns.BeginResolve(txtIP.Text,
MyResolveDel, obj);
// when reolve is done, it will callback MyResolveCallback
}// via the MyResolveDel
Add the following function in the Form1 class.
private void
MyResolveCallback(IAsyncResult res)
{
IPHostEntry
hostent = Dns.EndResolve(res);
MessageBox.Show(hostent.HostName);
}
WebClient Class: .Net library provides a higher level class called WebClient which is very useful for making socket connections to web servers, uploading and downloading files etc.. The following example will demonstrate how to make a socket connection to the Nasdaq web server, and request Intel’s stock price using the Get method.
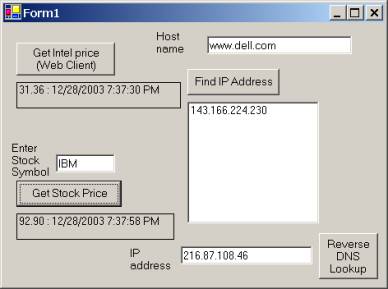
Example: Add another button and a label to the above form. Name the button “btnGetIntelPrice” and the label as “lblPrice”. Write the following code in the button’s handler.
private void
btnGetIntelPrice_Click(object sender,
System.EventArgs e)
{
WebClient
wbc = new WebClient();
byte[] bytes = wbc.DownloadData
("http://quotes.nasdaq.com/Quote.dll?mode=stock&symbol=intc&quick.x=23&quick.y=10");
string str1 = new
UTF8Encoding().GetString(bytes);
int pos = str1.IndexOf("$ ");
if(pos>0)
{
string s2 = str1.Substring(pos+7, 5);
lblPrice.Text
= s2 + " : " + System.DateTime.Now.ToString();
}
}
Add the following namespace declaration to the top of the form.
using System.Text;
In the above example, the name of stock is hard coded in the URL. To create a parametrized query, the WebClinet class allows us to add parameters via the QueryString collection’s Add method. To see this kind of example, add another label, a button and a text box to the bottom left side of the form as shown in the figure below. Name the button “btnGetStockPrice”, the textbox as “txtSymbol” and the label as “LblStockPrice”. Write the following code in the “get Stock Price” button handler.
private void
btnGetStockPrice_Click(object sender,
System.EventArgs e)
{
string url =
"http://quotes.nasdaq.com/Quote.dll" ;
WebClient
wbc1 = new WebClient();
wbc1.QueryString.Add("mode","stock");
wbc1.QueryString.Add("symbol",txtSymbol.Text);
wbc1.QueryString.Add("quick.x","23");
wbc1.QueryString.Add("quick.y","10");
byte [] bytes = wbc1.DownloadData(url);
string str1 = new
UTF8Encoding().GetString(bytes);
int pos = str1.IndexOf("$ ");
if(pos>0)
{
string s2 = str1.Substring(pos+7, 5);
lblStockPrice.Text
= s2 + " : " + System.DateTime.Now.ToString();
}
}
Build and test the application.
Examining Response Headers and Content: While WebClient class is very useful in connecting to a web server and exchanging information i.e., downloading or uploading a file or content, sometimes we need to examine the response headers to find out the “Content-Type” or “last-Modified” date or “Content-Length” etc.. For these type of tasks, the WebRequest and WebResponse classes are better suited. The WebRequest class allows us to make a request to a web site. The response is stored in a WebResponse type of object from where we can examine the content and the headers in a straight forward manner.
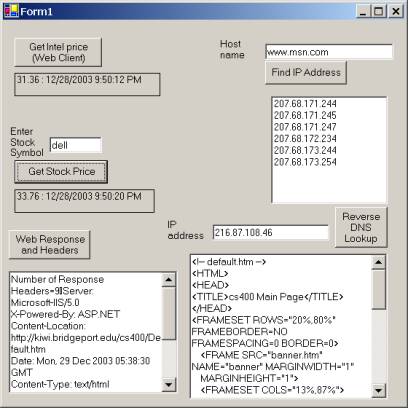
Example: Add two text boxes and a button to the previous form. Name the button “btnWebResponse” with a text property of “Web Response and Headers”. The two text boxes should have their Multilane property set to true and Scrollbars property to both. Name the first text box as txtHeader and the second one as txtContent. Type the following code in the button handler.
private void
btnWebResponse_Click(object sender,
System.EventArgs e)
{
HttpWebRequest
webReq =
(HttpWebRequest)WebRequest.Create("http://kiwi.bridgeport.edu/cs400");
webReq.Referer="http://www.bridgeport.edu"; //optional
HttpWebResponse
webResp =(HttpWebResponse)webReq.GetResponse();
// opens URL and gets the response.
// Now you can examine the content as well as headers
Stream
strResp = webResp.GetResponseStream(); // binary stream
StreamReader
strRead = new StreamReader(strResp); // Text stream
Char[]
buff = new Char[256];
StringBuilder
pageContent = new StringBuilder();
int cnt = strRead.Read(buff, 0, 256 );
while (cnt > 0)
{
pageContent.Append(new String(buff, 0, cnt));
cnt =
strRead.Read(buff, 0, 256);
}
txtContent.Text
= pageContent.ToString();
txtRespHeaders.Text
= "Number of Response Headers=" + webResp.Headers.Count.ToString();
txtRespHeaders.Text
+= webResp.Headers.ToString();
MessageBox.Show(webResp.Headers["Content-Type"].ToString());
strRead.Close();
strResp.Close();
// Release the response object resources.
webResp.Close();
}
Add the following namespace declaration to the top of the form.
using System.IO;
Socket
Programming:
There are two kinds of sockets that need to be created in implementing client server programs. One is referred to as a server socket and the other a client socket. Since it is possible that a large amount of data (requiring more than one IP packet) may need to be transferred from one program to the other, TCP is used in the actual transfer of data from one program to the other. Thus in a client server type of environment, often the server program is referred to as the TCP server and the client as TCP client. Or in other words, you can think of the socket mechanism as a higher level of abstraction of the TCP layer. The socket API has a number of steps that need to be followed in order to create the TCP server and the TCP client. These are shown in the following diagram.

 TCP Client Program TCP Server Program
create a socket create
a socket
connect to an IP address bind to an IP address
and port number and
port number
![]()
![]()
![]() send data listen
send data listen
![]()
![]()
![]() recv data accept
recv data accept
recv data
send data
Socket class in .Net (available in the System.Net.Sockets namespace) is used to make TCP clients. Its constructor identifies the TCP server (by its domain name or IP address) and the port number on which to connect to.
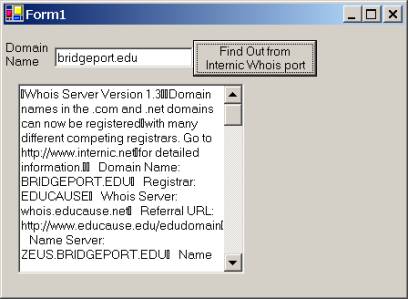
Example: Build a windows application that connects to the port 43 (Whois port on the internic server to find out if a given domain is registered or not and if so information about it).
Create a new Windows C# project. Name the project SocketEx2. Add a label, a text box, a button and another text box with multilane property set to true, as shown below. Name the top text box as “txtDomain”, the button as “btnWhoisInternic”, and the last text box that is in multilane mode as “txtResults”. Give a text property of “Find out from Internic Whois Port”. The label has a text property of “Domain Name”.
Add the following namespaces to the top of the form code.
using System.Net;
using System.Net.Sockets;
using System.Text;
using System.IO;
Type the following code in the button’s handler.
private void
btnWhoisInternic_Click(object sender,
System.EventArgs e)
{
try
{
TcpClient
client = new TcpClient();
client.Connect("internic.net",
43);
Stream
inoutStr = client.GetStream();
// socket is bidirectional, binary stream
String
domainName = txtDomain.Text;
byte [] sendBuff =
ASCIIEncoding.ASCII.GetBytes(domainName+"\n");
// "\n" is how the server will know to start
responding
inoutStr.Write(sendBuff,0,sendBuff.Length);
StreamReader
strRead = new StreamReader(inoutStr); // Text stream
Char[]
recvBuff = new Char[256];
StringBuilder
recvData = new StringBuilder();
int cnt = strRead.Read(recvBuff, 0, 256 );
while (cnt > 0)
{
recvData.Append(new String(recvBuff, 0, cnt));
cnt = strRead.Read(recvBuff, 0, 256);
}
txtResults.Text
= recvData.ToString();
inoutStr.Close();
client.Close();
strRead.Close();
}
catch (Exception ex)
{
MessageBox.Show(ex.Message);
}
}
Build and test the program, your output will look as.
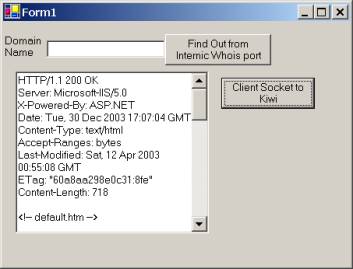
Example: If you modify the above program to connect to a web server (most web servers are listening on port 80), then by sending the following string:
“GET /default.htm HTTP/1.0 \n\n” to the socket that is connected to the web server, you will get the page back on the socket. Add another button to the form with a name of “btnClientSocketKiwi” and a text property of “Client Socket to Kiwi”. Write the following code in the button’s handler.
private void
btnClientSocketKiwi_Click(object sender,
System.EventArgs e)
{
try
{
TcpClient
client = new TcpClient();
client.Connect("kiwi.bridgeport.edu",
80);
Stream
inoutStr = client.GetStream();
// socket is bidirectional, binary stream
byte []
sendBuff = ASCIIEncoding.ASCII.GetBytes("GET /cs400/default.htm
HTTP/1.0\n\n");
// "\n\n" is important now for the server to
start responding
inoutStr.Write(sendBuff,0,sendBuff.Length);
StreamReader
strRead = new StreamReader(inoutStr); // Text stream
Char[]
recvBuff = new Char[256];
StringBuilder
recvData = new StringBuilder();
int cnt = strRead.Read(recvBuff, 0, 256 );
while (cnt > 0)
{
recvData.Append(new String(recvBuff, 0, cnt));
cnt
= strRead.Read(recvBuff, 0, 256);
}
txtResults.Text
= recvData.ToString();
/* the following code will also work
StreamReader
inStr = new StreamReader(inoutStr); // text stream for input reading
StringBuilder
recvData = new StringBuilder();
string
line = inStr.ReadLine();
while
(line != null)
{
recvData.Append(line);
line
= inStr.ReadLine();
}
txtResults.Text
= recvData.ToString();
*/
inoutStr.Close();
client.Close();
strRead.Close();
}
catch (Exception ex)
{
MessageBox.Show(ex.Message);
}
}
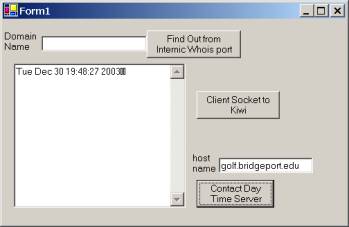
In the previous examples, we used the TcpClient class to make a socket connection to the server. .Net library also provides the low level Socket class that implements the Berkeley sockets. We will use a plain socket to connect to a server in our next example. In some situations the client may take a while to read the data from a socket. In such cases, the socket reading code can be invoked in a separate thread. Further the .Net delegate mechanism can be used to have the thread (reading from socket) call a callback function once the data has been read by the thread. The following example illustrates the use of client socket to contact a Daytime server on port 13, and also the related thread creation and callback once the data from the socket has been read.
Example: Add a label, a text box and a button to the form as shown below. The textbox has a name of “txtHostname”, and the button name is “btnContactDayTimeServer”. The label has a text property of “Host Name”, and the button’s text property is “Contact Day Time Server”.
Add another class to the SocketEx2 project by right clicking on the project name and choosing “Add New Item”. Select the item to be C# class with a name of MyDayTime.cs.
Type the following code for the MyDayTime class.
using System;
using System.Net.Sockets;
using System.Net;
using System.Threading;
using System.Text;
namespace SocketEx2
{
public class
MyDayTime
{
Socket
mSockdt; //
client socket for day time server
public string msDaytime="";
CallBackDel
mcbDel;
public MyDayTime(string
hostname, CallBackDel mc)
{
try
{
IPAddress
ipadd = (Dns.GetHostByName(hostname)).AddressList[0];
System.Net.IPEndPoint
ipepdt = new System.Net.IPEndPoint(ipadd,13); // daytime port
mSockdt =
new
Socket(AddressFamily.InterNetwork,SocketType.Stream,ProtocolType.Tcp);
mSockdt.Connect(ipepdt);
mcbDel =
mc; // now
mcbDel is pointing to the callback in form1
}
catch(Exception e)
{
throw new
Exception("Error: "+e.Message);
}
}
public void
GetDayTime() //
will be called in a separate thread
{ // reads the data from socket
try
{
byte [] buff = new byte[256]; // Day time server sends one line
mSockdt.Receive(buff);
mSockdt.Close();
lock (this)
{
msDaytime
= Encoding.ASCII.GetString(buff);
}
mcbDel(); // call the
callback function in form1 so that it can get } // dtat
obtained by this thread from the socket
catch(Exception e)
{
throw new Exception(e.Message);
}
}
}
}
Add the following declarations to the top of form1 class (shown in bold).
using
System.Threading;
…
namespace SocketEx2
{
public delegate void
CallBackDel();
public class Form1 : System.Windows.Forms.Form
{
private
CallBackDel mcb; // delegate mcb of CallBackDel type
MyDayTime dt;
Type the following code for the “Contact Day Time Server” button’s handler.
private void
btnContactDayTimeServer_Click(object sender,
System.EventArgs e)
{
try
{
mcb = new CallBackDel(this.CallBackFromThread);
dt = new MyDayTime(txtHostname.Text, mcb);
Thread t1
= new Thread(new
ThreadStart(dt.GetDayTime));
t1.Start(); // thread will
call back on the function in this
//
form once it gets the data
//Thread.Sleep(5000);
}
catch (Exception ex)
{
MessageBox.Show(ex.Message);
}
}
public void
CallBackFromThread() // thread will call back this function
{ //
once it has read all the data from the socket
txtResults.Text
= dt.msDaytime;
}
Build and test the application.
Note: A socket is a two way communication mechanism. If you contact a TCP server using a buffered stream, you need to flush the data that is to be written to the output stream.
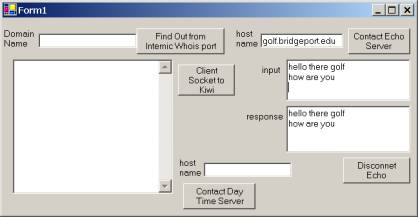
Example: Contacting an echo server on port 7. The echo server simply echoes back the data that was sent to it on the socket. A ‘\n’ on the input to the socket indicates to the echo server to start responding with the echo.
Add three labels, three text boxes and two buttons to the existing form in SocketEx2 project as shown below. The labels have text properties of “host name”, “input” and “response”. The first text box has a name of “txthost”. The second text box has a name of “txtInputEcho” and its multiline property set to true. The third text box has a name of “txtResponseEcho” and its multiline property also set to true. The first button has a name of “btnContactEchoServer” and a text property of “Contact Echo Server”. The second button has a name of “btnDisconnectEcho” and a text property of “Disconnect Echo Server”. Add another class to the project called “MyEchoClient”. The code for this class is shown below.
using System;
using System.Net.Sockets;
using System.Net;
using System.Threading;
using System.Text;
namespace SocketEx2
{
public class
MyEchoClient
{
Socket
mSockEcho; //
client socket for echo server
public MyEchoClient(string
hostname)
{
try
{
IPAddress
ipadd = (Dns.GetHostByName(hostname)).AddressList[0];
System.Net.IPEndPoint
ipepdt = new System.Net.IPEndPoint(ipadd,7); // Echo port
mSockEcho
= new
Socket(AddressFamily.InterNetwork,SocketType.Stream,ProtocolType.Tcp);
mSockEcho.Connect(ipepdt);
}
catch(Exception e)
{
throw new
Exception("Error: "+e.Message);
}
}
public string
SendReceiveEcho(string inp)
{ // sends and reads data back from socket
try
{
byte [] buff = ASCIIEncoding.ASCII.GetBytes(inp);
mSockEcho.Send(buff);
byte [] respbuff = new
byte[256];
mSockEcho.Receive(respbuff);
return ASCIIEncoding.ASCII.GetString(respbuff);
}
catch(Exception e)
{
throw new
Exception(e.Message);
}
}
public void
DisconnectEcho()
{
mSockEcho.Close();
}
}
}
Add the following declaration in the form class.
MyEchoClient echoClient;
int mpos = 0;
Type the following code for the “Contact Echo Server” button handler.
private void btnContactEchoServer_Click(object sender, System.EventArgs e)
{
mpos = 0;
echoClient = new
MyEchoClient(txthost.Text);
}
Type the following code for the “disconnect Echo” button handler.
private void
btnDisconnectEcho_Click(object sender,
System.EventArgs e)
{
txtInputEcho.Text
= "";
txtResponseEcho.Text
= "";
echoClient.DisconnectEcho();
}
Add a “Text changed” handler for the “txtInputEcho” text box. Type the following code in it.
private void
txtInputEcho_TextChanged(object sender,
System.EventArgs e)
{
if (txtInputEcho.Text == "")
return;
if (txtInputEcho.Text[txtInputEcho.Text.Length-1] ==
'\n')
{ // \n tells the echo
server to start responding
int lastpos = txtInputEcho.Text.Length;
txtResponseEcho.Text
= txtResponseEcho.Text +
echoClient.SendReceiveEcho(txtInputEcho.Text.Substring(mpos,lastpos-mpos));
mpos =
lastpos;
}
}
Build and test the application. Type in a host name in the host name text box, then click on the “Contact Echo Server” button. Now type in some text in the “txtInputEcho” textbox. Whenever you hit enter, the line is sent to the echo server, which responds by the same text on the same socket (remember socket is bi-directional). When you are done sending and receiving lines from the echo server, click on the “Disconnect Echo” button to close the client socket.
As you have seen from the previous examples, the “Socket” class on the client-side provides “Send(byte [])” and “Receive(byte [])” methods for sending and receiving bytes. You can also use the TCPClient class instead of a Socket class. The TCPClient allows for a stream-based sending and receiving of data. Since you can also use text streams (StreamReader and StreamWriter classes) for those servers that you know exchange text based information such as Web Servers, the TCPClient class is often preferred over the low level Socket class.
Creating TCP servers: .Net library provides the TCPListener class to create
TCP servers in an easy manner. You can also use the Socket class for this
purpose. However, just like the TCPClient is easier to use than a Socket class
on the client side, a TCPListener has a higher level interface for creating
servers. The TCPListener class constructor creates the server socket, binds it
to an IP and a port number, then goes into listening mode. The class provides
an accept method which is a blocking call and waits for the incoming client.
Example: Line length server.
A simple server that
accepts a client connection and sends back the length of the line in terms of
number of characters it receives from the client. Create a C# Windows
application with the project name as “TCPLineLengthServer”. Create the
following user interface in the default form.
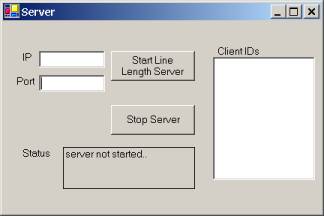
The text boses in the left
hand corner have names of “txtIP” and “txtPort” respectively. The two buttons
have names of “btnStartServer” and “btnStopServer”. The label at the bottom has
a name of “lblStatus”. The list box on the right has a name of “lbClients”.
Add the following
namespaces statements to the top of the form.
using System.Net;
using System.Net.Sockets;
using System.Text;
using System.Threading;
using
System.IO;
Add the following code to
the top of the Form1 class.
TcpListener tcpServer;
Thread srvTh;
Type the following code for
the Start Server button.
private void
btnStartServer_Click(object sender,
System.EventArgs e)
{
try
{
tcpServer
= new TcpListener(IPAddress.Parse(txtIP.Text),int.Parse(txtPort.Text));
tcpServer.Start();
srvTh = new Thread(new
ThreadStart(ServeClients));
// handle client requests in a separate thread
srvTh.Start();
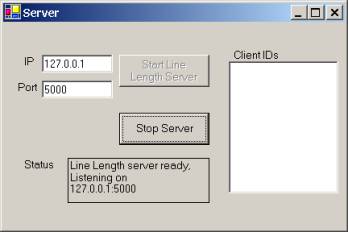
lblStatus.Text
= "Line Length server ready, Listening on\n" +
tcpServer.LocalEndpoint.ToString();
btnStartServer.Enabled
= false;
}
catch(Exception ex)
{
MessageBox.Show(ex.Message);
}
}
As you can see from the above code, the TcpListener creates a server. The IP address and port number are assigned in its constructor. Once the server is started, it can “Accept” incoming connections from clients. The above code starts a new thread to handle the client request. Add the following function that will be invoked in a separate thread in the Form1 class.
private void
ServeClient() //
can only serve a single client
{
tcpSrv =
tcpServer.AcceptTcpClient();
// thread will block here until client connects
Stream
strm = tcpSrv.GetStream(); // binary stream
StreamReader
strmRead = new StreamReader(strm); // text stream
while (true) // allows client
to submit multiple line length requests
{
string recvString = strmRead.ReadLine();
byte [] sendData;
if (recvString != "DONE")
sendData
= Encoding.ASCII.GetBytes((recvString.Length).ToString()+"\n");
else
sendData
= Encoding.ASCII.GetBytes("Server closed socket\n");
strm.Write(sendData,0,sendData.Length);
// strm.Flush();
if (recvString == "DONE") // client is done
and is closing connection
break;
}
strmRead.Close();
strm.Close();
tcpSrv.Close();
}
The above code is capable
of serving only one client. To handle multiple concurrent clients, we can
modify the above “ServeClient” function, so that it creates a new thread each
time a client connects to it: Recall the server blocks at the “AcceptTcpClient(
)” call until a client connects to it.
We can make a TCP server more responsive by having it create a separate
thread for each client as the server does an accept of an incoming connection.
Since we may want to keep track of each client ID, and the thread that is used
for each client, add a new class to the project with a name of "HandleClient".
The code for the HandleClient class is shown below.
using System;
using System.Net.Sockets;
using System.IO;
using System.Text;
using System.Threading;
namespace TCPLineLengthServer
{
public class
HandleClient
{
public TcpClient tcpClientSocket = null;
int clientID;
// issued by the TCP server
public int ClientID
{
get { return clientID; }
}
public Thread clientThread; // for send, recv of data to/from
client
Form1
pForm; //
parent form
public HandleClient(TcpClient tcpClient, int id, Form1 fm)
{
this.tcpClientSocket = tcpClient;
this.clientID = id;
pForm =
fm;
}
public void
SendReceiveClientData()
{// will execute in a separate thread to send receive data
to/from client
Stream
strm = null;
StreamReader
strmRead = null;
try
{
strm =
tcpClientSocket.GetStream(); // binary stream
strmRead
= new StreamReader(strm); // text stream
while (true) // allows client
to submit multiple line length requests
{
string recvString = strmRead.ReadLine();
byte [] sendData;
if (recvString != "DONE")
sendData = Encoding.ASCII.GetBytes((recvString.Length).ToString()+"\n");
else
sendData
= Encoding.ASCII.GetBytes("Server closed socket\n");
strm.Write(sendData,0,sendData.Length);
// strm.Flush();
if (recvString == "DONE") // client is done
and is closing connection
break;
}
}
catch(Exception ex)
{
throw new
Exception(ex.Message);
}
finally
{
strmRead.Close();
strm.Close();
// remove self from array list of active clients
lock (pForm.syncobj)
{
foreach (HandleClient hc in
pForm.activeClients)
{
if (hc.clientID == this.clientID)
pForm.activeClients.Remove(hc);
}
}
}
}
}
}
Add the following code to
the top of the Form1 class.
TcpClient tcpSrv;
int clientNum = 0;
public ArrayList activeClients
= new ArrayList();
public object
syncobj = new object();
// for multithreading synchronization
The array list
“activeClients” keeps a list of the clients that are currently connected to
this server. Because we are creating a multithreaded server, any modifications
to the activeClients array list should be protected by a lock. The syncobj
object above will be used to provide the synchronization lock.
Type the following code for
the ServeClients( ) function in the Form1 class.
private void
ServeClients() //
can server multiple clients in a multithreaded manner
{
try
{
while (true)
{
TcpClient
tcpClient = tcpServer.AcceptTcpClient();
// thread will block here until client connects, at that
time
// the AcceptTcpClient will return a client socket
Interlocked.Increment(ref clientNum);
// important because of multithreading
HandleClient
hc = new HandleClient(tcpClient,clientNum, this);
lock (syncobj)
{
activeClients.Add(hc);
}
hc.clientThread
= new Thread(new
ThreadStart(hc.SendReceiveClientData));
hc.clientThread.IsBackground
= true;
// otherwise thread cleaning does not work
hc.clientThread.Start();
}
}
catch (ThreadAbortException ex)
{
throw new
Exception(ex.Message);
}
}
Type the following code for the Form load event.
private void Form1_Load(object
sender, System.EventArgs e)
{
txtIP.Text = "192.168.0.100";
txtPort.Text = "5000";
lblStatus.Text = "server not
started..";
activeClients.Clear();
}
Type the following code for
the “Stop Server” button.
private void
btnStopServer_Click(object sender,
System.EventArgs e)
{
// ------close all client sockets, stop client threads
foreach
(HandleClient hc in this.activeClients)
{
if (hc.clientThread != null)
{
if (hc.clientThread.IsAlive)
{
hc.tcpClientSocket.Close();
hc.clientThread.Abort();
}
}
}
// ------wait for all client threads to finish
foreach (HandleClient hc in
this.activeClients)
{
if (hc.clientThread != null)
{
hc.clientThread.Join(0); // proper way to
abort a thread, some prob. so 0
}
}
//------stop TCP server
--this should be before aborting main server thread
if (tcpServer != null)
tcpServer.Stop();
lblStatus.Text
= "Line Length server Stopped" ;
btnStartServer.Enabled
= true;
// ------stop the main server thread
if (srvTh != null)
{
if (srvTh.IsAlive)
{
srvTh.Abort();
srvTh.Join();
}
}
}
Type the following code for the Form closing event.
private void
Form1_Closing(object sender,
System.ComponentModel.CancelEventArgs e)
{
btnStopServer_Click(null,null);
// GC.Collect(); //trigger
GC
// GC.WaitForPendingFinalizers();
}
Add a timer to the form.
Set its enabled property to true and the interval property to 500. Type the
following code in the timer handler (double click on the timer1 to write the
following handler). The code below checks the active clients list and updates
the listbox showing the currently connected clients.
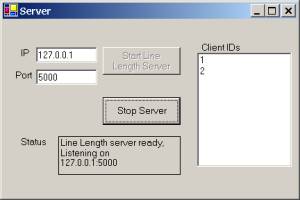
private void timer1_Tick(object
sender, System.EventArgs e)
{
lbClients.Items.Clear();
lock
(syncobj)
{
foreach
(HandleClient hc in this.activeClients)
lbClients.Items.Add(hc.ClientID);
}
}
The server is ready. You
can build and run it. Pick a port number and an IP corresponding to your
computer, and then clcik on the “Start Server” button. You can find your IP
address by typing “ipconfig” from the command prompt. If you are not connected
to the internet, then choose the loopback localhost IP address of 127.0.0.1.
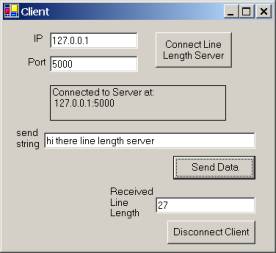
Building the client for Line Length Server:
Create a windows C# application called
“TCPLineLengthClient”. Create the following user interface in the default form.
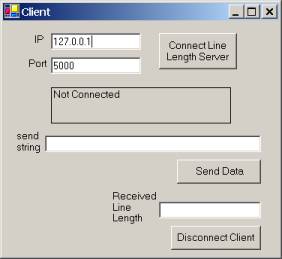
The two text boxes in the
top left have names of “txtIP” and “txtPort”. The middle label has a name of
“lblStatus”. The top right button has a name of “ConnectLLServer”. The middle
text box has a name of “txtSendString”. The “Send Data” has a button of
“btnSenddata”. The text box below it has a name of “txtLineLength”. The button
at the bottom has a name of “btnDisconnect Client”.
The important code for the
Form1 class including the different event handlers is shown below. The client
uses the TcpClient class to connect to the LineLengthServer.
..
using System.Net.Sockets;
using System.Net;
using System.Text;
using System.IO;
using System.Threading;
namespace TCPLineLengthClient
{
public class Form1 :
System.Windows.Forms.Form
{
private TcpClient tcpClient = null;
private Thread thClient;
….
….
private void
btnConnectLLServer_Click(object sender,
System.EventArgs e)
{
try
{
IPEndPoint
ipLLS = new IPEndPoint(IPAddress.Parse(txtIP.Text),
int.Parse(txtPort.Text));
tcpClient
= new TcpClient();
tcpClient.Connect(ipLLS); // blocking call
lblStatus.Text
= "Connected to Server at:\n " + ipLLS.ToString();
thClient
= new Thread(new
ThreadStart(this.SendReceiveData));
thClient.Start();
}
catch (Exception ex)
{
MessageBox.Show(ex.Message);
}
}
private void
Form1_Load(object sender, System.EventArgs e)
{
txtIP.Text
= "192.168.0.100";
txtPort.Text
= "5000";
lblStatus.Text
= "Not Connected";
}
void SendReceiveData()
{
try
{
tcpClient.SendTimeout
= 200; // 200
milliseconds
tcpClient.ReceiveTimeout
= 200;
Stream
strm = tcpClient.GetStream();
byte [] sendData =
Encoding.ASCII.GetBytes(txtSendString.Text+"\n");
strm.Write(sendData,0,sendData.Length);
StreamReader
strmRead = new StreamReader(strm); // text stream
string lineLength = strmRead.ReadLine();
txtLineLength.Text
= lineLength;
}
catch (Exception ex)
{
lblStatus.Text
= "problem connecting.." ;
MessageBox.Show(ex.Message);
}
}
private void
btnSendData_Click(object sender,
System.EventArgs e)
{
SendReceiveData();
}
private void
btnDisconnectClient_Click(object sender,
System.EventArgs e)
{
if (thClient != null)
{
if (thClient.IsAlive)
{
thClient.Abort();
}
}
if (tcpClient != null)
tcpClient.Close();
tcpClient
= null;
lblStatus.Text
= "Disconnected..";
}
private void
Form1_Closing(object sender,
System.ComponentModel.CancelEventArgs e)
{
btnDisconnectClient_Click(null, null);
}
}
}
Run the server, then the
client. Make sure the server has a valid IP and port number before you click on
the “Start Server” button. The client should connect to the same IP address and
port number the server has been started on.
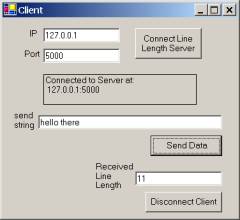
You can run multiple clients by clicking on the exe file in the bin/debug folder of the TCPLineLengthClient project directory.
Each time you type in a line in the middle text box and click on “Send Data” button, the TCPLineLengthServer returns the length of the line which the client displays in the bottom text box. You can type the “DONE” message in the client to indicate that the server should close the socket to this client.
Asynchronous
Programming:
You have already seen the use of delegates as “call back”
functions in the case of event handlers, message communication between modeless
dialogs, and having another thread block while making a synchronous call, then
once the call is returned invoke the “call back” method via the delegate.
Rather than creating the thread yourself that (blocks on the synchronous call)
and have it call back via a delegate, the standard delegate mechanism can be
used to create asynchronous calls in a straightforward manner. Here is the
general procedure to accomplish this.
1. Declare an appropriate delegate corresponding to the
method you wanted to call (i.e., the method that blocks).
2. Use the BeginInvoke( ) method from the above
delegate to invoke the intended method. The BeginInvoke(.) method takes
two extra parameters in addition to the parameters required in the original
call. The additional parameters are a delegate to the callback function (has to
be of type AsyncCallback) and a context object for state information.
Both of these additional parameters can be null if they are not needed. The BeginInvoke(.)
method is nonblocking and returns an “IAsyncResult” type object that can
be used to determine the status of the call.
3. Once BeginInvoke(.) is called, you have several
options to wait on the completion of the actual call.
a. Call EndInvoke(IAsyncResult ar) to see if the
call has completed and collect the result from the call via the IAsyncResult
parameter. Note that EndInvoke is a blocking call, so you can first do
some work and then make this call. Also, you should not make this call from a
user interface thread as it will block the user interface.
b. Obtain a wait handle using the IAsyncResult.AsyncWaitHandle
property. Then use wait handle’s WaitOne method to block execution until
the wait handle is signaled. Then call EndInvoke to collect the result.
c. Poll the IAsyncResult object returned by the BeginInvoke
call to see when the call gets actually completed. Then call EndInvoke
to collect the result.
d. Pass a delegate for a callback function to the BeginInvoke
method. This delegate has to be of AsyncCallback type. This method will
be called back automatically when the actual call finishes. Note that the
invoked function and the call back method automatically execute in another
thread provided by the thread pool. The code in the call back method should
call EndInvoke to collect the result.
NOTE: You should always call EndInvoke to collect
the result from the call. Even if result is not needed, EndInvoke should
be called to do the proper clean up in an asynchronous call.
Example: Create a C#
windows application. Name the project “AsyncCalls”. Create the following user
interface in the default form.
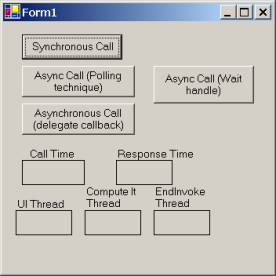
Put four buttons on the
form with text properties as shown above. The names of the four buttons are:
“btnSyncCall”, “btnAsyncPoll”, “btnAsyncDelegate” and “btnAsyncWaitHandle”. Put
five 10 labels on the form as shown above. The labels with rectangles around
them have their border style property set to “FixedSingle”. Name these labels
as “lblCallTime”, “lblEndTime”, “lblthUI”, “lblthComputeit”, and
“lblthEndInvoke”.
Add another class to the
project. Name this class “MyCompute”. Type the following code in it.
using
System;
using
System.Threading;
using
System.Windows.Forms;
namespace
AsyncCalls
{
/// <summary>
/// Summary description for MyCompute.
/// </summary>
public class MyCompute
{
public
MyCompute()
{
}
public
System.DateTime Computeit(int data, out int thID)
{
data = data + 5;
// dummy
computation
Thread.Sleep(5000); // pretend
computation takes 5 seconds
thID =
System.AppDomain.GetCurrentThreadId();
return
System.DateTime.Now;
}
}
}
Add the following
declaration after the namespace in Form1.cs file (but before the Form1 class).
delegate System.DateTime MyDelAsyn(int a, out int ret);
As you can see, the above
declaration defines a delegate for the function that we intend to call in an
asynchronous manner (i.e., the Computeit function in MyCompute class).
Add the following line in
the beginning of the Form1 class.
MyDelAsyn delComputeit; // delegate
for async call
Type the following code for
the “Synchronous Call” button.
private void btnSyncCall_Click(object
sender, System.EventArgs e)
{
MyCompute mc = new
MyCompute();
System.DateTime t1 = System.DateTime.Now;
lblCallTime.Text = t1.ToString();
lblthUI.Text =
System.AppDomain.GetCurrentThreadId().ToString();
int
thIDComputeit;
System.DateTime t2 = mc.Computeit(5, out thIDComputeit) ;
lblEndTime.Text = t2.ToString();
lblthComputeit.Text =
thIDComputeit.ToString();
}
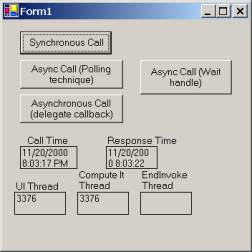
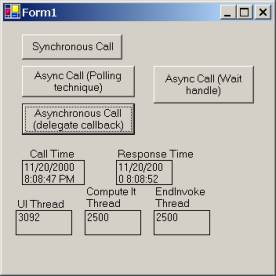
If you run the above
program, you will see that nothing shows up in the labels in the form for about
five second (because of the synchronous call that takes five seconds), and then
the following results appear.
The best technique for
asynchronous calls is where we pass a delegate to the callback function in the
“BeginInvoke” method. Type the following code for the “Asynchronous Call
(delegate callback)” button’s handler.
private void
btnAsyncDelegate_Click(object sender,
System.EventArgs e)
{
MyCompute mc = new
MyCompute();
delComputeit = new
MyDelAsyn(mc.Computeit);
// set delegate
for async call
AsyncCallback MyCallBackDel = new AsyncCallback(this.MyCallback); // callback
delegate
System.DateTime
t1 = System.DateTime.Now;
lblCallTime.Text = t1.ToString();
lblthUI.Text =
System.AppDomain.GetCurrentThreadId().ToString();
int
thIDComputeit;
IAsyncResult ar =
delComputeit.BeginInvoke(5, out thIDComputeit,
MyCallBackDel, delComputeit);
// asynchronous call, function pointed to MyCallBackDel
// will be automatically invoked, when the call to
Computeit finishes
// Computeit is being pointed to by delComputeit delegate,
last
// param is the context. First two parameters are given to
Computeit.
}
Add the following callback function in the Form1
class. This function will be automatically invoked when the actual call
(Computeit method) via the BeginInvoke finishes.
private void
MyCallback(IAsyncResult ar)
{
try
{
int thIDComputeit;
AsyncCalls.MyDelAsyn
delComp = (AsyncCalls.MyDelAsyn) ar.AsyncState;
// retrieve async delegate from state
System.DateTime
t2 = delComp.EndInvoke(out thIDComputeit, ar);
// the ar parameter has to be the same as that received in
this call
// the above call could be through delComputeit in which
case you will // not need
state object.
lblEndTime.Text
= t2.ToString();
lblthEndInvoke.Text
= System.AppDomain.GetCurrentThreadId().ToString();
lblthComputeit.Text
= thIDComputeit.ToString();
}
catch (Exception ex)
{
MessageBox.Show(ex.Message);
}
}
If you run the program and click on the “Asynchronous
Call” button, you will see that the “Call Time” and “UI Thread” labels are filled
right away, as the button’s handler immediately returns because of the
asynchronous BeginInvoke call. After about five seconds, the callback delegate
(MyCallback) that was passed to the BeginInvoke method is automatically
triggered, and the rest of the labels are filled by the MyCallback method. Note
that the called function via BeginInvoke(i.e., Computeit), and the call back
function (i.e., MyCallback) are automatically executed in a separate thread.
In short, the
benefit of the asynchronous calls using the built-in delegate mechanism
(BeginInvoke, EndInvoke etc..) is that you do not have to create threads
yourself, the .Net framework automatically does this for us so that there is no
blocking involved.
Very similarly, the other two asynchronous techniques
- “Polling” and “Wait Handle” are demonstrated by the two button handlers as
shown below.
private void
btnAsyncPoll_Click(object sender,
System.EventArgs e)
{
MyCompute
mc = new MyCompute();
delComputeit
= new MyDelAsyn(mc.Computeit); // set delegate
for async call
System.DateTime
t1 = System.DateTime.Now;
lblCallTime.Text
= t1.ToString();
lblthUI.Text
= System.AppDomain.GetCurrentThreadId().ToString();
int thIDComputeit;
IAsyncResult
ar = delComputeit.BeginInvoke(5, out thIDComputeit,
null, null);
// we will use polling technique
while (ar.IsCompleted == false)
{
Thread.Sleep(100); // wait 100
milliseconds, then check again
}
System.DateTime
t2 = delComputeit.EndInvoke(out thIDComputeit,
ar);
// the ar parameter has to be the same as that received in
this call
// the above call could be through delComputeit in which
case you will // not need state
object.
lblEndTime.Text
= t2.ToString();
lblthEndInvoke.Text
= System.AppDomain.GetCurrentThreadId().ToString();
lblthComputeit.Text
= thIDComputeit.ToString();
}
private void
btnAsyncWaitHandle_Click(object sender,
System.EventArgs e)
{
MyCompute
mc = new MyCompute();
delComputeit
= new MyDelAsyn(mc.Computeit); // set delegate
for async call
System.DateTime
t1 = System.DateTime.Now;
lblCallTime.Text
= t1.ToString();
lblthUI.Text
= System.AppDomain.GetCurrentThreadId().ToString();
int thIDComputeit;
IAsyncResult
ar = delComputeit.BeginInvoke(5, out
thIDComputeit, null, null);
// we will use wait handle technique
ar.AsyncWaitHandle.WaitOne(); // wait for this
handle to get signaled
System.DateTime
t2 = delComputeit.EndInvoke(out thIDComputeit,
ar);
// the ar parameter has to be the same as that received in
this call
// the above call could be through delComputeit in which
case you will
// not need state object.
lblEndTime.Text
= t2.ToString();
lblthEndInvoke.Text
= System.AppDomain.GetCurrentThreadId().ToString();
lblthComputeit.Text
= thIDComputeit.ToString();
}