ADO.Net
– Database programming in .Net
ADO.Net is a new object model for dealing with databases in
.Net. Although some of the concepts are similar to the classical
Here are some of the main classes for database programming in ADO.Net. Classes that start with Sql… are direct .Net classes for Sql server (i.e., accesses data via managed providers). Classes that start with OleDb… access database through OleDb providers.
SqlConnection, OleDbConnection – for opening a connection to the database (it is similar in concept to the classical ADO Connection class).
SqlCommand, OledbCommand – for invoking SQL commands or stored procedures.
SqlCommandBuilder, OledbCommandBuilder – for building parameterized queries.
DataSet – a disconnected object containing all or part of a database.
SqlDataAdapter, OleDbDataAdapter – for populating a Dataset.
SqlDataReader, OleDbDataReader – A connected forward-only access to database.
SqlParameter, OleDbParameter – for specifying parameter to a stored procedure.
SqlTransaction, OleDbTransaction – for programming database transactions.
The DataSet class can further use DataTable, DataRow, DataColumn, DataRelation and Constraint classes to define its offline data.
The namespaces needed for different database classes are: System.Data, System.Data.Common, System.Data.OleDb (for OleDb provider), System.Data.SqlClient (for Sql server managed provider) and System.Data.SqlTypes.
Even though majority of the database programming in ADO.Net uses the disconnected model, database connections are an important resource and you should explicitly close the connection. There are two recommended programming styles for achieving this:
try
{
// open the connection to the database
//
// do something with the database
}
catch (Exception e)
{
// report error
}
finally
{
conn.Close( );
}
The second technique for using connections efficiently is by the using clause:
String connstr = “database connection string “;
try
{
using (SqlConnection conn = new SqlConnection(connstr))
{
conn.Open( );
// do something with the database
//
conn.Close( );
// more code
}
}
catch (Exception e)
{
// report error
}
Although the end of using clause will automatically call the Close( ) method on the connection object, it is a good practice to close the connection yourself as early as possible.
The SqlCommand and the OleDbCommand have the following execute methods.
ExecuteNonQuery( ) – used when no records are expected in the output e.g., insert or update sql commands.
ExecuteReader( ) – returns a connected DataReader (actually IDataReader interface)
ExceuteScalar( ) – returns a single row, useful when verifying login for a particular user.
ExecuteXmlReader( ) – returns an XML reader.
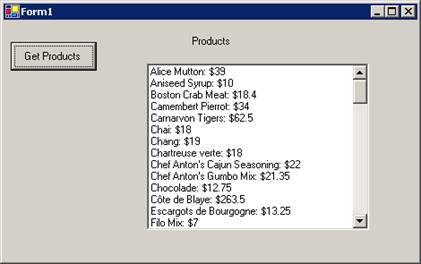
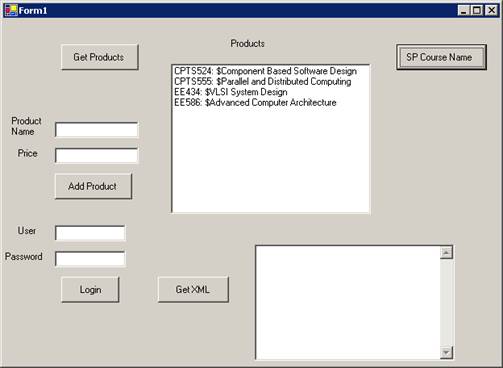
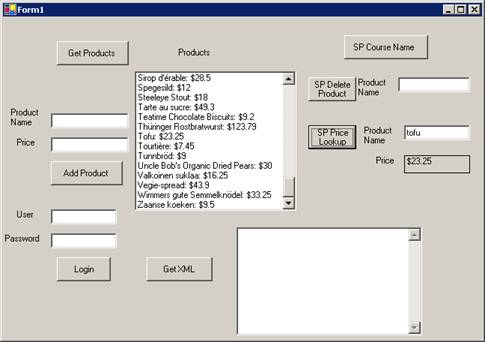
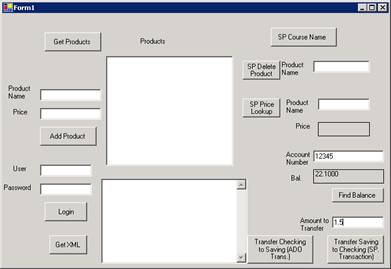
Example: Create a new C# windows application. Name the project DbExamples. Add a listbox to the form with a name of “lbProducts”. Add a button with a name of “btnGetProducts” and a text property of “Get Products.
Add the following using statement towards the top of the code area.
using System.Data.SqlClient;
Double click on the button to write the following code for the Get Products button handler.
private void
btnGetProducts_Click(object sender,
System.EventArgs e)
{
try
{
string connstr = "server=tennis;uid=sa;pwd=duportail;database=Northwind";
string sql = "Select productname, unitprice from
products order by productname";
using(SqlConnection conn = new
SqlConnection(connstr))
{
conn.Open();
SqlCommand
cmd = new SqlCommand(sql,conn);
SqlDataReader
reader = cmd.ExecuteReader();
while (reader.Read())
{
lbProducts.Items.Add(reader[0].ToString()
+ ": $" + reader[1].ToString());
// column 0,1
}
conn.Close();
}
}
catch(Exception ex)
{
MessageBox.Show(ex.Message);
}
}
Build and run the program.
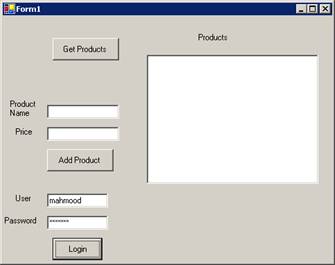
Add one more button to the form with name property of “btnAddProduct” and text property of “Add Product”. Add two text boxes with names of txtProductName and txtPrice as shown below. The code for the Add Product handler is shown below.
private void
btnAddProduct_Click(object sender,
System.EventArgs e)
{
try
{
string pname = txtProductName.Text;
string price = txtPrice.Text;
string connstr = "server=tennis;uid=sa;pwd=duportail;database=Northwind";
string sql = "insert into products
(productname,unitprice) values ('"
+
pname + "'," + price + ")";
using(SqlConnection conn = new
SqlConnection(connstr))
{
conn.Open();
SqlCommand
cmd = new SqlCommand(sql,conn);
int rowcnt = cmd.ExecuteNonQuery();
MessageBox.Show(rowcnt.ToString());
btnGetProducts_Click(null,null);
}
}
catch(Exception ex)
{
MessageBox.Show(ex.Message);
}
}

Add two more text boxes with names of txtUser and txtPassword. Set the PasswordChar property of password text box to ‘*’. Add a button with a text property of “Login” and a name of btnLogin. Write the following code in the Login handler.
private void
btnLogin_Click(object sender, System.EventArgs
e)
{
try
{
string uname = txtUser.Text;
string pwd = txtPassword.Text;
string connstr =
"server=tennis;uid=sa;pwd=duportail;database=XYZ";
string sql = "select * from users where
username='" +
uname + "'and password='" + pwd +
"'";
using(SqlConnection conn = new
SqlConnection(connstr))
{
conn.Open();
SqlCommand
cmd = new SqlCommand(sql,conn);
Object
obj = cmd.ExecuteScalar(); // returns first col. of first row
if (obj != null)
MessageBox.Show(obj.ToString() + "
logged in");
else
MessageBox.Show("Invalid
login");
}
}
catch(Exception ex)
{
MessageBox.Show(ex.Message);
}
}
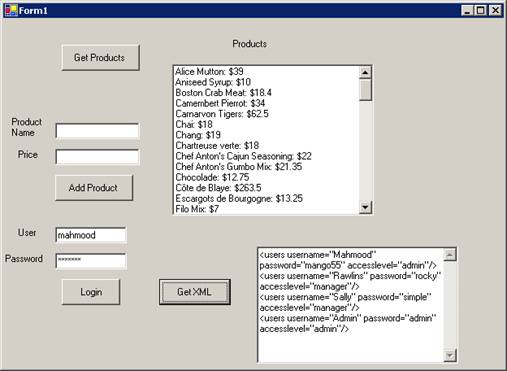
Getting XML from SqlClient provider:
The SqlCommand class has an ExecuteXmlReader( ) that returns the XML data from aSQL query. You have to specify “For XML Auto” or “For XML Raw” or “For XML Explicit” in your SQL statement. The Xml Explicit statement requires you to specify the shape of the XML tree to be returned. The Auto and Raw will return each row as an element, and the columns specified as attributes in XML.
Add a multiline text box to the form with a name of “txtXML”. Add a button with a name of “btnGetXml” and a text property of “GetXml”. Write the following code in the Get Xml handler.
Add the following namespace declarations to the top of the form code.
using System.Xml;
using System.Text;
using System.IO;
private void
btnGetXml_Click(object sender, System.EventArgs
e)
{
try
{
string connstr = "server=tennis;uid=sa;pwd=duportail;database=XYZ";
string sql = "select username, password,
accesslevel from users for XML AUTO";
// FOR XML AUTO builds a tree based on the tables
using(SqlConnection conn = new
SqlConnection(connstr))
{
conn.Open();
SqlCommand
cmd = new SqlCommand(sql,conn);
XmlReader
reader = cmd.ExecuteXmlReader();
StringBuilder
sb = new StringBuilder(""); // need System.Text namespace
string fname = @"d:\temp\t1.xml";
StreamWriter
rdw = new StreamWriter(fname,false);
string sline;
reader.Read();
while (!reader.EOF)
{
sline
= reader.ReadOuterXml();
sb.Append(sline
+ "\r\n");
rdw.WriteLine(sline);
}
rdw.Close();
txtXML.Text
= sb.ToString();
System.Diagnostics.Process.Start(fname); //launch browser
}
}
catch(Exception ex)
{
MessageBox.Show(ex.Message);
}
}
The above code uses the StringBuilder class instead of the usual string class to store the Xml before putting its contents in the multilane edit box, as a String builder is more efficient in catenating strings.
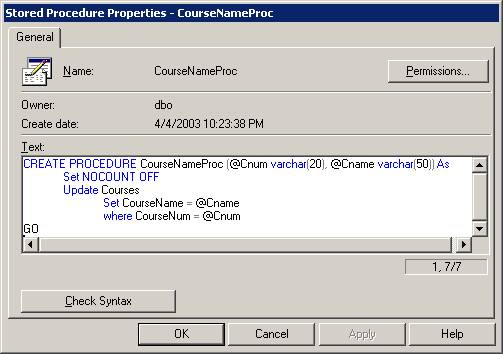
Invoking Stored Procedures:
Invoking stored procedures is easy in .Net. All you need to do is specify the name of the stored procedure via the Command object (SqlCommand or OleDbCommand). Then define all the parameter names and their SQL types by the SqlParameter object.
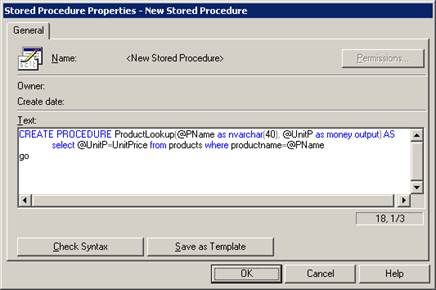
On my computer, I have a SQL server database called “StDbSql” with three tables in it. One of the tables is called “Courses” which has three columns in it – CourseNum, CourseName and CreditHours. Through the SQL server enterprise manager, expand on the StDbSql database, then right click on the “Stored Procedures” to add a new stored procedure. Type the following code for the stored procedure called “CourseNameProc”. It simply updates the course name for a particular course num. Both of these are passed as parameters to the stored procedure.
Add a button with a name of “btnSPCname” and a text property of “SP Course Name” to the form. Type the following code in the button handler.
private void
btnSPCname_Click(object sender,
System.EventArgs e)
{
try
{
string connstr =
"server=tennis;uid=sa;pwd=duportail;database=StDbSql";
using(SqlConnection conn = new
SqlConnection(connstr))
{
conn.Open();
SqlCommand
cmd = new
SqlCommand("CourseNameProc",conn);
cmd.CommandType
= CommandType.StoredProcedure;
cmd.Parameters.Add(new
SqlParameter("@Cnum",SqlDbType.VarChar,20,"CourseNum"));
cmd.Parameters.Add(new SqlParameter("@Cname",SqlDbType.VarChar,50,"CourseName"));
cmd.UpdatedRowSource
= UpdateRowSource.None;
cmd.Parameters[0].Value
= "EE434";
cmd.Parameters[1].Value
= "VLSI System Design";
cmd.ExecuteNonQuery();
// -- display the updated results
string sql = "Select CourseNum, CourseName from
courses";
SqlCommand
cmd2 = new SqlCommand(sql,conn);
SqlDataReader reader = cmd2.ExecuteReader();
lbProducts.Items.Clear();
while (reader.Read())
{
lbProducts.Items.Add(reader[0].ToString()
+ ": $" +
reader[1].ToString());
// column 0,1
}
conn.Close();
}
}
catch(Exception ex)
{
MessageBox.Show(ex.Message);
}
}
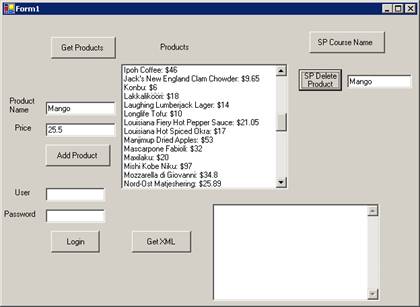
Build and execute the program. Click on “SP Course Name” button to invoke the stored procedure that changes the name of course “VLSI Systems” to “VLSI System Design” as shown below.
Stored Procedure that Deletes a Record:
From
the enterprise manager in SQL server, add a stored procedure to the Northwind
database called “SPDeleteProduct” as shown below.
Add another button to the form in DbExamples project with a name of “btnSPDelProd” and a text property of “SP Delete Product”. Add a text box next to it with a name of “txtProdName”. Type the following code in the “SP Delete Product” button handler.
private void
btnSPDelProd_Click(object sender,
System.EventArgs e)
{
try
{
string connstr =
"server=tennis;uid=sa;pwd=duportail;database=Northwind";
using(SqlConnection conn = new
SqlConnection(connstr))
{
conn.Open();
SqlCommand
cmd = new
SqlCommand("SPDeleteProduct",conn);
cmd.CommandType
= CommandType.StoredProcedure;
cmd.Parameters.Add(new
SqlParameter("@PName",SqlDbType.NVarChar,40,"ProductName"));
cmd.UpdatedRowSource
= UpdateRowSource.None;
cmd.Parameters[0].Value
= txtProdName.Text;
cmd.ExecuteNonQuery();
// -- display the updated results
string sql = "Select ProductName, UnitPrice from
Products order by ProductName";
SqlCommand
cmd2 = new SqlCommand(sql,conn);
SqlDataReader reader = cmd2.ExecuteReader();
lbProducts.Items.Clear();
while (reader.Read())
{
lbProducts.Items.Add(reader[0].ToString()
+ ": $" +
reader[1].ToString());
// column 0,1
}
conn.Close();
}
}
catch(Exception ex)
{
MessageBox.Show(ex.Message);
}
}
Invoking Stored Procedures that return Output
Parameters:
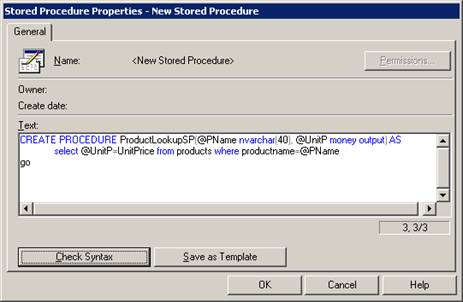
Create a stored procedure called “PriceLookupSP” in the Northwind database, as shown below.
You can test the above stored procedure by typing the following in the Query analyzer and executing the script.
declare @unitp money
execute productlookupsp "chai",@unitp output
select @unitp "price output"
Add a button with a name of “btnSPPriceLookup” and a text property of “SP Price Lookup”. Add a text box next to it with a name of “txtProductNm”. Put a label below it with a name of “lblPrice”. Add two more labels with text properties of “Product Name” and “Price”, as shown below.
Write the following code for the “SP Price Lookup” handler.
private void
btnSPPriceLookup_Click(object sender,
System.EventArgs e)
{
try
{
string connstr =
"server=tennis;uid=sa;pwd=duportail;database=Northwind";
using(SqlConnection conn = new
SqlConnection(connstr))
{
conn.Open();
SqlCommand
cmd = new
SqlCommand("ProductLookupSP",conn);
cmd.CommandType
= CommandType.StoredProcedure;
cmd.Parameters.Add(new
SqlParameter("@PName",SqlDbType.NVarChar,40,"ProductName"));
cmd.Parameters.Add(new
SqlParameter("@UnitP",SqlDbType.Money,8,ParameterDirection.Output,false,2,2,"UnitPrice",DataRowVersion.Default,null));
cmd.UpdatedRowSource = UpdateRowSource.OutputParameters;
cmd.Parameters[0].Value
= txtProductNm.Text;
cmd.ExecuteNonQuery();
// -- display the updated results
lblPrice.Text = "$" + cmd.Parameters["@unitP"].Value.ToString();
conn.Close();
}
}
catch(Exception ex)
{
MessageBox.Show(ex.Message);
}
}
Examine the code shown in bold carefully as these are the important changes that are needed for output parameters for stored procedures. The Add method of the Parameters collection requires quite a few more parameters if the parameter is an output type.
Note that if the stored procedure returns a number of rows, then you will use ExecuteReader that returns a data reader object instead of ExecuteNonQuery as shown above.
Using OLE-DB provider instead of a Managed Provider:
A managed provider is a better way to connect to a database. However, there are currently only a few managed providers available in ADO.NET (e.g., for SQL Server and Oracle). As time goes by, more managed providers will be available for other databases. In contrast, OLE-DB providers exist for almost any database, such as Oracle, Microsoft Access, SQL server, DB2, Sybase and so on. Recall that OLE-DB is an ActiveX or COM based driver. To interact with the actual COM/ActiveX based OLE-DB provider for a database, there is an OLE-DB managed provider in ADO.NET.
Some of the most commonly used OLE-DB providers are:
- Microsoft Access 97 - Microsoft.Jet.OLEDB.3.51
- Microsoft Access 2000 – Microsoft.Jet.OLEDB.4.0
- Microsoft Indexing Service - MSIDXS.1
- Microsoft SQL Server - SQLOLEDB.1
- Oracle - MSDAORA.1
Example: Finding Information about a Database:
Let’s build a simple C#
application that retrieves database meta information from Microsoft’s Access
Northwind.mdb database. We will use ADO.NET OLE-DB provider. Create a new C#
console application from File -> New
-> Project. The purpose of this
application is to print out the tables and different column names in each table
in the database.
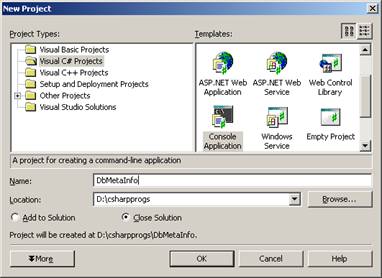
Change the name of the default class to DbInfo. Add the two using statements at the top,
using System.Data;
using System.Data.OleDb;
The overall code should look as:
using System;
using
System.Data;
using
System.Data.OleDb;
namespace
DbMetaInfo
{
class DbInfo
{
// connection string
static readonly string CONN_STRING =
"Provider=Microsoft.Jet.OLEDB.4.0;"+
"Data Source=c:/Program Files/Microsoft Visual Studio/vb98/Nwind.mdb;";
// connection object
OleDbConnection
connection;
DbInfo() // constructor
{
this.connection = new
OleDbConnection(DbInfo.CONN_STRING);
this.connection.Open();
}
public void
getTablesInfo()
{
DataTable
tables = this.connection.GetOleDbSchemaTable(OleDbSchemaGuid.Tables,
null);
Console.WriteLine("\nCreating
Listing for Table Meta Data");
foreach (DataRow row in
tables.Rows)
{
Console.WriteLine("Table
Name:"+row["TABLE_NAME"]);
}
}
public void
getColInfo()
{
DataTable
tables = this.connection.GetOleDbSchemaTable(OleDbSchemaGuid.Columns,
null);
Console.WriteLine("\nListing
Column Metadata Information ...");
//foreach( DataColumn column in tables.Columns )
//{
// Console.WriteLine("c:
"+column);
//}
Console.WriteLine("\nColumns
(TableName : ColumnName format)...");
foreach( DataRow row in
tables.Rows )
{
Console.WriteLine(row["TABLE_NAME"]+"
: "+ row["COLUMN_NAME"]);
}
}
/// <summary>
/// The main entry point
for the application.
/// </summary>
[STAThread]
static void Main(string[] args)
{
try
{
DbInfo
info = new DbInfo();
info.getTablesInfo();
info.getColInfo();
info.connection.Close();
}
catch( OleDbException exception )
{
foreach(OleDbError error in
exception.Errors)
{
Console.WriteLine("Error
:"+error);
}
}
}
}
}
Build and execute the application. The output will appear as:
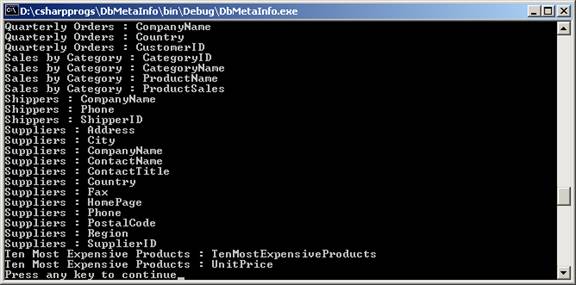
The above code uses the GetOleDbSchemaTable method to obtain the information about tables in the database and the columns of each table in the database. The following call,
DataTable tables = this.connection.GetOleDbSchemaTable(OleDbSchemaGuid.Tables,
null);
returns the tables in the database and the names of stored procedures.
Whereas the call,
DataTable tables = this.connection.GetOleDbSchemaTable(OleDbSchemaGuid.Columns,
null);
returns the column information for each table in the database.
Once the table names or the column names have been obtained, we can cycle through the collection by using the DataRow object and obtain information about each row in the collection (i.e., find its table name or the column name).
foreach (DataRow row in
tables.Rows)
{
Console.WriteLine("Table
Name:"+row["TABLE_NAME"]);
}
Specifying Connection Properties:
In the example above we used only data source and oledb provider properties for the connection object for simplicity, but there are other properties that one can place in their connection strings.
- Addr or Address - Synonym for Data Source.
- Connect Timeout or Connection Timeout - The number of seconds to wait for a login response from Database Server. If no response is received during this period, an exception is thrown. Default value is 15 seconds.
- Data Source - The name or network address of the computer on which Database Server is located.
- User ID - The Database Server login account to use for authentication.
- Password or Pwd - The Database Server login password for the user specified in the User ID setting.
- Trusted_Connection - Synonym for Integrated Security. Default value is ‘false’
- Workstation ID - The name of the computer that is connecting to Database Server. Default value is the client computer name.
Using DataSets and DataAdapters:
DataSet class encapsulates tables and the relations between these tables. It is always completely disconnected from any data source and it doesn’t have any knowledge about data source tables and relations at all. You can think of the DataSet as in memory representation of the database so that the client can access the data very quickly. Any updates made to the data are submitted to the database in a very efficient manner so that only the changed data is communicated back to the database. To achieve the DataSet functionality, we have two choices: either to create them (i.e., the tables and relations in the DataSet) dynamically or to fill them from data source. To fill DataSet, we normally use DataAdapters. Here is a summary of the important concepts.
- DataSet: is an in-memory representation of a collection of related data tables. It can be generated using the help of a DataAdapter or filled dynamically by the application.
- DataAdapter: A class that is used to fill DataSet object from a data source.
- DataReader: This is similar to DataAdapter but is used for very fast connected, forward-only reading of data source.
Let’s now build a more interesting application to show how we can use DataAdapters, DataSets and Commands in C# and ADO.NET. This application will create a simple windows form and we will have two buttons and one list box. We will use our Access database (Northwind) from the previous example and you can see how easy it is to fill the list box with data using DataSet and DataAdapters.
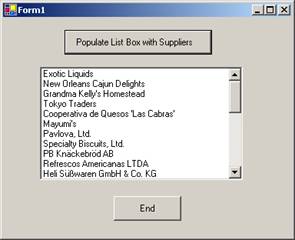
Example: Create new project of type Windows Application. Name the project DbEx0.
Put two buttons and a list box on the form. The top button has a text
property of “Populate List Box with Suppliers” and a Name of “btnSuppliers”.
The list box below this button has a name of “lstSuppliers”. There is another
button underneath the list box with a text property of “END” and a name of “btnEnd”.
The important code including the different event handlers is shown below:
using System;
using
System.Drawing;
using
System.Collections;
using
System.ComponentModel;
using
System.Windows.Forms;
using
System.Data;
using System.Data.OleDb;
// added by Ausif
namespace DbEx0
{
/// <summary>
/// Summary description for
Form1.
/// </summary>
public class Form1 :
System.Windows.Forms.Form
{
static readonly string CONN_STRING =
"Provider=Microsoft.Jet.OLEDB.4.0;"+
"Data
Source=c:\\Program Files\\Microsoft Visual Studio\\vb98\\Nwind.mdb;";
…….
private void
btnEnd_Click(object sender, System.EventArgs e)
{
Application.Exit();
}
private void
btnPopulate_Click(object sender,
System.EventArgs e)
{
OleDbConnection
cn = new OleDbConnection();
cn.ConnectionString
= CONN_STRING;
cn.Open();
OleDbDataAdapter
dAdapt = new OleDbDataAdapter(
"SELECT
* from Suppliers", cn);
DataSet
myDS = new DataSet("Supplier");
dAdapt.Fill(myDS,
"Supplier");
//--- now create a datatable for the dataset
DataTable dt = myDS.Tables["Supplier"];
//-- or DataTable dt = myDS.Tables[0];
foreach (DataRow dr in
dt.Rows) // add to list box
{
lstSuppliers.Items.Add(dr["CompanyName"].ToString());
}
cn.Close();
}
}
}
Build and run the application.
To explain the above code, first we need our connection
string and we can declare it as a data member in our class as:
static readonly string CONN_STRING =
"Provider=Microsoft.Jet.OLEDB.4.0;"+
"Data Source=c:\\Program Files\\Microsoft Visual
Studio\\vb98\\Nwind.mdb;";
Of course you have to write the correct path
to your data source according to your office installation.
Now it is time to open our data source:
OleDbConnection cn = new OleDbConnection();
cn.ConnectionString = CONN_STRING;
cn.Open();
Then we need a simple SQL statement or so
called command string:
string
strSQL = "SELECT * FROM Suppliers" ;
Here is the part that creates our
DataAdapter, this is very easy as you can see. You need only one line of code:
OleDbDataAdapter dAdapt = new OleDbDataAdapter( strSQL, cn);
The next thing to do is to create our DataSet
object and to fill it with data form our DataAdapter. It’s done by:
DataSet myDS = new
DataSet("Supplier");
dAdapt.Fill(myDS, "Supplier");
Now we need a DataTable class which is
basically a class that represents a table into the memory, and we needed it for
our DataSet, so that we can get all the information from data source. If you
look in Northwind database you will see that there is a table called Suppliers
and our task is to get all company names from that table. So we need some
representation of it in the memory. That’s why we use DataTable class which is
an important class in the ADO.NET library.
The following code represents that we need
only one table for our in-memory data:
DataTable dt =
myDS.Tables["Supplier"];
//-- or DataTable dt = myDS.Tables[0];
The last thing we have to do in our button
method is to get all those rows that have company names. If you look in the
Suppliers table you will see that there is a column Company Name and we need
this to get all rows form it. We create the following foreach cycle:
foreach
(DataRow dr in dt.Rows) // add to list box
{
lstSuppliers.Items.Add(dr["CompanyName"].ToString());
}
And that is all the code we need for the Populate button.
Using
DataGrid to Display Data:
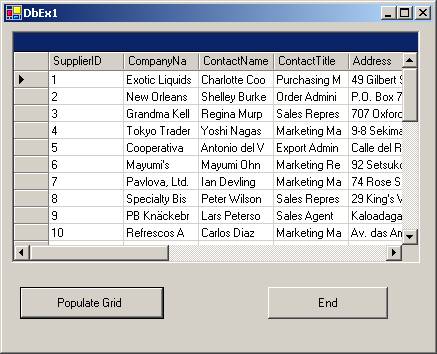
In the next example we will see how we can use DataGrid to create a good-looking database application. The code for the most part will be similar to the previous example. You can add another form to the existing DbEx0 application by right clicking on the project name and choosing “Add Windows Form”. Name the form DbEx1.cs.
Place a DataGrid control on the new form. You can leave its name property to have the default value of “dataGrid1”. Place two buttons underneath the DataGrid control. One with a name of “btnPopulate” and a text property of “Populate Grid”. The second button will have a name of “btnEnd” and a text property of “End”. Add the following two lines to import the appropriate namespaces at the top of the form code.
using System.Data;
using System.Data.OleDb;
The code for the populate button handler looks as:
private void
btnPopulate_Click(object sender,
System.EventArgs e)
{
string
CONN_STRING = "Provider=Microsoft.Jet.OLEDB.4.0;"+
"Data
Source=c:\\Program Files\\Microsoft Visual Studio\\vb98\\Nwind.mdb;";
OleDbConnection
cn = new OleDbConnection();
cn.ConnectionString
= CONN_STRING;
cn.Open();
string strSQL = "SELECT * FROM Suppliers" ;
OleDbDataAdapter
dAdapt = new OleDbDataAdapter( strSQL, cn);
DataSet
myDS = new DataSet("Supplier");
dAdapt.Fill(myDS,
"Supplier");
//--- now create a datatable for the dataset
DataTable dt = myDS.Tables["Supplier"];
//-- or DataTable dt = myDS.Tables[0];
dataGrid1.DataSource
= myDS.Tables[0].DefaultView;
dataGrid1.Refresh();
cn.Close();
}
In the original form (Form1.cs), add another button with a name property of “btnGridView” and a text property of “Show Grid View”. The click handler for this button has the following code:
private void
btnGridView_Click(object sender,
System.EventArgs e)
{
DbEx1 ex1 = new DbEx1();
ex1.Show();
}
Build and Test the application.
Here is a little more “complex” example that shows how you can work with Oracle stored procedures in ADO.NET using C#.
Well due to limited MS Access functionality, we cannot create and use stored procedures in this kind of databases. Unlike other objects in Access, stored procedures have no interface and cannot be created or run through the Access User Interface. The way to get them into your database is to simply code them. But even if you code them they are converted to some sort of query and that is unnecessary work to code a query.
So we will take a look at Oracle stored procedures and show how you can invoke them through ADO.NET and C#. It is basically the same idea for other data sources.
Here is how you can create a stored procedure in your Oracle database, of course you need to have an account, but the procedure is similar with SQL Server.
Well suppose we have an Oracle database and we created the following stored procedure for it
CREATE OR REPLACE PROCEDURE updateBalance(accNo number, amount number) IS
BEGIN
UPDATE customer_account
SET balance = balance + amount
WHERE accountNo = accNo ;
END ;
Here is the code you need to write for the console application.
// import the required assemblies
using System;
using System.Data;
using System.Data.OleDb;
Here is time for our class definition:
class StoredProc
{
Of course we need Main function (entry point for our program)
public static void Main()
{
Well this every body should be familiar with:
// your Database connection string
// this is for Oracle, but you need the full path to your
database
string connString = "Provider=MSDAORA.1;"
;
// create an instance of the connection object
OleDbConnection
myConnection = new OleDbConnection(connString);
And here is something interesting that I didn’t mention before. And
that is how to create OleDbCommand object. Well you can see it is easy and what
does it mean you will know in a second. It represents a SQL command or stored
procedure to execute against a data source:
OleDbCommand myCommand = new
OleDbCommand("updateBalance", myConnection);
If you noticed the first parameter is the name of the stored procedure
we will execute. The second one is self explanatory – we need data source to
play with.
Here is the key part. We have to specify the command type property. And
in our case this is stored procedure and we do so:
myCommand.CommandType
= CommandType.StoredProcedure;
Now is time to specify all the parameters that this stored procedure
takes. Take a look at the sample stored procedure and you will see that we have
2 parameters and we assume that they are both integers. How we can tell C#
compiler that we need those parameters as input and what value they have. This
is done by using OleDbCommand Parameters property:
//Add the parameter "accNo" giving it's value and
defining it as a Input parameter
myCommand.Parameters.Add("accNo",OleDbType.Integer,16);
myCommand.Parameters["accNo"].Value
= 1 ;
myCommand.Parameters["accNo"].Direction
= ParameterDirection.Input ;
//Add the parameter "amount" giving it's value
& defining it as Input parameter
myCommand.Parameters.Add("amount",OleDbType.Integer,16);
myCommand.Parameters["amount"].Value
= 200 ;
myCommand.Parameters["amount"].Direction
= ParameterDirection.Input ;
This code part is self-explanatory except this number 16 in
Parameters.Add method. This is the size of the column in the table. The next
code part is just try – catch block, follow the comments and you will get the
point. The only thing I will explain is that ExeuteNonQuery() method. It
executes a SQL statement against the connection and returns the number of rows
affected. The ExecuteNonQuery does not return any records. You will use the
ExecuteQuery method for those cases where some records are being returned as a
result of the query’s execution.
// using the Try Catch Finally Block.
try
{
// Open the connection
myConnection.Open();
Console.WriteLine("created
connection") ;
// execute the stored procedure
myCommand.ExecuteNonQuery()
;
// get the confirmation on the screen
Console.WriteLine("Procedure
Completed") ;
}
catch(Exception ex)
{
// catch the error message and put it in the string
"msg"
string msg = ex.Message ;
//show the error message on the screen
Console.WriteLine(msg) ;
}
finally
{
myCommand.Dispose();// Destroy the command object
myConnection.Dispose()
; // Destroy the connection object
}
}
}
In the following example we will see how to use MS SQL Server in ADO.NET.
Well, in this example, we can see basic commands like updating records,
deleting and inserting them. Okay this will be a little bit complex but hold
your breath and be patient First comes the code, you can copy and paste it and
read carefully what you need to do before running it! You can add another
windows form called DbEx2.cs to the DbEx0 project.
You also need to have MS SQL Server installed and to have account on
it. So we create a very simple database on the SQL Server and one table in this
database – Students.
The table has the following fields:
StudetnID – int
FirstName – string
LastName – string
GPA - float
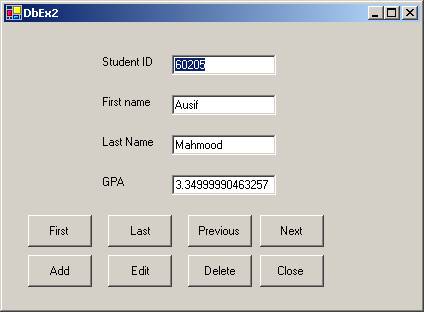
Modify the DbEx2 form to look like this:

It has four labels, four text boxes and ten buttons. The labels are (as you guessed ) SNo, FirstName, LastName and Score. The buttons are as follows:
Four buttons to navigate through database records: First, Previous, Next and Last.
Four buttons to execute database commands: Add, Edit, Delete and Close.
Close: When clicked will close the form.
Add: Allows you to enter values into the text boxes. All the buttons are disabled and only Update and Cancel buttons are enabled. After user enters the values into the text boxes you can click on Update to add the record or click on Cancel to cancel the operation.
Edit: Allows you to edit an existing record.
Delete: Allows you to delete an existing record.
Update: Is enabled when user selects Edit or Add buttons.
Cancel: Is enabled when user selects Edit or Add buttons.
Add the following Data category controls to the form from the Data part of the toolbox. You can leave their default names.
SqlConnection1: establishes a connection to the Data database in the Sql server database. Click on the Connection String property of the SqlConnection1. Then click on the drop down arrow and another click will take you to the following dialog that can let you build the connection string.
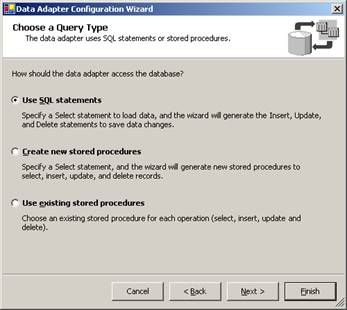
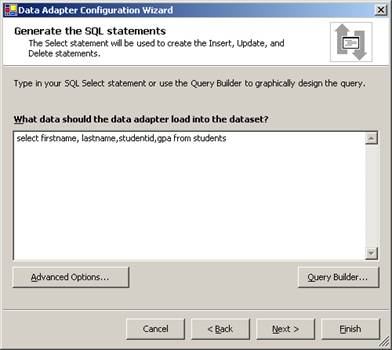
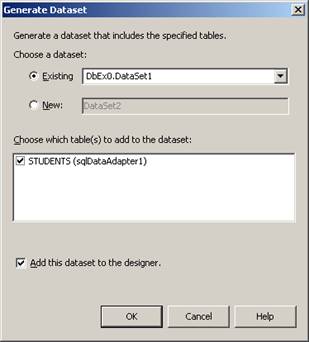
SqlDataAdapter1: The data adapter sits between a dataset and a database and fills data from the data source to the dataset. Add SQLDataAdapter from the Data part of the toolbox to the form. You can leave the default name to be SqlDataAdapter1. The wizard will prompt you on how to build the dataset, as shown below.
Once the SqlDataAdaptor1 is selected, click on the “Generate Data Set” in the properties part of the screen (bottom right corner hyper link), you will something like.
To bind the text boxes to the appropriate fields of the table:
Select the text box and in the properties window click on the DataBindings property collection and select the text property which contains the dataset and the fields the dataset is supposed to populate. Set the text box to the appropriate field of the dataset. Follow the same for all the text boxes.
This what VS.NET generates for the above operation
this.txtStudentID.DataBindings.Add(new
System.Windows.Forms.Binding ("Text", this.dataSet1,
"STUDENTS.StudentID"));
Okay, look at the important sections of the code and I’ll explain every single function below, so don’t be afraid!
using System;
using
System.Drawing;
using
System.Collections;
using
System.ComponentModel;
using
System.Windows.Forms;
using
System.Data;
namespace DbEx0
{
/// <summary>
/// Summary description for
DbEx2.
/// </summary>
public class DbEx2 :
System.Windows.Forms.Form
{
private System.Windows.Forms.Label Label1;
private System.Windows.Forms.Label label2;
private System.Windows.Forms.Label label3;
private System.Windows.Forms.Label label4;
private System.Windows.Forms.Button btnPrevious;
private System.Windows.Forms.Button btnLast;
private System.Windows.Forms.Button btnFirst;
private System.Windows.Forms.Button btnNext;
private System.Windows.Forms.Button btnClose;
private System.Windows.Forms.Button btnAdd;
private System.Windows.Forms.Button btnEdit;
private System.Windows.Forms.Button btnDelete;
private System.Data.SqlClient.SqlConnection
sqlConnection1;
private System.Data.SqlClient.SqlDataAdapter
sqlDataAdapter1;
private System.Data.SqlClient.SqlCommand
sqlSelectCommand1;
private System.Data.SqlClient.SqlCommand
sqlInsertCommand1;
private System.Data.SqlClient.SqlCommand sqlUpdateCommand1;
private System.Data.SqlClient.SqlCommand
sqlDeleteCommand1;
private System.Windows.Forms.TextBox txtStudentID;
private System.Windows.Forms.TextBox txtFirstName;
private System.Windows.Forms.TextBox txtLastName;
private System.Windows.Forms.TextBox txtGPA;
private DbEx0.DataSet1 dataSet1;
private bool
AddUpdate; //
added
private DataRow drUpdate;
private System.Windows.Forms.Button btnUpdate;
private System.Windows.Forms.Button btnCancel; // added
/// <summary>
/// Required designer
variable.
/// </summary>
private System.ComponentModel.Container components = null;
public DbEx2()
{
//
// Required for Windows Form Designer support
//
InitializeComponent();
sqlDataAdapter1.Fill(dataSet1,"Students");
btnUpdate.Visible=false;
btnCancel.Visible=false;
}
/// <summary>
///
The main entry point for the application.
/// </summary>
[STAThread]
static void
Main()
{
Application.Run(new Form1());
}
private void
btnFirst_Click(object sender, System.EventArgs
e)
{
this.BindingContext[dataSet1,"Students"].Position=0;
}
private void
btnLast_Click(object sender, System.EventArgs
e)
{
this.BindingContext[dataSet1,"Students"].Position
=this.BindingContext[dataSet1,"Students"].Count-1;
}
private void
btnNext_Click(object sender, System.EventArgs
e)
{
this.BindingContext[dataSet1,"Students"].Position+=1;
}
private void
btnPrevious_Click(object sender,
System.EventArgs e)
{
this.BindingContext[dataSet1,"Students"].Position-=1;
}
private void
btnEdit_Click(object sender, System.EventArgs
e)
{
btnAdd.Visible
=false;
btnEdit.Visible =false;
btnDelete.Enabled =false;
btnClose.Enabled=false;
btnFirst.Enabled=false;
btnLast.Enabled=false;
btnNext.Enabled=false;
btnPrevious.Enabled=false;
btnUpdate.Visible=true;
btnCancel.Visible=true;
txtStudentID.Focus();
AddUpdate=false;
drUpdate=dataSet1.Tables["Students"].Rows.Find(Int32.Parse(txtStudentID.Text));
}
private void
btnUpdate_Click(object sender, System.EventArgs
e)
{
btnUpdate.Visible=false;
btnCancel.Visible=false;
btnAdd.Visible=true;
btnEdit.Visible=true;
btnDelete.Enabled=true;
btnClose.Enabled=true;
btnFirst.Enabled=true;
btnLast.Enabled=true;
btnNext.Enabled=true;
btnPrevious.Enabled=true;
if(AddUpdate==true)
{
try
{
int vSNo=Int32.Parse(txtStudentID.Text);
float vScore=float.Parse(txtGPA.Text);
DataRow
drAdd;
drAdd=dataSet1.Tables["Students"].NewRow();
drAdd[0]=vSNo;
drAdd[1]=txtFirstName.Text;
drAdd[2]=txtLastName.Text;
drAdd[3]=vScore;
dataSet1.Tables["Students"].Rows.Add(drAdd);
sqlDataAdapter1.Update(dataSet1,"Students");
}
catch(Exception ex)
{
MessageBox.Show(ex.Message);
}
}
else
{
try
{
int vSNo=Int32.Parse(txtStudentID.Text);
float vScore=float.Parse(txtGPA.Text);
drUpdate.BeginEdit();
drUpdate["StudentID"]=vSNo;
drUpdate["FirstName"]=txtFirstName.Text;
drUpdate["LastName"]=txtLastName.Text;
drUpdate["GPA"]=vScore;
drUpdate.EndEdit();
sqlDataAdapter1.Update(dataSet1,"Students");
}
catch(Exception ex)
{
MessageBox.Show(ex.Message);
}
}
}
private void
btnCancel_Click(object sender, System.EventArgs
e)
{
btnUpdate.Visible=false;
btnCancel.Visible=false;
btnAdd.Visible=true;
btnEdit.Visible=true;
btnDelete.Enabled=true;
btnClose.Enabled=true;
btnFirst.Enabled=true;
btnLast.Enabled=true;
btnNext.Enabled=true;
btnPrevious.Enabled=true;
btnFirst_Click(sender,e);
}
private void
btnAdd_Click(object sender, System.EventArgs e)
{
btnAdd.Visible
=false;
btnEdit.Visible =false;
btnDelete.Enabled =false;
btnClose.Enabled=false;
btnFirst.Enabled=false;
btnLast.Enabled=false;
btnNext.Enabled=false;
btnPrevious.Enabled=false;
btnUpdate.Visible=true;
btnCancel.Visible=true;
txtStudentID.Text="";
txtFirstName.Text="";
txtLastName.Text="";
txtGPA.Text="";
txtStudentID.Focus();
AddUpdate=true;
}
private void
btnDelete_Click(object sender, System.EventArgs
e)
{
if(MessageBox.Show("Do you want to delete the
record","Delete Box",System.Windows.Forms.MessageBoxButtons.YesNo,System.Windows.Forms.MessageBoxIcon.Warning)==DialogResult.Yes)
{
DataRow
dr;
int vSNo=Int32.Parse(txtStudentID.Text);
dr=dataSet1.Tables["Students"].Rows.Find(vSNo);
dr.Delete();
try
{
sqlDataAdapter1.Update(dataSet1,"Students");
}
catch(Exception ex)
{
MessageBox.Show(ex.Message);
}
}
}
private void
btnClose_Click(object sender, System.EventArgs
e)
{
this.Close();
}
Explanation of above code: Okay, after we design our form the VS.NET generates class Form1 for us. The most complex and important function in this form class is InitializeComponent( ). And actually for our fortune it is generated by the VS.NET. We have to create our connection string and initialize our connection to the data source, though.
The other interesting topic is navigating through the database. It is simple we have to add the proper code in our _Click methods. But you have to know that:
Every windows form has a BindingContext object. Any datasource that you bind to a windows control to will have an associated CurrencyManager object. The CurrencyManager keeps track of the position and otherwise supervises bindings to that data source. The BindingContext object keeps track of all of the CurrencyManager objects on a form.
this.BindingContext[dataSet1,"Students"].Position=0;
//Move First
this.BindingContext[dataSet1,"Students"].Position=this.BindingContext[dataSet1,"Students"].Count-
1; // Move Last
this.BindingContext[dataSet1,"Students"].Position+=1;
//Move Next
this.BindingContext[dataSet1,"Students"].Position-=1;
// Move Previous
That’s why we enabled DataBindings properties for each textbox when we created our form!
The tricky part in database commands is to know that you execute the command in your DataSet and you update your database only when “copying” your memory copy of this DataSet. At this point we you have to use the dataAdapter! Well, I think that the code is straight forward and is not hard to understand.
Deleting an existing record:
Create temporary DataRow type it will hold our changes into the current dataSet
Then get the SNo to be deleted. Try to find it. If the search is unsuccessful when we update the database with our dataAdapter it will throw an exception. See the btnDelete_Click method.
DataRow dr;
int vSNo=Int32.Parse(txtStudentID.Text);
dr=dataSet1.Tables["Students"].Rows.Find(vSNo)
dr.Delete();
sqlDataAdapter1.Update(dataSet1,"Students");
Adding a new record:
Here we have pretty much the same stuff. The difference is that we get all the information from our textboxes and fill our DataRow (drAdd) with it.
int vSNo=Int32.Parse(txtStudentID.Text);
float vScore=float.Parse(txtGPA.Text);
DataRow drAdd
drAdd=dataSet1.Tables["Students"].NewRow();
drAdd[0]=vSNo;
drAdd[1]=txtFirstName.Text;
drAdd[2]=txtLastName.Text;
drAdd[3]=vScore;
dataSet1.Tables["Students"].Rows.Add(drAdd);
sqlDataAdapter1.Update(dataSet1,"Students");
Editing an existing record is actually as simple as Adding, but we need to navigate to the record we intend to edit.
int vSNo=Int32.Parse(txtStudentID.Text);
float vScore= float.Parse(txtGPA.Text);
drUpdate.BeginEdit();
drUpdate["StudentID"]=vSNo;
drUpdate["FirstName"]=txtFirstName.Text;
drUpdate["LastName"]=txtLastName.Text;
drUpdate["GPA"]=vScore;
drUpdate.EndEdit();
sqlDataAdapter1.Update(dataSet1,"Students");
For the rest buttons it is easy to understand what is going on from the source code itself.
Well, I don’t know about you but after this long example I would feel charged to try and play around with the code.
Add a button in the main form (DbEx0) called “Student Database Test” so that if some one clicks it, it will invoke the DbEx2 form. You can name this button btnStuEx with the following code in it.
private void
btnStuEx_Click(object sender, System.EventArgs
e)
{
DbEx2 ex2 = new DbEx2();
ex2.Show();
}
Build and test the application:
Database Transactions:
Often we run into a situation where we need to do multiple operations on a database (or even multiple operations with different databases). Database transactions are atomic operations where either all required operations to the database are carried out, or in case of an error, no change is made to the database. For example, you may have a student database where when some student registers for a course, you need to not only modify the “Enrollment” table but also the current student count for the course in the “CoursesOffered” table. Both of these modifications should be carried out as a transaction so that either both tables are properly modified or in case of an error, no change to the database occurs. An example of a transaction involving multiple databases could be when you withdraw money from one bank account and try to deposit it in another account.
Formally, transaction is defined as a sequence of operations that comprise a logical unit of work. This logical unit must exhibit four properties known as the ACID properties i.e., Atomic, Consistent, Isolated, and Durable. Atomic means either the entire set of operations is completed or nothing is modified. Consistency means that the results of combined operations do not have any missing data e.g., if you withdraw 100 dollars from your checking account and deposit it into your savings account, there is no money missing. The SQL data manipulation statements should be such that they leave the data in a consistent state as defined by the business rules of the application. Isolation means that no one can view the intermediate state of data. The records involved in a transaction will be properly locked until the transaction is completed. Durability means that once all operations are completed, the database will be properly modified, even if there is a power failure or system crash. Note that this can be achieved by the database server via a log file from which to recover in case of power failure or other error conditions.
Isolation, Durability and Transaction management has to be properly supported by the underlying enterprise database system. For example, SQL server provides proper locking of records to ensure Isolation, and has all required logging facilities to guarantee durability in case of a system crash. Also, SQL server provides the proper transaction committing and rollback in case of errors.
For transactions involving a single database, we can use one of the following techniques:
1. SQL transactions through SQL.
2. ADO.Net transactions through Connection and Transaction classes.
3.
ASP.Net
page transactions.
4. COM+ transactions via Serviced Components in .Net.
For transactions involving multiple databases (even of different kind e.g., one database may be SQL server, the other database may be Oracle), you need a Distributed Transaction Coordinator (DTC). You will learn about this capability in the COM+ handouts.
Implementing transactions using SQL: SQL has “begin transaction”, commit transaction”, and “rollback transaction” statements that you can use to implement transactions.
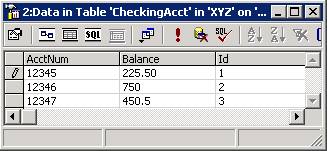
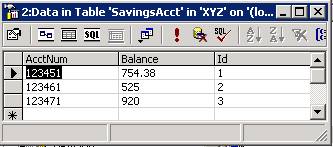
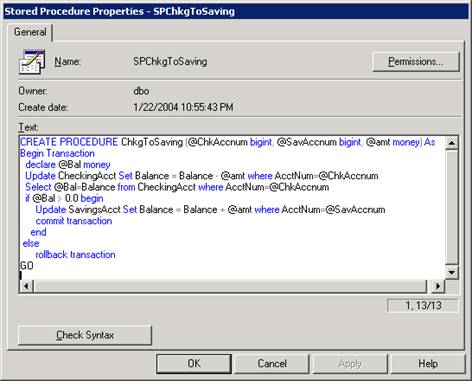
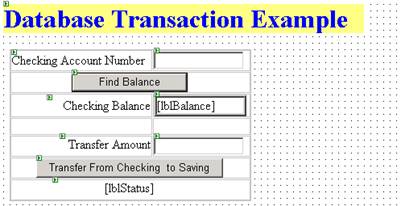
Example: Create two tables in a database called XYZ in SQL server. The table names are “CheckingAcct” and “SavingsAcct”. The AcctNum column has the data type of “bigint”, the Balance of type “money”. You can add an Identity column called ID in both tables.
Create a stored procedure in SQL server as shown below.
Now we can invoke the above stored procedure through a windows or web application. Add the following controls to the Form1 in DbExamples project.
A text box for the Account Number with a name of “txtAcctNum”. A label next to it indicating “Account Number”. Another label with a name of “lblBalance”. A button with a name of “btnFindBalance” and a text property of “Find Balance”. A text box with a name of “txtAmount” and a label next to it indicating “Amount to Transfer”.
Add another button with a name of “btnChkToSavSP” with a text property of “Transfer Saving to Checking (SP Transaction)”. Type the following code in the button handler.
private void
btnTransferChkToSavSP_Click(object sender,
System.EventArgs e)
{
try
{
string connstr = "server=tennis;uid=sa;pwd=duportail;database=XYZ";
using(SqlConnection conn = new SqlConnection(connstr))
{
conn.Open();
SqlCommand
cmd = new
SqlCommand("SPChkgToSaving",conn);
cmd.CommandType
= CommandType.StoredProcedure;
cmd.Parameters.Add(new SqlParameter("@ChkAccnum",SqlDbType.BigInt));
cmd.Parameters[0].Value
= long.Parse(txtAcctNum.Text);
cmd.Parameters.Add(new SqlParameter("@SavAccnum",SqlDbType.BigInt));
cmd.Parameters[1].Value
= long.Parse(txtAcctNum.Text+"1");
// savings account num has "1" at the end
cmd.Parameters.Add(new SqlParameter("@Amt",SqlDbType.Money));
cmd.Parameters[2].Value
= decimal.Parse(txtAmount.Text);
cmd.UpdatedRowSource
= UpdateRowSource.None;
int res = cmd.ExecuteNonQuery(); // returns rows
affected
if (res == 1) // transaction failure, else res=2
MessageBox.Show("Transaction
failure - probably amt. error, rolling back");
// -- display the updated results
btnFindBalance_Click(null,null);
conn.Close();
}
}
catch(Exception ex)
{
MessageBox.Show(ex.Message);
}
}
You can test the committing and rollback of the transaction by trying to transfer money from checking to savings where either the attempted transferred amount is less than the one in checking account causing a committing of the transaction, or more than the amount in checking account causing a rollback.
ADO.Net Transactions:
ADO.Net provides the Transaction class for implementing transactions. The Connection class has a BeginTransaction( ) method that returns the transaction object. The Command class has a Transaction property that can be used to assign many command objects with a single transaction object obtained from the BeginTransaction( ) method of the Connection object.
Example: Add another button with a name of “btnChkToSavingADO” with a text property of “Transfer Saving to Checking (ADO Trans.)”. Type the following code in the button handler.
private void
btnChkToSavingADO_Click(object sender, System.EventArgs
e)
{ // ADO.Net
transaction
SqlTransaction
sqtr = null;
try
{
string sql1 = "Update CheckingAcct Set
Balance=Balance-" +
txtAmount.Text
+ " where AcctNum=" + txtAcctNum.Text;
string sql2 = "select balance from CheckingAcct
where AcctNum=" +
txtAcctNum.Text;
string sql3 = "Update SavingsAcct Set
Balance=Balance-" +
txtAmount.Text
+ " where AcctNum=" + txtAcctNum.Text+"1";
string connstr =
"server=tennis;uid=sa;pwd=duportail;database=XYZ";
using( SqlConnection conn = new SqlConnection(connstr))
{
SqlCommand
cmd1 = new SqlCommand(sql1,conn);
cmd1.CommandType
= CommandType.Text;
SqlCommand
cmd2 = new SqlCommand(sql2,conn);
cmd2.CommandType
= CommandType.Text;
SqlCommand
cmd3 = new SqlCommand(sql3,conn);
cmd3.CommandType
= CommandType.Text;
conn.Open();
sqtr
= conn.BeginTransaction();
cmd1.Transaction
= sqtr;
cmd2.Transaction
= sqtr;
cmd3.Transaction
= sqtr;
cmd1.ExecuteNonQuery(); // subtract amount
from Checking
// check to see if there is enough balance in checking
object obj = cmd2.ExecuteScalar();
if (double.Parse(obj.ToString())
< 0.0)
throw new
Exception("Insufficient Funds in Checking Acct");
cmd3.ExecuteNonQuery(); // add to savings account
sqtr.Commit(); // commit the
transaction
// -- display the updated results
btnFindBalance_Click(null,null);
conn.Close();
}
}
ASP.Net Page Transactions:
ASP.Net provides some page level directives to support database transactions. You can specify the page transaction to be one of the following categories.
- Disabled – transactions are disabled for this page
- NotSupported – no transactions are possible in this page
- Supported – If a transaction already exists, this page will execute within the context of the current transaction, otherwise a transaction will not be started for this page.
- Required - If a transaction already exists, this page will execute within the context of the current transaction, otherwise a new transaction will be started for this page.
- RequiresNew – A new transaction is started for this page.
The ContextUtil class in .Net provides two important methods for committing and rolling back transactions, one is called SetComplete( ) that commits a transaction, the other is SetAbort( ) that rolls back a transaction.
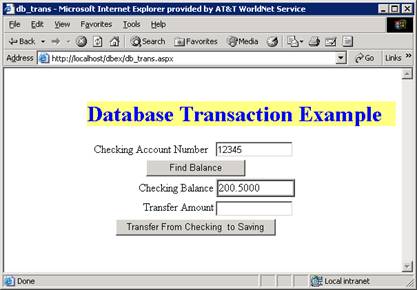
Example: Create an ASP.Net application called “dbex”. Add a web form to it with a name of “db_trans.aspx”. Add a table to the page with the following controls in it.
The important code in the code behind file “db_trans.aspx.cs” is shown below.
…
using
System.Data.SqlClient;
using
System.EnterpriseServices; // for ContextUtil
private void
Page_Load(object sender, System.EventArgs e)
{
// Put user code to initialize the page here
if(IsPostBack) // not first time
{
lblBalance.Text
= "";
lblStatus.Text
= "";
}
}
private void
btnFindBalance_Click(object sender, System.EventArgs
e)
{
try
{
string chkAcctNum = txtAcctNum.Text;
string connstr =
"server=tennis;uid=sa;pwd=duportail;database=XYZ";
string sql = "select Balance from CheckingAcct where
AcctNum="+ chkAcctNum;
using(SqlConnection conn = new SqlConnection(connstr))
{
conn.Open();
SqlCommand
cmd = new SqlCommand(sql,conn);
object retobj = cmd.ExecuteScalar();
lblBalance.Text
= retobj.ToString();
lblStatus.Text
= "";
txtAmount.Text
= "";
}
}
catch(Exception ex)
{
lblStatus.Text
= ex.Message;
}
}
private void
btnTransfer_Click(object sender, System.EventArgs
e)
{
// SqlTransaction sqtr = null;
try
{
string sql1 = "Update CheckingAcct Set
Balance=Balance-" +
txtAmount.Text
+ " where AcctNum=" + txtAcctNum.Text;
string sql2 = "select balance from CheckingAcct
where AcctNum=" +
txtAcctNum.Text;
string sql3 = "Update SavingsAcct Set
Balance=Balance-" +
txtAmount.Text
+ " where AcctNum=" + txtAcctNum.Text+"1";
string connstr = "server=tennis;uid=sa;pwd=duportail;database=XYZ";
using( SqlConnection conn = new SqlConnection(connstr))
{
SqlCommand
cmd1 = new SqlCommand(sql1,conn);
cmd1.CommandType
= CommandType.Text;
SqlCommand
cmd2 = new SqlCommand(sql2,conn);
cmd2.CommandType
= CommandType.Text;
SqlCommand
cmd3 = new SqlCommand(sql3,conn);
cmd3.CommandType
= CommandType.Text;
conn.Open();
cmd1.ExecuteNonQuery(); // subtract amount
from Checking
// check to see if there is enough balance in checking
object obj = cmd2.ExecuteScalar();
if (double.Parse(obj.ToString())
< 0.0)
throw new
Exception("Insufficient Funds in Checking Acct");
cmd3.ExecuteNonQuery();
// add to savings account
// commit the transaction
ContextUtil.SetComplete();
// -- display the updated results
btnFindBalance_Click(null,null);
conn.Close();
}
}
catch(Exception ex)
{
// automatic rollback occurs in case of error
lblStatus.Text
= ex.Message;
ContextUtil.SetAbort();
}
}
}
}
Build and test the application.
APPENDIX A
Simple SQL Tutorial
SQL is an ANSI
standard language for accessing databases.
What is SQL?
SQL stands for Structured Query Language
SQL allows you to access a database
SQL can execute queries against a database
SQL can retrieve data from a database
SQL can insert new records in a database
SQL can delete records from a database
SQL can update records in a database
SQL is very easy to learn
SQL is a Standard
SQL is an ANSI (American National Standards Institute) standard for accessing database systems. SQL statements are used to retrieve and update data in a database. SQL works with database programs like Access, DB2, Informix, Microsoft SQL Server, Oracle, Sybase, and many others (but unfortunately most of them also have their own proprietary extensions to the language).
Database Tables
Databases contain objects called Tables.
Records of data are stored in these tables. Tables are identified by names (like "Persons", "Orders", "Suppliers").
Tables contain Columns and Rows with data. Rows contain records (like one record for each person). Columns contain data (like First Name, Last Name, Address, and City).
Here is an example of a Table called "Persons":
|
LastName |
FirstName |
Address |
City |
|
Mahmood |
Ausif |
10 Somewhere St. |
Bridgeport |
|
Tsvetanov |
Stanislav |
55 Noble Rd. |
Bridgeport |
|
Gates |
Bill |
77 Microsoft Dr. |
Seattle |
LastName, FirstName, Address, and City are table Columns. The Rows contain 3 records about 3 persons.
SQL Queries
With SQL, we can Query a database and have a Result returned in a tabular form. A Query like this:
SELECT LastName FROM Persons
Will give a Result like this:
|
LastName |
|
Mahmood |
|
Tsvetanov |
|
Gates |
Note: Some database systems require a semicolon at the end of the SQL statement. We don't use the semicolon in our tutorials.
SQL Data Manipulation
As the name suggests, SQL is a syntax for executing queries. But the SQL language also includes a syntax to update records, insert new records, and delete existing records.
- SELECT - extracts data from a database
- UPDATE - updates data in a database
- DELETE - deletes data from a database
- INSERT - inserts new data into a database
Let’s take a closer look at these four manipulation commands as we need them the most!
SQL SELECT
The SELECT statement selects columns of data from a database.
The tabular result is stored in a result table (called the resultset or recordset).
The general form of select statement is:
SELECT column_name(s) FROM table_name
Example 1: Select Columns from a Table
To select the columns named "LastName" and "FirstName", use a SELECT statement like this:
SELECT LastName,FirstName FROM Persons
The "Persons" table looks like:
|
LastName |
FirstName |
Address |
City |
|
Mahmood |
Ausif |
10 Somewhere St. |
Bridgeport |
|
Tsvetanov |
Stanislav |
55 Noble Rd. |
Bridgeport |
|
Gates |
Bill |
77 Microsoft Dr. |
Seattle |
The result of the select statement is:
|
LastName |
FirstName |
|
Mahmood |
Ausif |
|
Tsvetanov |
Stanislav |
|
Gates |
Bill |
Example 2: Select all Columns
To select all columns from the "Persons" table, use a * symbol instead of column name like this:
SELECT * FROM Persons
The result will look as:
|
LastName |
FirstName |
Address |
City |
|
Mahmood |
Ausif |
10 Somewhere St. |
Bridgeport |
|
Tsvetanov |
Stanislav |
55 Noble Rd. |
Bridgeport |
|
Gates |
Bill |
77 Microsoft Dr. |
Seattle |
The Result Table:
The result from a SQL query is stored in a result set. The result set can be thought of as a result table. Most database software allow navigation of the result set with programming functions like: Move-To-First-Record, Get-Record-Content, Move-To-Next-Record.etc..
We will see programming functions like these in our last example for accessing MS SQL database.
The WHERE Clause
To conditionally select data from a table, a WHERE clause can be added to the SELECT statement with the following syntax:
SELECT column FROM table WHERE column condition value
Example: Select Persons from a City
To select only the people that live in a city, add a WHERE clause to the SELECT statement like this:
SELECT * FROM Persons WHERE City = 'Bridgeport'
The result:
|
LastName |
FirstName |
Address |
City |
|
Mahmood |
Ausif |
10 Somewhere St. |
Bridgeport |
|
Tsvetanov |
Stanislav |
55 Noble Rd. |
Bridgeport |
SQL UPDATE
The UPDATE statement updates or changes rows:
UPDATE table_name SET column_name = new_value
WHERE column_name = some_value
Person Table:
|
LastName |
FirstName |
Address |
City |
|
Mahmood |
Ausif |
10 Somewhere St. |
Bridgeport |
|
Tsvetanov |
Stanislav |
55 Noble Rd. |
Bridgeport |
|
Gates |
Bill |
77 Microsoft Dr. |
Seattle |
Update one Column in a Row:
We want to add a first name to the person with a last name of "Tsvetanov":
UPDATE Person SET FirstName = 'Stas' WHERE LastName = 'Tsvetanov'
Result:
|
LastName |
FirstName |
Address |
City |
|
Mahmood |
Ausif |
10 Somewhere St. |
Bridgeport |
|
Tsvetanov |
Stas |
55 Noble Rd. |
Bridgeport |
|
Gates |
Bill |
77 Microsoft Dr. |
Seattle |
SQL Delete
The DELETE statement is used to delete rows in a table.
DELETE FROM table_name WHERE column_name = some_value
Person Table:
|
LastName |
FirstName |
Address |
City |
|
Mahmood |
Ausif |
10 Somewhere St. |
Bridgeport |
|
Tsvetanov |
Stas |
55 Noble Rd. |
Bridgeport |
|
Gates |
Bill |
77 Microsoft Dr. |
Seattle |
Delete a Row for "Stas Tsvetanov":
DELETE FROM Person WHERE LastName = 'Tsvetanov' AND FirstName =’Stas’
Result:
|
LastName |
FirstName |
Address |
City |
|
Mahmood |
Ausif |
10 Somewhere St. |
Bridgeport |
|
Gates |
Bill |
77 Microsoft Dr. |
Seattle |
SQL INSERT
The INSERT INTO statement inserts new rows into a table:
INSERT INTO table_name VALUES (value1, value2,....)
You can also specify the columns for which you want to insert data:
INSERT INTO table_name
(column1, column2,...) VALUES (value1, value2,....)
Example: Insert a New Row into "Persons" table:
|
LastName |
FirstName |
Address |
City |
|
Mahmood |
Ausif |
10 Somewhere St. |
Bridgeport |
|
Gates |
Bill |
77 Microsoft Dr. |
Seattle |
And this SQL statement:
INSERT INTO Persons
VALUES ('Tsvetanov', 'Stanislav', '55 Noble Rd. ', 'Bridgeport')
Will give this result:
|
LastName |
FirstName |
Address |
City |
|
Mahmood |
Ausif |
10 Somewhere St. |
Bridgeport |
|
Gates |
Bill |
77 Microsoft Dr. |
Seattle |
|
Tsvetanov |
Stanislav |
55 Noble Rd. |
Bridgeport |
Okay, this will give you the basic idea behind SQL. As you can see it is very easy, although there are additional features in this language like data definitions, functions, joins and many advanced details. But with time you will become proficient!