Threads in Dot Net - C#
C# provides an extensive set of classes in the System.Threading namespace to support multithreading. The basic threading model is similar to Java providing the “Monitor” mechanism to support synchronization of threads. There are additional primitives equivalent to critical sections, mutexes (for cross process locking of resources), monitor wait and signal. The major features in the Dot Net threading model are summarized below.
- Thread class is responsible for starting, stopping, suspending, resuming, setting thread priorities to a thread.
- ThreadStart class specifies the actual thread function to be executed (as a delegate) to the ThreadObject.Start( ) call. The typical thread creation code looks like:
MyClass objname = new MyClass ( );
….
Thread threadobj = new Thread(new ThreadStart(objname.funcname));
…..
threadobj.Start( ) ; // will cause the funcname to run as a separate thread
Example: Let us take the MFC example on using the Time Class object and calling the IncrementTime and GetTime functions on it.
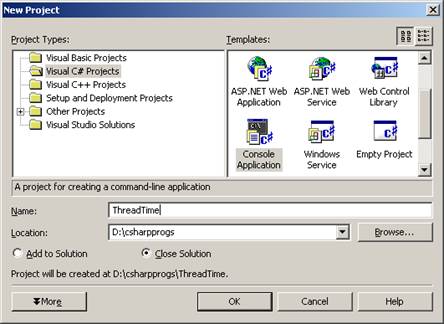
Create a new C# project in Visual Studio 7 (Dot Net). Name the project “ThreadTime”.
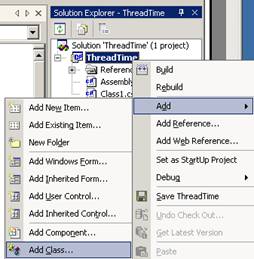
Right Click on the project name in the Solution explorer window, then choose, Add -> Add Class, as shown below.
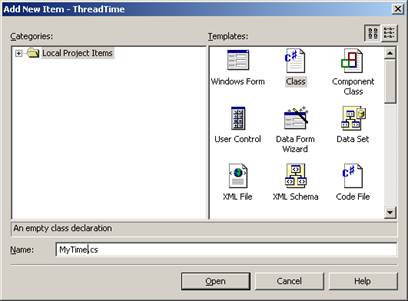
Give the class a name of MyTime as shown below.
Type the following code in MyTime.cs file:
using System;
using System.Threading; //
added by Ausif
namespace ThreadTime
{
/// <summary>
/// Summary description for
MyTime.
/// </summary>
public class MyTime
{
int hours;
int minutes;
int seconds;
public MyTime()
{
hours
= 3; //
initial time when object is created
minutes
= 59;
seconds
= 59;
}
public void
IncrementTime()
{
// Win32 API -
::EnterCriticalSection(&gCS);
seconds
++;
if (seconds == 60)
{
seconds
= 0;
minutes
++;
if (minutes == 60)
{
minutes
= 0;
Thread.Sleep(1000);
// try without this line
// it will produce
wrong results with Sleep
hours
++;
if (hours == 13)
hours
= 1;
}
}
// Win32 API for synchronization - ::LeaveCriticalSection(&gCS);
}
public void
CheckTime()
{
// Win32 API for Syncronization - ::EnterCriticalSection(&gCS);
System.Console.WriteLine
("Current
Time = hours: {0} minutes: {1} seconds:
{2}",
hours,
minutes, seconds);
// ::LeaveCriticalSection(&gCS);
}
}
}
Add another file to the project called “TestTime.cs. Delete the existing Class1.cs file by selecting it in the solution explorer and hitting the delete key. The code in the TestTime.cs will look like:
using
System;
using
System.Threading;
namespace
ThreadTime
{
/// <summary>
/// Summary description for TestTime.
/// </summary>
public class TestTime
{
public
TestTime()
{
//
// TODO: Add
constructor logic here
//
}
static void
{
MyTime t1 = new
MyTime();
Thread myth = new
Thread(new ThreadStart(t1.IncrementTime));
// set the
delegate
myth.Start();
// run
increment time as a separate thread
Thread.Sleep(100);
t1.CheckTime(); // should report
4:0:0 if synchronized properly
}
}
}
Choose “Build” from the Build menu. If there are no errors, execute the program by choosing Debug-> “Start without Debugging” menu item. The output of the program will look like:

Note that the expected output is hours:4 minutes:0 seconds:0. We need to synchronize the IncrementTime thread and the main thread. We can achieve this by either using the lock primitive, or the equivalent Monitor.Enter(obj) and Monitor.Exit(obj) calls.
Modify the MyTime.cs to as shown below:
using System;
using System.Threading; //
added by Ausif
namespace ThreadTime
{
/// <summary>
/// Summary description for
MyTime.
/// </summary>
public class MyTime
{
int hours;
int minutes;
int seconds;
public MyTime()
{
hours
= 3; //
initial time when object is created
minutes
= 59;
seconds
= 59;
}
public void
IncrementTime()
{
// Win32 API -
::EnterCriticalSection(&gCS);
lock(this)
{
seconds
++;
if (seconds == 60)
{
seconds
= 0;
minutes
++;
if (minutes == 60)
{
minutes
= 0;
Thread.Sleep(1000);
// try without this line
// it will produce
wrong results with Sleep
hours
++;
if (hours == 13)
hours = 1;
}
}
} // end of
lock(this) Monitor.Exit() -
// ::LeaveCriticalSection(&gCS)
}
public void
CheckTime()
{
// Win32 API for Syncronization - ::EnterCriticalSection(&gCS);
//lock(this)
//{
Monitor.Enter(this);
System.Console.WriteLine
("Current
Time = hours: {0} minutes: {1} seconds:
{2}",
hours,
minutes, seconds);
//} // ::LeaveCriticalSection(&gCS);
Monitor.Exit(this);
}
}
}
Now if you rebuild and execute the program, it will show the correct results.

NOTE: The thread function has to have a return type void and should not accept any parameters.
Suspending, Resuming, Changing Thread Priorities:
The thread class allows us to suspend or resume a thread as well as change its priority. There are five different priority levels within a category of a thread (normal, background etc..). These are, normal, above normal, highest, below normal and lowest.
Example: Let us create an example similar to the blue dot and red dot example we did in MFC. Create a Windows application in C#. Name the project dots. Add a menu control to the form. Name the menu control mnuMain. Design the menus to look like:

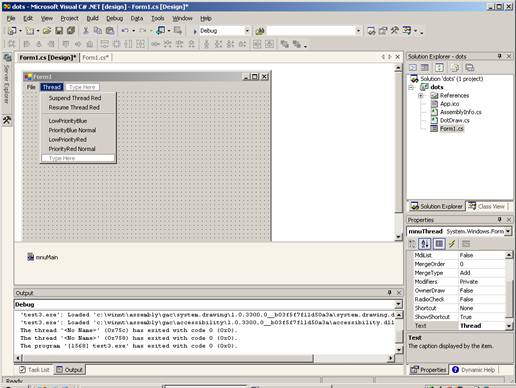
The File menu has Exit underneath it. Name the menus properly, e.g., mnuFile for the File, mnuFileExit for the File->Exit menu etc..
By Right clicking on the dots project in the solution explorer, add a class called DotDraw to the project. Type the following code in it:
using System;
using System.Threading;
using System.Drawing;
namespace dots
{
/// <summary>
/// Summary description for
DotDraw.
/// </summary>
public class DotDraw
{
Random
m_r;
public int m_cx,
m_cy; // width
height of client area
public Graphics m_gc;
Pen
redPen;
Pen
bluePen;
public bool
terminate;
public DotDraw(Graphics g, int
cw, int cy)
{
m_gc =
g;
m_cx =
cw; m_cy = cy;
redPen
= new Pen(Color.Red,1); // 1 pixel wide
bluePen
= new Pen(Color.Blue,1); // 1 pixel wide
m_r = new Random();
this.terminate = false;
}
public void RedDot()
{ // cx and cy are
client area width and height
Point
p1 = new Point();
Point
p2 = new Point();
while (terminate == false)
{
int rnum = m_r.Next(m_cx); //
random number from 0 to cx
int cnum = m_r.Next(m_cy);
p1.X
= rnum; p1.Y = cnum;
if ((rnum < m_cx) && (cnum < m_cy))
{
p2.X
= rnum+1; p2.Y = cnum+1;
lock (this)
{
m_gc.DrawLine(redPen,p1,p2);
// 1 pixel line
}
}
}
}
public void BlueDot()
{ // cx and cy are
client area width and height
Point
p1 = new Point();
Point
p2 = new Point();
while (terminate == false)
{
int rnum = m_r.Next(m_cx); //
random number from 0 to cx
int cnum = m_r.Next(m_cy);
p1.X
= rnum; p1.Y = cnum;
if ((rnum < m_cx) && (cnum < m_cy))
{
p2.X
= rnum+1; p2.Y = cnum+1;
lock (this)
{
m_gc.DrawLine(bluePen,p1,p2);
// 1 pixel line
}
}
//Thread.Sleep(100);
}
}
}
}
The RedDot and BlueDot methods in the above class will be invoked as two separate threads. The Graphics object is needed to do any output to the client area (you can think of it as the equivalent of the device context in MFC). There is a SetPixel method but only available for Bitmaps. This is the reason I am using the DrawLine method in the above class to color a pixel. Also since the Graphics object is going to be shared by multiple threads, we need to protect it by the lock synchronization mechanism.
The code for the main form class is shown below. Note that you will be adding the code for the event handlers by first double clicking on a menu item, then adding the code to the handler function.
using System;
…
using System.Threading;
namespace dots
{
public class Form1 :
System.Windows.Forms.Form
{
Thread
m_thred, m_thblue;
DotDraw
m_dotobj;
Graphics
m_g;
private System.Windows.Forms.MainMenu mnuMain;
…….
…..
private void
Form1_Load(object sender, System.EventArgs e)
{
m_g
= this.CreateGraphics();
int cx = this.ClientRectangle.Width;
int cy = this.ClientRectangle.Height;
m_dotobj
= new DotDraw(m_g,cx,cy);
m_thred
= new Thread(new
ThreadStart(m_dotobj.RedDot));
m_thred.Start();
m_thblue
= new Thread(new
ThreadStart(m_dotobj.BlueDot));
m_thblue.Start();
}
private void
mnuFileExit_Click(object sender,
System.EventArgs e)
{
m_dotobj.terminate
= true;
m_thred.Join();
m_thblue.Join(); // wait for threads
to finish
Application.Exit();
}
private void
mnuThreadSuspendRed_Click(object sender,
System.EventArgs e)
{
m_thred.Suspend();
}
private void
mnuThreadResumeRed_Click(object sender,
System.EventArgs e)
{
m_thred.Resume();
}
private void
mnuThreadLowBlue_Click(object sender,
System.EventArgs e)
{
m_thblue.Priority
= ThreadPriority.BelowNormal;
}
private void
mnuThreadNormalBlue_Click(object sender,
System.EventArgs e)
{
m_thblue.Priority
= ThreadPriority.Normal;
}
private void
mnuThreadLowRed_Click(object sender,
System.EventArgs e)
{
m_thred.Priority
= ThreadPriority.BelowNormal;
}
private void
mnuThreadNormalRed_Click(object sender,
System.EventArgs e)
{
m_thred.Priority
= ThreadPriority.Normal;
}
private void
Form1_Resize(object sender, System.EventArgs e)
{
if (m_dotobj != null)
{
int cx = this.ClientRectangle.Width;
int cy = this.ClientRectangle.Height;
m_g
= CreateGraphics();
m_dotobj.m_gc
= m_g;
m_dotobj.m_cx
= cx;
m_dotobj.m_cy
= cy;
}
}
}
}
Producer Consumer – Event
Mechanism:
Often we run into a situation where one thread may be producing some data while the other thread should not start to consume data until it is ready. .Net provides a Monitor.Wait(obj) and Monitor.Pulse(obj) (or Monitor.PulseAll(obj)) methods to help implement the multithreading Event mechanism.
Example: Create a C# windows application called “ThreadEvents”. Put two buttons and a status bar in the form as shown below.
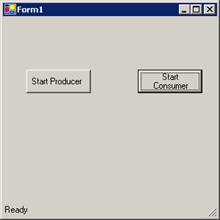
The “Start Producer” button has a name of “btnStartProducer” and a text property of “Start Producer”. The second button has a name of “btnStartConsumer” and a text property of “Start Consumer”. Give the status bar a name of “sb1”.
By right clicking on the project name, choose “Add New Item” and add a C# class called “ThreadProCon.cs”. The code for this class is shown below.
using System;
using
System.Threading;
namespace
ThreadEvents
{
/// <summary>
/// Summary description for
ThreadProCon.
/// </summary>
public class
ThreadProCon
{
Form1
fm;
int data;
object myObj=new object();
public ThreadProCon(Form1 f1)
{
fm
= f1;
}
public void
Consumer()
{
fm.sb1.Text
= "Consumer thread started";
Thread.Sleep(3000);
fm.sb1.Text
= "Waiting for Data to be ready";
lock (myObj) //
Monitor.Wait call requires synchronized block
{
Monitor.Wait(myObj);
data =
data - 5;
fm.sb1.Text
= "Consumer pulsed, consuming data:"+data.ToString();
}
}
public void
Producer()
{
Thread.Sleep(5000);
data =
25;
lock(myObj) //
Monitor.Pulse call requires synchronized block
{
Monitor.PulseAll(myObj);
}
}
}
}
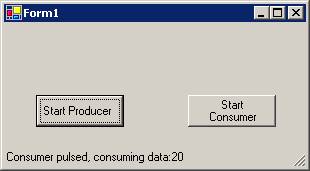
As you can see from the above code, the Consumer( ) method will be run in a separate thread. It prints a message to the status bar, waits for 3 seconds, prints another message, then calls Monitor.Wait(myObj) to wait for the producer to finish producing the data. The producer thread will be implemented by the Producer( ) method shown above. It waits 5 seconds, then sets the data to 25 and calls the Monitor.PulseAll(myObj) to fire an event to the Consumer thread i.e., unblocking the Consumer thread so that it can proceed.
The important code in the main Form1 class including the two button handler methods are shown below.
using System;
…
using
System.Threading;
namespace
ThreadEvents
{
public class Form1 :
System.Windows.Forms.Form
{
private System.Windows.Forms.Button btnStartConsumer;
private System.Windows.Forms.Button btnStartProducer;
public System.Windows.Forms.StatusBar
sb1;
private ThreadProCon tpc ;
public Form1()
{
//
// Required for Windows Form Designer support
//
InitializeComponent();
tpc = new ThreadProCon(this); // thread class object
}
private void
btnStartConsumer_Click(object sender,
System.EventArgs e)
{
Thread t1
= new Thread(new
ThreadStart(tpc.Consumer));
t1.Start();
}
private void
btnStartProducer_Click(object sender,
System.EventArgs e)
{
Thread t2
= new Thread(new
ThreadStart(tpc.Producer));
t2.Start();
}
}
}
As you can see, the two button handlers start the producer and the consumer threads. You can test the program by clicking on the “Start Consumer” button. You will see the status bar displaying the message, “Consumer Thread Started”. Then after three seconds, it will display the message “Waiting for Data to be ready”. Once you click on the “Start Producer” button to start the producer thread, you will see the following message on the status bar after 5 seconds.
Note: The Monitor.Wait and Monitor.Pulse or Monitor.PulseAll calls are required to be inside synchronized blocks i.e., inside lock(obj) { }.
Sharing Resources Across
Processes - Mutex in .Net:
A Mutex is similar to a Monitor (or a semaphore), except that it can be used for synchronization (with the signaling mechaism) between different processes. Operating system provides the support for mutexes by making sure that mutex names created by different processes are unique. As an example, if you created a mutex object called “MyMutex”, then operating system provides the support that if some one else tried to create this mutex, they will be informed that this already exists and in that case, their code can execute WaitOne. Now when you are done using the protected resource, you will release the mutex. At this point one of the processes waiting on WaitOne will be signaled and its code will unblock and can continue.
Example: Create a C# windows application. Name the project “MutexTest”. Put a button in the default form with a name of “btnMutextTest” and a text property of “Mutex Test”. Add a status bar to the form with a name of “sb1”.
Declare the following namespace at the top of the form.
using System.Threading;
Type the following code in the “Test Mutex” button’s handler.
private void btnMutexTest_Click(object
sender, System.EventArgs e)
{
bool
reqCreation = true ; // to request
creation of a mutex
bool
alreadyExists; // if a mutex already exists
int thId =
System.AppDomain.GetCurrentThreadId();
Mutex m1 = new
Mutex(reqCreation,"MyMutex",out
alreadyExists);
// check to see
if the mutex is owned by this thread
if
(!(reqCreation && alreadyExists))
{
sb1.Text = "Mutex already exists,
waiting on its release..." + thId.ToString();
m1.WaitOne(); // this thread wil
block here
}
sb1.Text = "Starting to use the
resource, .. mutex owner" + thId.ToString() ;
// if this is the
owner thread, you can use the shared resource
Thread.Sleep(10000);
// done using the
resource
sb1.Text = "Done using mutex,
releasing resource ..." + thId.ToString();
m1.ReleaseMutex();
}
Build the application. If there are no errors, terminate the application. From the explorer, go to the bin/debug folder where MutexTest.exe resides. Double click on the file to execute the program. Run two more copies of the program i.e., a total of three processes. Now click on one at a time on all the “Mutex Test” buttons. You will see the status of each program via the status bar. Note that only one program is allowed to access the shared resource. Once it releases it, another program can use the resource.

Miscellaneous Threading Issues:
If you need to increment or decrement a variable e.g., cnt = cnt + 1; as an atomic operation, you can use the Interlocked class’s Increment or decrement method as.
Interlocked.Increment(ref cnt) ;
To run a thread as a background thread, you can use the IsBackground property. By setting it to true, the thread will run as a background thread.
You can test if a thread is alive by checking the IsAlive property.
Foreground and Background Threads: A thread executes either as a foreground thread or as a background thread. A background thread is identical to a foreground thread except that the background thread does not prevent a process from terminating. Once all foreground threads belonging to a process have been terminated, the CLR ends the process by invoking Abort on any background threads that may still be alive.
To create a background thread, you simply set its IsBackground property to true.
Thus to terminate a process properly, you can call the Abort method yourself for all foreground threads. You should check first if the thread is alive (IsAlive property) before calling the Abort method. Further, since the Abort method on a foreground thread may not necessarily abort it right away, you should call the join method to make sure it terminated before proceeding to shut down the process.
Typical code for this purpose looks as:
Thread t1 = new Thread(new ThreadStart(xyz.f1));
t1.Start();
…
// some time later
if (t1.IsAlive)
t1.Abort(); // may not abort right away if there are pending I/O ops
t1.Join(); // to make sure thread is done
Application.Exit();
ThreadPool Class:
Thread pooling gives us a pool of worker threads that allow for a fast creation of threads. Once a thread is done, it is not destroyed but returned to the pool. The ThreadPool class has a default limit of 25 threads per available processor. You can change this limit through the “CorSetMaxThreads” definition as defined in the “mscoree.h” file. Each thread uses the default priority. Each process can have only one operating system thread pool.
Using threads from the pool is very easy. Suppose you wanted to execute the method f1 of class xyz in a thread retrieved from the thread pool. The code for this will look as:
xyz x1 = new xyz();
ThreadPool.QueueUserWorkItem(new WaitCallback(x1.f1));
The WaitCallback above is used to set the delegate to the proper function that needs to executed by a thread from the thread pool. The function that needs to be executed in a thread should have the following prototype.
void threadfunction(object stateinfo); //
Note that no Start method is used to start the execution of a thread. Setting the delegate above through the QueueUserWorkItem automatically starts the execution of a thread. The thread pool uses background threads, so shutting down the process is easy.
Process and Thread
Monitoring:
.Net provides a very easy way of monitoring the processes currently executing on a system and the threads and their states in each of the processes. The System.Diagnostics namespace provides a very useful Process class that can be used to collect information about processes. This class also has a Threads property which contains a collection of ProcessThread types. The ProcessThread class can provide useful information about the threads associated with a process.
Example: create a windows C# application. Name the project “ProcThMonitor”. Add a button, a listbox, three labels and a text box as shown below. The button has a text property of “List Processes” and a name of “btnListProcesses”. The list box has a name of “lbProcs”. The main label on the right hand side has a name of “lblProcessInfo” and the text box has a name of “txtThreadsInfo”. The text box has its multiline property set to true, and scrollbars set to both. Add a timer to the form. Set its interval property to “1000” and enabled property to true.

The code for the button handler, timer event, and the “SelectedIndexChanged” event for the list box is shown below.
…
using
System.Diagnostics;
using
System.Text;
private void btnListProcesses_Click(object
sender, System.EventArgs e)
{
lbProcs.Items.Clear();
Process [] procs = Process.GetProcesses();
foreach
(Process pr in procs)
lbProcs.Items.Add(pr.ProcessName+":"+
pr.Id.ToString());
}
private void timer1_Tick(object
sender, System.EventArgs e)
{
btnListProcesses_Click(null,null);
}
private void lbProcs_SelectedIndexChanged(object sender, System.EventArgs e)
{
char [] sep
= {':'};
string
pnameId = lbProcs.SelectedItem.ToString();
int Id = int.Parse((pnameId.Split(sep,2))[1]);
Process pr = Process.GetProcessById(Id);
lblProcessInfo.Text = "Process name:
Id = " + pnameId + "\n" +
"Priority Class = " + pr.PriorityClass.ToString()+
"\n"+
"Base Priority = " + pr.BasePriority.ToString()+
"\n"+
"Start Time = " + pr.StartTime.ToString()+
"\n"+
"Processor Time = " + pr.TotalProcessorTime.ToString()+
"\n"+
"physical Memory = " +
pr.WorkingSet.ToString()+ "\n"+
"Virtual Memory = " + pr.VirtualMemorySize.ToString()+
"\n";
ProcessThreadCollection threads =
pr.Threads;
StringBuilder sb = new
StringBuilder();
foreach
(ProcessThread pth in threads)
{
string
tinfo = "Thread ID = " +
pth.Id.ToString() + "\r\n" +
"
"Base Priority = " +
pth.BasePriority.ToString() + "\r\n" +
"Thread Priority = " +
pth.PriorityLevel.ToString() + "\r\n" +
"Start Time = " +
pth.StartTime.ToString() + "\r\n" +
"CPU
time = " + pth.TotalProcessorTime.ToString() + "\r\n\r\n" ;
sb.Append(tinfo);
}
txtThreadsInfo.Text = "Total Threads
in this Process = " + threads.Count.ToString() +
"\r\n" + sb.ToString();
}
Build and test the application.