Dot Net Assemblies
As you are already aware of, a .Net project is compiled into the IL form. This IL is then converted to the machine language using the JIT (Just In Time) compilation and executed by the CLR(Common Language Runtime). The CLR caches the compiled machine code so that it does not have to recompile if the IL code did not change. The IL code produced, when compiling a .Net project is packaged into an assembly. An assembly, not only contains the IL code for all the types in the project, it also contains meta data in the form of a manifest which has complete information about all the types in the assembly, and all the methods and their prototypes in each class. If you have a COM background, you can think of this metadata in the assembly as the equivalent of a type library. .Net also provides different classes to dynamically explore and invoke a type contained in an assembly. Note that an assembly is a logical grouping of the types and the associated metadata. In its implementation, an assembly is physically packaged into a dll (for library applications) or an exe (for windows or console applications).
The concept of assemblies in .Net has been developed to improve upon two problems in the COM technology, i.e., version control, and easy deployment of components. In COM, the version control is achieved by requiring that once an interface has been published, it cannot be modified. If an interface needs new methods, or changes in the signature of a method, the developer of the component creates a new interface and adds the required capabilities in it. Thus the existing clients of the component use the older interface, which was never modified, and the newer clients use the newer interface. Even though theoretically, this concept yields good version control, in practice, it causes serious problems. For example, if an application installs a COM dll as part of its installation process, it is possible that it may contain an older version of the component dll that does not contain the newer interface, and also it may replace a newer version of the dll that is already present on this machine. So, even though this newly installed application runs fine, it may cause problems in other applications as it has replaced the newer version of the dll with an older one that does not contain the newer interface required by other applications.
Similarly, another problem in COM has been the registration of COM servers in the registry. Every COM server is required to be registered in the registry before it can be used (COM+ does not have this requirement and uses its own catalog). In traditional COM, this could be a tedious process in those cases where an application needs to be installed on many machines. Further, if the COM dll was moved to a different location, (perhaps due to a hard disk crash), this would break the application if the registry entries were not properly modified. In DCOM, this problem could become worse if many clients were using a remote server. If this remote server’s location is changed, every DCOM client’s registry entries have to be properly modified.
The .Net assemblies have greatly improved upon the above problems of version control, and registry dependencies in deployment by some simple design changes. The version control problem is easily taken care of by keeping multiple copies of the assembly belonging to different versions in a dll. A client explicitly asks for a particular version of an assembly and binds to it. Thus different clients can simultaneously use different versions of the assembly. Assemblies also do not rely on the registry for deployment.
The assemblies in .Net are divided into two categories, private and shared. The private assemblies are tied to a specific client application. The assumption here is that there is only a single client of the application, so the assembly is physically copied into the client application, and there are no problematic issues of version control and deployment. The shared assemblies are equivalents of shared dlls and require proper implementation of the version information, and storing it inside the Global Assembly Cache (GAC), before the .Net environment can locate and launch an object contained in an assembly on behalf of a client. The internal architecture of a single file assembly is shown below:
Assembly packaged into a dll or an exe file
As you can see from the above picture, an assembly in .Net is completely self describing through the manifest and the type metadata. An assembly is finally packaged into a dll or an exe file. Although the .Net assembly does not contain machine code for the types it contains (it contains only IL), it does have an entry point of DllMain or WinMain (or Main for console applications) that instructs the compilation of the IL to machine code when invoked properly. As mentioned earlier, the .Net framework has different classes available to explore the contents of an assembly and find the information about different types it contains. There is also a tool called ILDASM.exe which you can use to find out the contents of a .Net assembly.
Large assemblies can be packaged into many different files (dlls and resource files) for efficient access to different types. In this case, typically the manifest is contained in one of the dlls (it points to the other dlls and resource files), and each remaining dll contains the metadata for the types it contains, and the IL for the types.
Each assembly is identified by an easy to identify name (called informational version) and a numeric version number - which is broken into four parts (major, minor, revision, build). Two assemblies are considered incompatible if they differ in the major or the minor version numbers. The client program can be instructed to choose a particular version of an assembly that it uses.
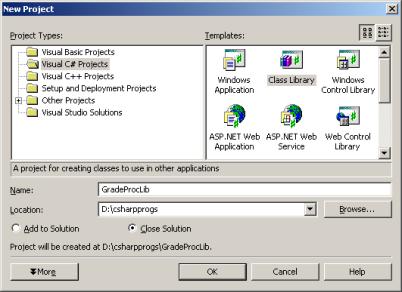
Example (Private Assembly): Private assemblies contain specialized classes that are needed by one particular application. For example, if we are to build a grade processing application for a particular course in a college, we could create the required types needed by such an application and package them into an assembly.
Create a VC# project of type “Class Library”. Name the project “GradeProcLib” as shown below.
Change the name of the default class from class1 to Student. Type the following code in it:
using System;
namespace GradeProcLib
{
/// <summary>
/// Summary description for
Class1.
/// </summary>
public class Student
{
protected string
fname; //
first name for student
public string Fname
{
get {return fname;}
set {fname = value; }
}
protected string
lname; //
last name for student
public string Lname
{
get { return lname; }
set { lname = value;
}
}
protected int id;
public int ID
{
get { return id; }
set { id = value; }
}
protected string
grade;
public string Grade
{
get { return grade; }
set { grade = value;
}
}
protected int
test1Score;
public int Test1Score
{
get { return
test1Score; }
set { test1Score = value;
}
}
protected int
test2Score;
public int Test2Score
{
get { return test2Score; }
set { test2Score = value;
}
}
protected float
weightedScore;
public float
WeightedScore
{
get { return
weightedScore; }
set { weightedScore = value;
}
}
public Student(string
fnm, string lnm, int
id, int test1, int
test2)
{
fname =
fnm;
lname =
lnm;
id =
id;
test1Score
= test1;
test2Score
= test2;
}
}
}
Add another C# class to the project. Name this class ProcessCourseGrade. Type the following code in it:
//--------------ProcessCourseGrade.cs----------------
using System;
using System.Collections; // for ArrayList
class
using System.IO; // for
file related classes
namespace GradeProcLib
{
enum GradeBoundary: int
{
A = 90,
Aminus =
87,
Bplus =
85,
B = 80,
Bminus =
75,
Cplus =
70,
C = 60,
D = 50,
}
/// <summary>
/// Summary description for
ProcessCourseGrade.
/// </summary>
public class
ProcessCourseGrade
{
private ArrayList st; // dynamically expanding array
public ArrayList ST // read only property
{
get { return st; }
}
private float
avgScore;
public float
AvgScore //
read only
{
get { return
avgScore; }
}
private float
maxScore;
public float
MaxScore //
read only
{
get { return
maxScore; }
}
private float
minScore;
public float
MinScore //
read only
{
get { return
minScore; }
}
public void
ComputeGrades() // compute & assign grades to
Students
{
for (int i=0; i <
st.Count; i++)
{
if (st[i] is Student)
{
Student
std = (Student) st[i];
std.WeightedScore
= 0.4f * std.Test1Score + 0.6f *
std.Test2Score;
// 40% weight to 1st test, 60% to 2nd
if (std.WeightedScore >= (float)
GradeBoundary.A)
std.Grade
= "A";
else if
(std.WeightedScore >= (float) GradeBoundary.Aminus)
std.Grade
= "A-";
else if
(std.WeightedScore >= (float)
GradeBoundary.Bplus)
std.Grade
= "B+";
else if
(std.WeightedScore >= (float)
GradeBoundary.B)
std.Grade
= "B";
else if
(std.WeightedScore >= (float)
GradeBoundary.Bminus)
std.Grade
= "B-";
else if
(std.WeightedScore >= (float)
GradeBoundary.Cplus)
std.Grade
= "C+";
else if
(std.WeightedScore >= (float)
GradeBoundary.C)
std.Grade
= "C";
else if
(std.WeightedScore >= (float)
GradeBoundary.D)
std.Grade
= "D";
else std.Grade = "F";
}
}
}
public void
ComputeStatistics() // finds highest weighted avg,
lowest etc.
{
float overallSum = 0.0f;
float maxSc = 0.0f;
float minSc = 100.0f;
for (int i = 0; i
< st.Count; i++)
{
if (st[i] is Student)
{
Student
std = (Student) st[i];
overallSum
= overallSum + std.WeightedScore;
if (std.WeightedScore > maxSc)
maxSc
= std.WeightedScore;
if (std.WeightedScore < minSc)
minSc
= std.WeightedScore;
}
}
this.avgScore = (float)
overallSum/st.Count;
this.maxScore = maxSc;
this.minScore = minSc;
}
public ProcessCourseGrade(string
fname) //
fname=course file with scores
{
st = new ArrayList();
FileInfo
fr = new FileInfo(@fname); // input file
StreamReader
reader = fr.OpenText(); // OpenText returns StreamReader
string sline; string
[] substrings;
char [] separators = {' ', ',','\t'};
string lnm, fnm; int
ID; int test1, test2; //
data for one line
// e.g., Baker Bill
35792 85 82
sline =
reader.ReadLine();
while (sline != null)
{
substrings
= sline.Split(separators,5); // 5 maximum size to
split
lnm =
substrings[0]; fnm = substrings[1];
ID = int.Parse(substrings[2]);
test1
= int.Parse(substrings[3]);
test2
= int.Parse(substrings[4]);
st.Add(new Student(fnm,lnm,ID,test1,test2));
sline
= reader.ReadLine();
}
}
}
}
You can modify the AssemblyInfo.cs file to indicate
the overall properties of the assembly, e.g., the first few lines of the
AssemblyInfo.cs file may look as:
using System.Reflection;
using
System.Runtime.CompilerServices;
//
// General Information about an assembly is controlled through the following
// set of
attributes. Change these attribute values to modify the information
// associated
with an assembly.
//
[assembly:
AssemblyTitle("Student Grading Lib")]
[assembly:
AssemblyDescription("Student Grading App Types")]
[assembly:
AssemblyConfiguration("")]
[assembly:
AssemblyCompany("AM")]
[assembly:
AssemblyProduct("")]
[assembly:
AssemblyCopyright("2002 by AM")]
[assembly:
AssemblyTrademark("AU")]
[assembly:
AssemblyCulture("")]
Build the library. If there are no errors, proceed
to the next step, otherwise try to fix all the errors.
Using, the notepad, prepare a text file called “grades.dat” containing the student names and scores, as shown below:
Bakerson Bill 35729 82 76
Miles Sandy 42682 86 91
Woods Tiger 83412 78 92
Simpson Sally 63529 94 97
Parker Adam 52792 68 73
Jones Jim 91245 83 81
Developing a Client application for the private
assembly developed above.
Create a new windows application. Name the project “GradeProcLibTest”.
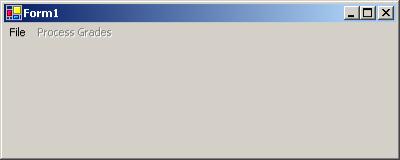
Add a main menu control to the form. The menus in the form should look as:
File->Load Grades File
File->Exit
Proces Grades -> Compute Grades
Process Grades-> Compute Course Statistics
Name the File menu as mnuFile, the Load Grades File menu as mnuFileOpen, the Process Grades menu as mnuProcessGardes, the ComputeGrades mneu as mnuComputeGrades, the Compute Course Statistics as mnuCourseStatistics.
Set the “Enabled” property of the “Process Grades” menu item to false, as it will be enabled only after the grade file has been loaded.
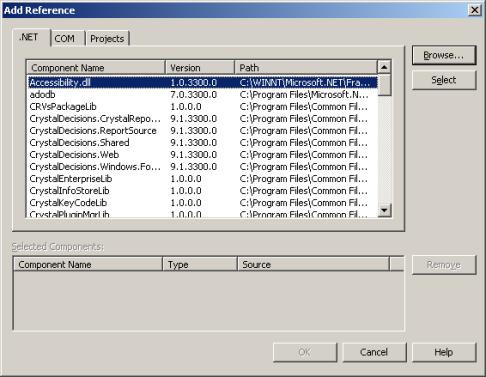
 Add
a reference to the “GradeProcLib” by right clicking on the project name in the
project explorer (right hand corner of the screen) and choosing “Add
Reference”, then clicking on the browse button to locate the GradeProcLib.dll.
Note that this dll will be in the GradeProcLib\bin\Debug folder.
Add
a reference to the “GradeProcLib” by right clicking on the project name in the
project explorer (right hand corner of the screen) and choosing “Add
Reference”, then clicking on the browse button to locate the GradeProcLib.dll.
Note that this dll will be in the GradeProcLib\bin\Debug folder.
The code for the different event handlers in the form is shown below.
Note that you will need to expose the GradeProcLib namespace before its types can be seen by the client application. Add the following line somewhere close to the top of the code in the form.
using System.Data;
using GradeProcLib;
namespace GradeProcLibTest
{
public class
Form1 : System.Windows.Forms.Form
{
private string
gradesFilename;
…..
…..
private void
mnuFileOpen_Click(object sender, System.EventArgs
e)
{
OpenFileDialog
dialog = new OpenFileDialog();
dialog.Filter
= "Grade files (*.dat)|*.dat";
dialog.InitialDirectory
= "d:\\Grades";
dialog.ShowDialog();
gradesFilename
= dialog.FileName;
mnuProcessGrades.Enabled=true;
}
private void
mnuFileExit_Click(object sender,
System.EventArgs e)
{
Close();
}
private void
mnuComputeGrades_Click(object sender,
System.EventArgs e)
{
ProcessCourseGrade
pg = new ProcessCourseGrade(this.gradesFilename);
pg.ComputeGrades();
pg.ComputeStatistics();
string sGrades = "";
Student
st;
for (int i = 0; i
< pg.ST.Count; i++) // num students
{
st
= (Student) pg.ST[i];
sGrades
= sGrades + st.Lname + ", " + st.Fname +
"\t:
Grade= " + st.Grade +"\n";
}
MessageBox.Show(sGrades);
}
private void
mnuCourseStatistics_Click(object sender,
System.EventArgs e)
{
ProcessCourseGrade
pg = new ProcessCourseGrade(this.gradesFilename);
pg.ComputeGrades();
pg.ComputeStatistics();
string sStats = "";
sStats
= sStats + "Min Score in Course = "
+
pg.MinScore.ToString() + "\n";
sStats
= sStats + "Max Score in Course = "
+
pg.MaxScore.ToString() + "\n";
sStats
= sStats + "Avg Score in Course = "
+
pg.AvgScore.ToString() + "\n";
MessageBox.Show(sStats);
}
Build and test the application:
After you choose, “Load Grades File” from the file menu, and then choose “Compute Grades” from the “Process Grades” menu, the results will looks as:
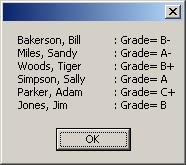
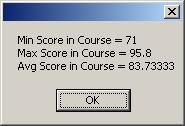
Similarly, if you choose, “Compute Statistics” from the “Process Grades” menu, the output may look as:
Note that you can examine the contents of an assembly through a utility called “ILDASM”. You may have to set the “path” to the directory of the ILDASM.exe file on your machine before using it. On a windows 2000 machine, you can set the path by going to the control panel and choosing the system icon, then the advanced tab, and then click on the “Environment Variables”. Then you can edit the existing path variable and add the following at the end of the current string:
;c:\Program Files\microsoft visual studio .NET\frameworkSDK\bin
(make sure that the ILDASM.exe file exists in the above directory before you set the path to it.)
Now if you go the DOS prompt and move to the directory containing the “GradeProcLib.dll” and type:

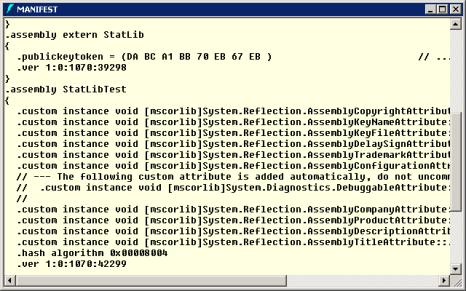
You will see the following information about the GradeProcLib assembly:

You can double expand on any of the types and then double click on an item to find the detailed information. For example, if you double click on the A in the GradeBoundary enumeration, you can find out its value as 5A hex i.e., 90.

Note that the manifest in the assembly contains the name and version of the assembly, listing of all internal and external module. Optionally an assembly can include the culture information (for internationalization purposes), a corresponding strong name (for shared assemblies), and security and resource information.
Note that the types in the assembly are needed at compile time to satisfy the compiler, and then the CLR needs the IL code in the assembly to actually execute the code. The CLR can discover the location of the assembly through a concept called probing. The client has two options to let the CLR know of the private assembly it wants to use.
1. By placing the shared assembly in the client application’s directory (this is what VS.Net does when you add a reference to a private assembly). If you examine the GradeProcLibTest folder, you will find the GradeProcLib.dll in the bin/Debug folder.
2. By optionally adding a file to the client application called application_name.exe.config. It is an XML file that contains the probing tag to locate the private assembly.
<!--GradeProcLibTest.exe.config -->
<configuration>
<runtime>
<assemblyBinding xmlns=”urn:schemas-microsoft.com:asm.v1”>
<probing
privatePath=”Hello”/>
</assembly>
</runtime>
</configuration>
The above config file will cause the CLR to look for the referenced assemblies in the client application in bin/Debug/Hello folder. If the GradeProcLib.dll is not found there, you will get a runtime exception.
Debugging a Library Application:
When you have developed a library and are using it in a client application, you can set the break points inside the library to debug your code. The Visual Studio debugger will stop at the break point and you can step through your library code exactly like you would when debugging a regular application.
Shared Assemblies:
Private assemblies are copied into the client application’s bin directory. Each client of a private assembly has its own copy. This way, even if you recompile or move the project that created the private assembly, the client application continues to work properly. Shared assemblies act like shared dlls in the sense that there is a single copy of the shared assembly servicing many different clients. Shared assemblies make sense for creating class libraries that will be potentially used by many client applications.
The main differences between a private assembly and a shared assembly are:
1. Shared assemblies typically reside in the Global Assembly Cache (GAC) which is c:\winnt\Assembly folder if the OS uses the c:\winnt folder.
2. Shared assemblies require additional version information. .NET runtime enforces version compatibility before it loads the assembly on behalf of the client application.
3. A Shared assembly must be assigned a strong name (some times referred to as shared name). The strong name consists of a friendly string name, a version identifier, a public/private key pair, and a digital signature. There is a utility called sn.exe that simplifies the creation of strong names.
Example: Creating a Shared Assembly.
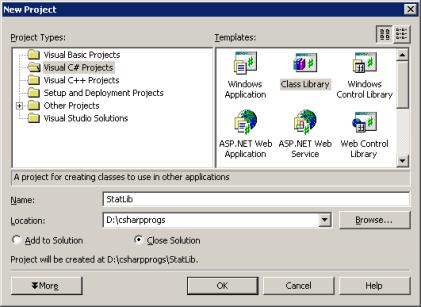
Create a C# class library project. Name the project “StatLib”.
Change the name of the default class to MyStat with the following code in it:
using System;
namespace StatLib
{
/// <summary>
/// Summary description for
Class1.
/// </summary>
public class MyStat
{
private float []
m_Data; // data array
private float
maxData;
public float MaxData
{
get { return maxData;
}
}
private float
minData;
public float MinData
{
get { return minData;
}
}
private float
avgData;
public float AvgData
{
get {return avgData;
}
}
private float
stdDevData;
public float
StdDevData
{
get {return stdDevData;
}
}
public MyStat(float
[] data)
{
// compute all statistics on data array
m_Data =
data;
float minVal = data[0];
float maxVal = data[0];
float sum = data[0];
for (int i = 1; i
< m_Data.GetLength(0); i++)
{
if (m_Data[i] < minVal)
minVal
= m_Data[i];
if (m_Data[i] > maxVal)
maxVal
= m_Data[i];
sum =
sum + m_Data[i];
}
minData
= minVal;
maxData
= maxVal;
avgData
= sum/m_Data.GetLength(0);
//----compute standard deviation-----
sum =
0.0f;
for (int i = 0; i
< m_Data.GetLength(0); i++)
{
sum =
sum + (m_Data[i]-avgData)*
(m_Data[i]-avgData);
}
stdDevData
= sum/m_Data.GetLength(0);
}
}
}
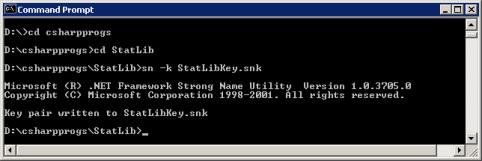
We need to create a strong name for the shared assembly, for which we will use the sn utility. From the command prompt, move to the StatLib directory and type the following command: sn –k StatLibKey.snk
Next modify the AssemblyInfo.cs file to look as:
using System.Reflection;
using
System.Runtime.CompilerServices;
//
[assembly: AssemblyTitle("StatLib")]
[assembly: AssemblyDescription("Statistics on
an Array")]
[assembly: AssemblyConfiguration("")]
[assembly: AssemblyCompany("AM")]
[assembly: AssemblyProduct("")]
[assembly: AssemblyCopyright("2002 by
AM")]
[assembly: AssemblyTrademark("AU")]
[assembly: AssemblyCulture("")]
[assembly: AssemblyVersion("1.0.*")]
//
//
[assembly: AssemblyDelaySign(false)]
[assembly:
AssemblyKeyFile(@"d:\csharpprogs\StatLib\StatLibKey.snk")]
[assembly: AssemblyKeyName("")]
Build the StatLib project.
Next, copy the StatLib.dll to the GAC directory i.e., c:\winnt\assembly folder. If you examine the c:\winnt\assembly folder, you will see the following:
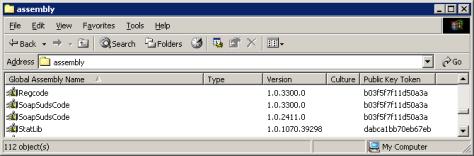
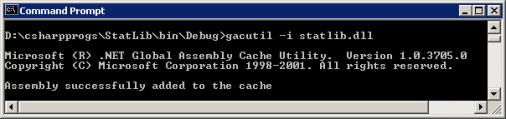
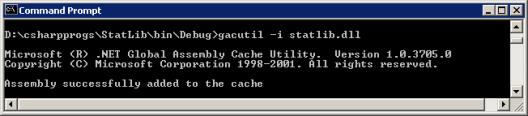
You can also use the gacutil to copy the Statlib.dll to the GAC as shown below.
If for some reason, you needed to delete the Statlib.dll from the GAC, you can simply right click on the file in the windows explorer, and choose delete.
Testing the Shared Assembly
by a Simple Client:
 Create a windows application called
StatLibTest. Put a button in it with a text property of “Test Shared Stat
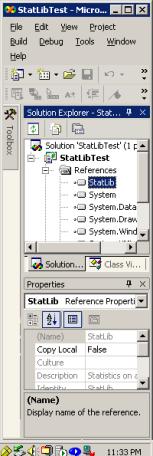
Library”. Add a reference to the StatLib by browsing to the StatLib project.
Note that theoretically speaking, you should be able to add a reference from
the c:\winnt\assembly folder but for some reason, I was unable to do this (I
set a reference to the Statlib\bin\debug\Statlib.dll directly). Since the
StatLib assembly is a shared assembly (as it has a strong name), it will not be
copied to your local folder. By default, the copy source property of the
referenced shared library dll will be set to false.
Create a windows application called
StatLibTest. Put a button in it with a text property of “Test Shared Stat
Library”. Add a reference to the StatLib by browsing to the StatLib project.
Note that theoretically speaking, you should be able to add a reference from
the c:\winnt\assembly folder but for some reason, I was unable to do this (I
set a reference to the Statlib\bin\debug\Statlib.dll directly). Since the
StatLib assembly is a shared assembly (as it has a strong name), it will not be
copied to your local folder. By default, the copy source property of the
referenced shared library dll will be set to false.
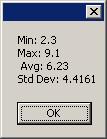
Add the following code to the Test library button handler.
private
void btnTestStatLib_Click(object sender, System.EventArgs e)
{
float
[] a = { 2.3f,5f,7f, 9f,6.3f,
4.5f,8.4f,9.1f,4.5f,6.2f};
MyStat s1 = new
StatLib.MyStat(a);
MessageBox.Show("Min:
"+s1.MinData.ToString()+"\n"+
"Max: " +
s1.MaxData.ToString() + "\n "+
"Avg:
"+s1.AvgData.ToString()+ "\n" +
"Std Dev:
"+s1.StdDevData.ToString());
}
Add the following using statement at the top of the form code.
using StatLib;
Build and test the application. You will see the following result.
If you examine the manifest for the StatLibTest.exe file using ILDASM, you will see the following reference to the shared assembly.
Version Control in Shared Assemblies:
.Net runtime does not worry about implementing versioning for private assemblies as the private assembly is copied locally in the client application. However, for shared assemblies, there is a detailed version control mechanism. The version number of a shared assembly is divided into four parts as shown below.
![]()
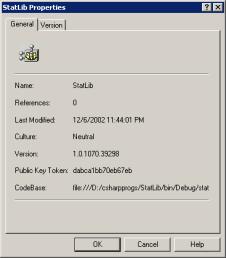
For example, if you go to GAC (c:\winnt\assembly folder), and right click on Statlib and choose properties, you will see the following version number 1.0.1070.39298 (the version number on your machine may be different):
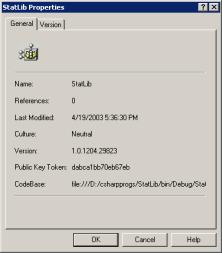
If you open the Statlib project and choose rebuild all. Then delete the Statlib from GAC (by right clicking on it in c:\winnt\assembly folder and choosing delete) and drag-drop Statlib.dll from the Statlib\bin\debug folder into the c:\winnt\assembly folder. If you examine the properties of Statlib.dll in the GAC, you will discover that the build and revision parts have been changed, e.g., on my machine, it looked like as shown below.
If you examine the AssemblyInfo.cs file in the Statlib project, you will find the following statement in it.
[assembly:
AssemblyVersion("1.0.*")]
The default version
1.0.* specified in the AssemblyInfo.cs file sets the build number to the number
of days since January 1, 2000, and the revision number to the number of seconds
since midnight, local time. So the build and revision numbers increase over
time. If you are creating commercial components, you should change this default
attribute to such as:
<Assembly:
AssemblyVersion("1.0.0.0")>
Each
recompilation of the library now should increase the build number on the
assembly version.
Note that difference in build and revision numbers do not indicate incompatibility. If a client references an older version of an assembly in terms of build and revision numbers, and if the assembly contains a newer build and revision number, the .Net runtime will use the newer version of the assembly from the GAC. However, any difference in major and minor numbers is considered an incompatible assembly.
If you are making major modifications to the dll such as adding more types or changing the prototypes of existing methods, you should manually set the assembly major, and minor version in the above statement in AssemblyInfo.cs file.
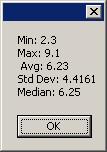
Example: Add an medianData property to the MyStat.cs file in the Statlib project as shown below.
private float medianData;
public float MedianData
{
get {return medianData; }
}
Modify the constructor of MyStat class so that it computes the median value (in addition to the existing calculations) as shown below (modifications are shown in bold).
//----compute standard deviation-----
sum
= 0.0f;
for (int i = 0; i
< m_Data.GetLength(0); i++)
{
sum
= sum + (m_Data[i]-avgData)*
(m_Data[i]-avgData);
}
stdDevData
= sum/m_Data.GetLength(0);
//------compute simple median--------
Array.Sort(m_Data);
if (m_Data.Length%2 != 0) //
odd length array
medianData
= m_Data[(m_Data.Length-1)/2];
else // even size of array
{
int mid1 = m_Data.Length/2;
medianData
= (m_Data[mid1-1] + m_Data[mid1])/2.0f;
}
}
Modify the AssemblyInfo.cs file to change the Assembly version to 1.1.* as:
[assembly: AssemblyVersion("1.1.*")]
Build the Statlib.dll. If there are no errors, copy it to GAC using the gacutil program as shown below.
Now if you examine the contents of c:\winnt\assembly folder, you will find that there are two separate copies of Statlib.dll as shown below.

Now the client has the choice of referencing either the Statlib with version 1.1.1205.174 or 1.0.1204.29823.
Modify the StatlibTest program. By expanding the references and right clicking on the StatLib.dll, choose remove. Then add a reference to the version 1.1.* of the StatLib.dll. Modify the button handler so that the code looks as:
private void
btnTestStatLib_Click(object sender,
System.EventArgs e)
{
float [] a = { 2.3f,5f,7f, 9f,6.3f,
4.5f,8.4f,9.1f,4.5f,6.2f};
MyStat
s1 = new StatLib.MyStat(a);
MessageBox.Show("Min:
"+s1.MinData.ToString()+"\n"+
"Max:
" + s1.MaxData.ToString() + "\n "+
"Avg:
"+s1.AvgData.ToString()+ "\n" +
"Std
Dev: "+s1.StdDevData.ToString()+"\n"+
"Median:
"+s1.MedianData.ToString());
}
Build and run the StatLibTest program. When you click on the button, you should see the following result.
Note that you can easily debug a shared assembly by setting break points in it and invoking the code in it from a client application.
Client-side Binding to a particular version of an
assembly:
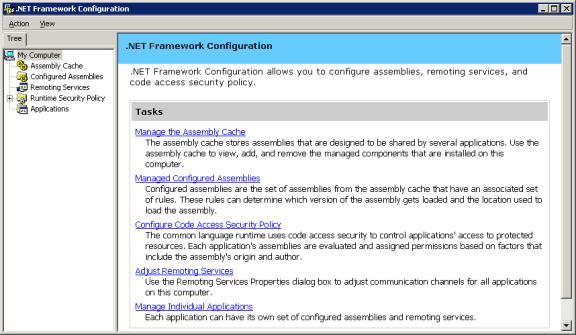
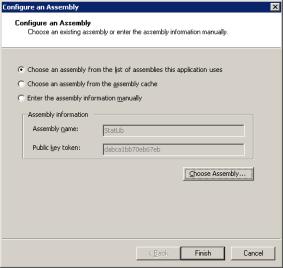
Rather than changing the reference to a particular version of an assembly and then rebuilding the client application, .Net uses an application configuration file in XML format where you can specify the binding to a particular version of an assembly. This XML file has a name of “projectname.exe.config”. There is an easy way to generate this XML file. From the administrative tools, choose “.Net Framework Configuration”, you will see the following screen.
Select Applications on the left hand side, then click on the hyper link to add a new application.
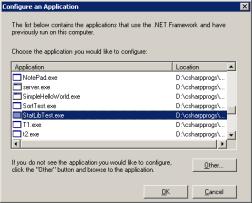
Then select the StatLibText.exe and click on OK button as shown above.
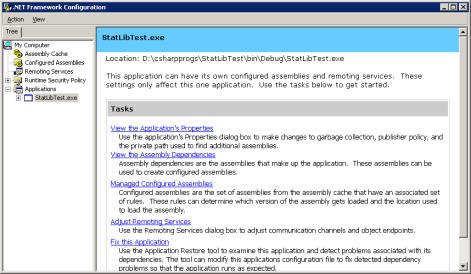
Click on “Managed Configured Assemblies”, then right click on “Configured Assemblies” on the left hand side and choose “Add…”. Then select the top radio button, click on Choose Assembly button and pick the StatLib, as shown below.
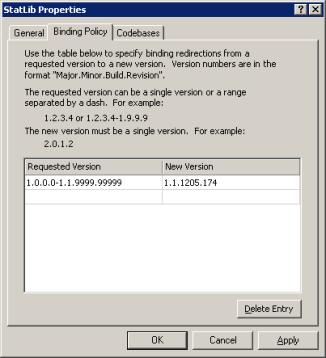
Choose the “Binding Policy” tab and enter the following information.
The requested version is the version that you set a reference to in the project. The new version can be the version of a newer (or older) assembly that you want to reference. Here I have picked on purpose an older version under the “New Version” category. The version 1.0.1204.29823 is present in the GAC on my computer. This version does not have the MedianData property. Once you click on the apply button, it will end up generating the “StatLibTest.exe.config” file in the StatLibTest\bin\debug folder. This XML file is shown below.
<?xml version="1.0"?>
<configuration>
<runtime>
<assemblyBinding xmlns="urn:schemas-microsoft-com:asm.v1">
<dependentAssembly>
<assemblyIdentity name="StatLib" publicKeyToken="dabca1bb70eb67eb" />
<bindingRedirect oldVersion="1.1.1205.174"
newVersion="1.0.1204.29823" />
</dependentAssembly>
</assemblyBinding>
</runtime>
</configuration>
Now if you run the StatLibTest.exe program, you will
get the following error, as the MedianData property is not present in the
version 1.0.1204.29823 of the StatLib.

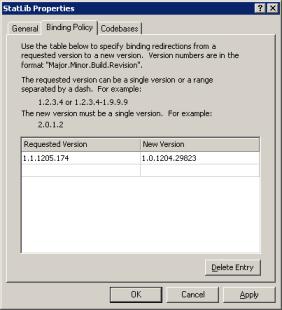
Now if you go back and change the binding attribute to as shown below, and run the program again, it will bind to the new assembly (ver. 1.1.1205.174) and it will work correctly.
The codebase tab in the properties of the assembly as shown above, lets you bind to a particular url where the code for the shared assembly is located. Thus it is not mandatory to store the shared assemblies in GAC. There are security related issues when using a shared assembly, that we will cover in the .Net security handout.