3 DEVELOPING BASIC GUI WITH WINDOWS FORMS USING C#
3.1 Introducing
Windows Forms
Windows Forms:
To write GUI applications in Microsoft .NET, Windows Forms are to be used. Windows Forms are a new style of application built around classes in the .NET Framework class library's System.Windows.Forms namespace. The programming model is cleaner, more robust, and more consistent than models based on the Win32 API or MFC, and runs in the managed environment of the .NET Common Language Runtime (CLR). For an old MFC (or Windows API) developer, Windows Forms are a great way to get started with the .NET Framework class library because they enable to write traditional GUI applications that create windows, process user input, and the like. Learning Windows Forms makes working with other parts of the .NET Framework easier, too.
The chief benefit of writing Windows-based applications the Windows Forms way is that Windows Forms homogenize the programming model and eliminate many of the bugs, quirks, and inconsistencies that plague the Windows API. For example, every experienced Windows-based programmer knows that certain window styles can only be applied to a window when that window is created. Windows Forms largely eliminate such inconsistencies. If you apply a style that's only meaningful at creation time to an existing window, Windows Forms will quietly destroy the window and recreate it with the specified style. In addition, the .NET Framework class library is much richer than the Windows API, and when writing applications using Windows Forms, the full power of the framework at the developer’s disposal. More often than not, applications written using Windows Forms require less code than applications that use the Windows API or MFC.
Another benefit of Windows Forms is that the same API is used, regardless of which programming language is chosen. In the past, the choice of programming language drove the choice of API. Programmers in Visual Basic used one API (the one embodied in the Visual Basic language), while C programmers used the Win32 API, and C++ programmers, by and large, used MFC. It was tough for an MFC programmer to switch to Visual Basic, or vice versa. All applications that use Windows Forms are written to one API—that of the .NET Framework class library. The knowledge of one API is sufficient to allow programmers to write applications in virtually any language they choose.
Windows Forms Programming Model:
A form is a bit of screen real estate, usually rectangular, that you can use to present information to the user and to accept input from the user. Forms can be standard windows, multiple document interface (MDI) windows, dialog boxes, or display surfaces for graphical routines. The term “form” means the top-level window in Windows Forms. An application's main window is a form. Any other top-level windows the application has are forms also. Dialog boxes are also considered forms. Despite their name, applications using Windows Forms don't have to look like forms. Like traditional Windows-based applications, applications exercise full control over what appears in their windows.
The easiest way to define the user interface for a form is by placing controls on its surface. Forms are objects that expose properties, which define their appearance, methods that define their behavior, and events that define their interaction with the user. By setting the properties of the form and writing code to respond to its events, you customize the object to meet the requirements of your application.
As with all objects in the .NET
Framework, forms are instances of classes. The form that is created with the
Windows Forms Designer is a class, and when displayed an instance of the form
at run time, this class is the template used to create the form. The
framework also allows you to inherit from existing forms to add functionality
or modify existing behavior. When you add a form to your project, you can
choose whether it inherits from the Form class provided by the
framework, or from a form you have previously created. Additionally, forms are
controls, because they inherit from the Control class.
Within a Windows Forms project, the form is the primary vehicle for user interaction. By combining different sets of controls and writing code, information could be elicited from the user and responded, work with existing stores of data, and query and write back to the file system and registry on the user's local computer. Although the form can be created entirely in the Code Editor, it is easier to use the Windows Forms Designer to create and modify forms.
Programmers see Microsoft .NET through the lens of the .NET Framework class library. Applications using Windows Forms rely heavily upon classes found in the System.Windows.Forms namespace. That namespace includes classes such as Form, which models the behavior of windows or forms; Menu, which represents menus; and Clipboard, which enables Windows Forms applications to access the clipboard. It also contains numerous classes representing controls with names like Button, TextBox, ListView, and MonthCalendar. These classes can be referred to using their class names only, or using fully qualified names such as System.Windows.Forms.Button.
At the heart of nearly every Windows Forms-based application is a class derived from System.Windows.Forms.Form. An instance of that class represents the application's main window. System.Windows.Forms.Form has scores of properties and methods that comprise a rich programmatic interface to forms. Windows Forms-based applications that use pushbuttons, listboxes, and other Windows control types rely on the control classes in System.Windows.Forms.
Another important building block of an application that uses Windows Forms is a System.Windows.Forms class named Application. That class contains a static method named Run that gets a Windows Forms-based application up and running by displaying a window and providing a message loop. Many classes have virtual methods that you can override to respond to paint messages, mouse messages, and the like. For example, System.Windows.Forms.Form contains a virtual method named OnPaint that's called when a form's client area needs updating. OnPaint is one of many virtual methods to override in a derived class to build interactive forms; OnMouseDown, OnKeyDown, and OnClosing are some of the others.
Another important facet of the
Windows Forms programming model is the mechanism that forms use to respond to
input from menus, controls, and other GUI application elements. Traditional
Windows-based applications process WM_COMMAND and WM_NOTIFY messages using
Windows Forms process events. In C# and in other languages that support the
.NET Common Language Runtime (CLR), events are first-class type members on par
with methods, fields, and properties. Virtually all Windows Forms control
classes (and many non-control classes, too) fire events. For example, button
controls—instances of System.Windows.Forms.Button—fire Click events when
they're clicked. EventHandler is a delegate defined in the System namespace. A
delegate is the CLR's equivalent of a type-safe function pointer. An
EventHandler is wrapped around the method that handles an event and added to
the list of event handlers called when the control fires the event.
A Simple Windows Forms Example:
In this example we will develop a very simple and standard “Hello World” application as a Windows Forms application in C# using VS.NET.
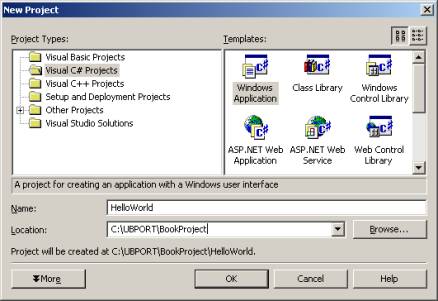
Step 1: Open the VS.NET, choose File->New->Project from the menu. The following dialog box appears:
· Choose “Visual C# Projects” on the “Project Types” window,
· Choose “Windows Application” on the “Templates” window,
· Type the “Name” as “HelloWorld” and
· Choose the path under which the application folder would be stored.
Click OK.
Step 2:
The following Forms Designer appears on the screen with an empty form “Form1.cs[Design]” as shown below. Some of the features of the VS.NET are described hereunder:
To view the code of the Form, right click on the “Form1.cs” in the “Solution Explorer”, choose “View Code”. The “Form1.cs” is now available as a tabbed window next to the “Form1.cs[Design]”.
On the “Properties Window”, set the “Name” property to “HelloWorldForm” and the “Text” property to “HELLO WORLD”.
![]()

![]()
![]()
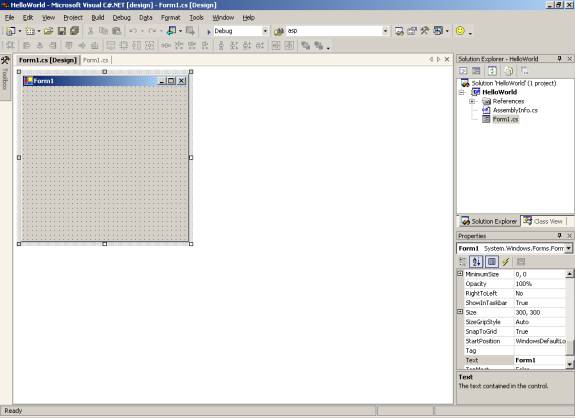
Properties Window
Design View Solution Explorer
Toolbox Code View
Step 3:
Move the mouse over the “Toolbox” on the upper left corner of the window. The toolbar slides out. Choose “Label” under “Windows Forms”, drag and drop it inside the form.
While the focus is on the “label”, make the following changes in the properties window:
· Change the “Name” to hwlabel
· Change the “Text” to “HELLO WORLD”
· Change the “Text Align” to MiddleCenter
Step 4:
From the menu choose Build->Build (or Rebuild All). Choose Debug->Start Without Debugging to run the application. The following form appears as the output:
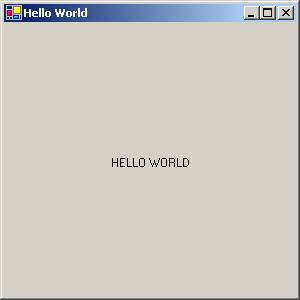
The code generated for the above application is hereunder:
using
System; // The root of the namespaces in the .NET framework
using
System.Drawing; // The namespace for GUI in the .NET framework
using
System.Collections; // The namespace for data structures
using
System.ComponentModel;
using
System.Windows.Forms; // The namespace for Windows Forms Application
using
System.Data;
namespace HelloWorld //
The name of the project
{
///
<summary>
///
Summary description for Form1.
///
</summary>
public
class HelloWorldForm : System.Windows.Forms.Form // The form class
{
private
System.Windows.Forms.Label hwlabel; //
The label declared
///
<summary>
///
Required designer variable.
///
</summary>
private
System.ComponentModel.Container components = null;
public
HelloWorldForm() // The constructor of the form
{
//
//
Required for Windows Form Designer support
//
InitializeComponent();
// This method initializes all the
components of the
// form with the
properties specified in the properties window for each of them
//
-------------TODO: Add any constructor code after InitializeComponent call
}
///
<summary>
///
Clean up any resources being used.
///
</summary>
protected
override void Dispose( bool disposing )
{
if(
disposing )
{
if
(components != null)
{
components.Dispose();
}
}
base.Dispose(
disposing );
}
#region
Windows Form Designer generated code
///
<summary>
///
Required method for Designer support - do not modify
///
the contents of this method with the code editor.
///
</summary>
private
void InitializeComponent()
{
this.hwlabel
= new System.Windows.Forms.Label();
this.SuspendLayout();
//
-------------------------------------hwlabel
this.hwlabel.Anchor
= System.Windows.Forms.AnchorStyles.None;
this.hwlabel.Name
= "hwlabel";
this.hwlabel.Size
= new System.Drawing.Size(296, 280);
this.hwlabel.TabIndex
= 0;
this.hwlabel.Text
= "HELLO WORLD";
this.hwlabel.TextAlign
= System.Drawing.ContentAlignment.MiddleCenter;
//
----------------------------------HelloWorldForm
this.AutoScaleBaseSize
= new System.Drawing.Size(5, 13);
this.ClientSize
= new System.Drawing.Size(292, 273);
this.Controls.AddRange(new
System.Windows.Forms.Control[] {
this.hwlabel});
this.Name
= "HelloWorldForm";
this.Text
= "Hello World";
this.ResumeLayout(false);
}
#endregion
///
<summary>
///
The main entry point for the application.
///
</summary>
[STAThread]
static
void Main() // The main method that starts up the form application
{
Application.Run(new
HelloWorldForm());
}
}
}
3.2
The .NET Framework Classes for Windows Forms
As described earlier the namespace System.Windows.Forms contains the framework of classes that aid in developing Windows Forms applications in .NET. The following chart explains in detail the hierarchy of the classes in this namespace.
The classes in the above hierarchy chart are explained in detail in the section “Controls in Windows Forms”.
3.3
Creating Windows Forms
The steps involved in creating a simple Windows Form using C# was depicted in the “Hello World” example in the first section of this chapter. While the example dealt with the creation of the form using VS.NET, the application can be developed on any text editor, by writing a class that derives from System.Windows.Forms.Form class of the .NET Framework’s class library.
Form is a container control that derives from System.Windows.Forms.Form class. A form can be derived from an existing form too, which is called “Visual Inheritance”. The purpose of a form is to present information to the user and to accept user input. Users interact with the controls on the form. The properties that a form exposes are discussed in the section “Working with Properties” and the events that correspond to forms are discussed in the section “Working with Events”. The following section explains in detail about the controls that can be added to a form. The example provided hereunder is the same “Hello World” application that was discussed earlier; this time developed using a notepad. The steps involved are provided in detail.
A Simple Windows Forms Example:
Type the following code in a notepad and save it as “simplehelloworld.cs”.
using
System;
public
class SimpleHelloWorld : System.Windows.Forms.Form {
[STAThread]
public static int Main(string[] args) {
System.Windows.Forms.Application.Run(new SimpleHelloWorld());
return 0;
}
public SimpleHelloWorld() {
this.Text = "Hello
World";
}
}
To compile the above program, type the following in the MS-DOS prompt, in the directory under which the file exists:
csc simplehelloworld.cs
The above command produces simplehelloworld.exe, the executable that could be run to see the following output.
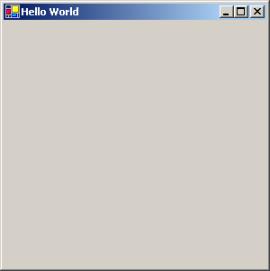
As we had not added any control to the form, except that we set the Form’s “Text” property, the output is as shown above.
Note that in order to compile and run the above code, the “path” should be set to the directory in which the “csc.exe” exists. Typically it would be under C:\WINNT\Microsoft.NET\Framework\v1.0.2914, and so the path should be set to this directory before the compile command is issued on the DOS prompt. To run the program, just say “simplehelloworld” at the prompt, as this is the name of the “.exe” file generated after compilation.
3.4
Controls in Windows Forms
This section explores the various controls available for the programmer in the .NET framework that could be used in Windows Forms applications. Controls are components that allow a user to interact with the application in various ways – for example a commonly used control is the push button. The .NET control types can be broadly classified into the following types:
Command Controls:
· Button, LinkLabel, NotifyIcon and ToolBar
Text Controls:
· TextBox, RichTextBox, Label and StatusBar
Option Controls:
· Checkbox, RadioButton, CheckedListBox, ComboBox, DomainUpDown, NumericUpDown, ListBox, ListView and TreeView
Container Controls:
· Panel, GroupBox, and TabControl
Graphic Controls:
· PictureBox and ImageList
Menu Controls:
· MainMenu and ContextMenu
Dialog Controls:
· OpenFileDialog, SaveFileDialog, ColorDialog, FontDialog, PrintDialog, PrintPreviewDialog and PageSetupDialog
Other useful controls:
· DateTimePicker and MonthCalendar
· DataGrid
· Splitter
· HscrollBar and VscrollBar
· TrackBar and ProgressBar
· Tooltip and ErrorProvider
· Timer
These controls are subclasses of System.ComponentModel.Component.
Adding and Removing Controls:
To include a control in a Windows Form, we must add it to the form. To do this, we must first create an instance of the desired control and add it to the Windows Form. Adding controls to a Windows form could be done either by drawing the control on the Form when working on VS.NET or adding the control programmatically incase of developing an application without the IDE. These methods are explained hereunder:
In order to draw a control on a Windows Form,
- The Form is opened using the Forms Designer
- From the Toolbox, the desired control that needs to be added to the Form is clicked
- Now, a click on the Form would fix the upper left corner of the control on the form and the size and its lower right corner are decided by dragging and releasing the mouse on it
If we desire to add controls using their default sizes that is provided by the framework, then,
- The Form is opened using the Forms Designer
- From the Toolbox, the desired control that needs to be added to the Form is clicked, dragged and dropped at the desired location on the form
- Double-clicking the control in the Toolbox would add it to the center of the form in its default size.
Controls can also be added to a form using the Add() method as follows. In this example, a Textbox control is added at location (50,50) on the Form.
Textbox tb = new Textbox(); // this creates the Textbox control
tb.Location = new Point(50,50); // this fixes the location at (50,50)
this.Controls.Add(tb); // this adds the control to the form
Sometimes, it would be necessary to remove a control from a form when it is no longer required in the application. To do this, we can use the Remove() method as follows:
this.Controls.Remove(tb); // this removes the text box added above from the form
Responding to Controls:
Except for labels that are passive controls, all controls generate events when accessed by the user. An event is an action that you can respond to or "handle" in code. Events can be generated by a user action, such as clicking the mouse or pressing a key, by program code or by the system. Event-driven applications execute code in response to an event. Each form and control exposes a predefined set of events that could be programmed against. If one of these events occurs and there is code in the associated event handler, that code is invoked. An event handler is a method that is bound to an event. When the event is raised, the code within the event handler is executed.
For example, most objects will handle a Click event — if a user clicks a button, code in the button's Click event handler is executed. Many events could occur in conjunction with other events. For example, in the course of the Click event occurring, the MouseDown, MouseUp, and Click events occur. The concept of Event Handling and how events are handled in .NET are discussed in detail in the section 3.6 of this chapter. The various types of controls briefly described above are explained in detail in this section. The following section 3.5 explores the properties that can be set to different controls as well as the Form of a Windows Form application.
Command Controls - Button:
The most widely used control is the Button, a component that generates an event when pressed. It has a label on it displaying some message to the user on its usage. This may be in the form of a text or in the form of images. The Button allows the user to click on it to perform some actions. When clicked it looks as if it has been pressed and generates the Click event. If code exists for Click event handling method of the button exists then it is executed.
To demonstrate the usage of a Button in a Windows Form Application, let us consider a very simple example:
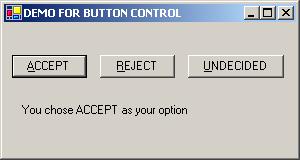
This example has three buttons on a form and a label that displays an appropriate message on the click of each button.
- Choose File->New->Project on VS.NET.
- In the dialog box, choose “Visual C# Projects” in the “Project Types” and “Windows Application” in the “Templates”.
- Give the name as “ButtonDemo”, choose an appropriate folder and click “OK”.
The project is created and an empty Windows Form appears on the Forms Designer. On the “Properties Window” of the Form,
· Set the form Name as “btnForm”
· Set the form Text as “DEMO FOR BUTTON CONTROL”
· Choose the “Button Control” on the Toolbox and drag and drop it thrice side by side onto the Form.
· Set the properties of each button as follows:
Button1 – Name : btnAccept
Text : ACCEPT
Button2 – Name : btnReject
Text : REJECT
Button3 – Name : btnUD
Text : UNDECIDED
- Choose the “Label Control” on the Toolbox and drag and drop it below the buttons on the Form, drag the mouse to change its size to fit the width of the Form. Set its Name property to “lblChoice” and its Text to be empty.
Now that we have designed our form, we can add events to each of the three buttons. Double clicking the mouse on each of the buttons takes us to the event handler method for the button.
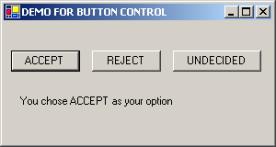
- Double-click on the ACCEPT button and add one line of code in the method to look as follows:
private void
btnAccept_Click(object sender, System.EventArgs e)
{
lblChoice.Text
= "You chose ACCEPT as your option";
}
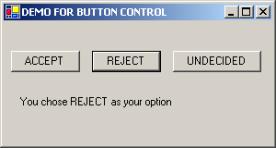
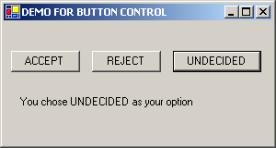
- Now double-click on the REJECT and the UNDECIDED buttons and add code in the methods to look as the following respectively.
private void
btnReject_Click(object sender, System.EventArgs e)
{
lblChoice.Text
= "You chose REJECT as your option";
}
private
void btnUD_Click(object sender, System.EventArgs e)
{
lblChoice.Text
= "You chose UNDECIDED as your option";
}
As we could see
from the above code, we are just setting the Text of the label that we added to
the form to display a message indicating which option has been chosen, when
each of the buttons is clicked by the user.
- Compile the above application choosing Build->Build from the menu.
- Run the application choosing Debug->Start without Debugging from the menu
The following screen appears:
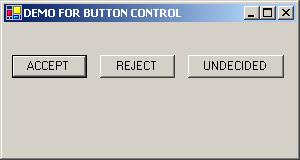
Click on each of the buttons to find the message displayed.
Creating an Access Key for a
Button:
We can also give the option of selecting a button to the user in the form of typing the ALT key + any character in the text displayed on the button, by adding an ampersand in front of the letter to be made as the access key. For example, in the above example, the ACCEPT button could also be made to access by the ALT+A key if the btnAccept.Text property is set as “&ACCEPT” instead of “ACCEPT”. Now, let us change the Text of each of the buttons in the example as follows:
ACCEPT as &ACCEPT
REJECT as &REJECT
UNDECIDED as &UNDECIDED
Now compile and run the application to see the results using the ALT+key options. Choosing ALT+A displays the following:
Command Controls -
LinkLabel:
A LinkLabel control is very similar to a Label control except that it is used to display hyper-links on a Windows Form. Clicking the hyper-link would perform a specified task, for example display a web site in the Internet Explorer, as the code in the LinkClicked event handler method would specify. A LinkLabel could be made to display multiple hyper-links as each of the links is an item in the LinkCollection of the control. Also, links can be added and removed from the LinkCollection using the Add and Remove methods respectively. Alternatively, the LinkArea property could be used to specify the link in the LinkLabel. The LinkLabel.Links.Add method enables to convert text within the LinkLabel control to a link that can be clicked on by the user to perform tasks similar to a Button control.
The LinkLabel provides a number of properties that enable you to define the display appearance of hyperlinks in the control. The ActiveLinkColor, DisabledLinkColor, LinkColor and VisitedLinkColor properties define the colors used when displaying a hyperlink in various states. The LinkBehavior property defines the display of the underline that is associated with a hyperlink.
Let us consider an example that has a hyper-link, clicking which would take the user to the page “www.msn.com”.
- Create a new project choosing File->New->Project from the menu
- Choose Visual C# Projects and Windows Application
- Name it “LinkLabelDemo” and choose an appropriate folder to store it in
- On the Forms Designer, set the Text of the form as “DEMO FOR LINK LABEL” and its Name as lnklblForm.
- Choose LinkLabel control from the Toolbox, drag and drop it onto the Form.
- In the property window of the LinkLabel control, set the following:
Name : lnklblMSN
Text : Click here to reach to MSN
We can see that the entire Text is shown as a hyper-link on the form. This is because by default the entire text is added to the LinkCollection class of the control.
- Set the LinkArea property as 6,4 – meaning the hyperlink should be starting from the position 6 and of length 4 in the Text specified.
Now we can see that only “here” is shown as hyperlink.
- Double click on the LinkLabel to open the event LinkClicked handler and type in to make the method look as the following:
private void
lnklblMSN_LinkClicked(object sender, LinkLabelLinkClickedEventArgs e)
{
// Determine which link was clicked within the
LinkLabel.
lnklblMSN.Links[lnklblMSN.Links.IndexOf(e.Link)].Visited
= true;
// Display the appropriate
link based on the value of the LinkData property of the Link //object.
System.Diagnostics.Process.Start(e.Link.LinkData.ToString());
// starts IE
}
- Also add the following line in the constructor code below “TODO”
//
// TODO: Add any
constructor code after InitializeComponent call
//
lnklblMSN.Links.Add(6,4,"www.msn.com"); // sets link for here in Click here to reach
MSN
- Build and run the application. Make sure that you are connected to the internet. The following screen appears:
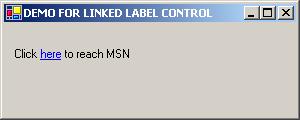
We can see that when the hyperlink is clicked, we are connected to the MSN homepage. This explains the usage of a LinkLabel control in an application.
You can set multiple hyperlinks to a single link by making different parts of the text property of the label link to point to different web sites. For example, by adding the following two lines in the constructor, Click (in Click here to reach MSN) will point to msn site and to will point to yahoo site:
this.linklblMSN.Links.Add(0,4,"www.msn.com");
this.linklblMSN.Links.Add(11,2,"www.yahoo.com");
Command Controls - ToolBar:
A ToolBar control is one that is used to display a set of ToolBarButon controls, that would act as short-cuts to any menu item in an application. The buttons can be of various styles like a standard button, toggle button and drop-down button. Images and Text can be added to the buttons to display any useful message about the button. ToolBarButton controls are added to the toolbar by using the Add or Insert methods on the Buttons property of the ToolBar. The event handler method ButtonClick is invoked when a button on a ToolBar is clicked.
Let us now consider a small example to understand the usage of a ToolBar and ToolbarButton control in a Windows Form application.
- Create a new project called “ToolBarDemo” as a Visual C# Project – Windows Application on VS.NET.
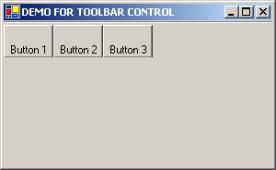
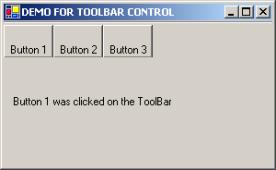
- Set the Text property of the Form as “DEMO FOR TOOLBAR CONTROL” and the Name property as “tbForm”
- Add a ToolBar control to the Form in the Forms Designer by choosing it from the Toolbox, dragging and dropping it on to the form. Note that a ToolBar is added to the top of the form.
- Click on the ToolBar on the Form, while it is highlighted, set its Name property in the Property Window to “tbDemo”.
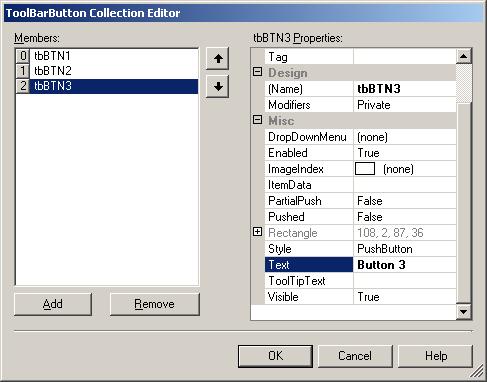
- Now let us add three ToolBarButton controls to the ToolBar. Choose the Buttons property on the Properties Window of the ToolBar. The “ToolBar Collection Editor” appears as shown below. Choose the Add button on the dialog. This adds one ToolBarButton control to the collection – set its Name property to “tbBTN1” and Text to “Button 1” in the adjacent window that exhibits its properties. Similarly add two more buttons and set their Name to “tbBTN2” and “tbBTN3” and their Text to “Button 2” and “Button 3” respectively. Note that the indices for these three ToolBarButton controls in the collection are 0, 1 and 2 respectively. Click OK to finish.
- Note that three buttons appear in the ToolBar added to the Form.
- Now add a “Label” control by choosing it from the ToolBox, dragging and dropping it on to the form below the ToolBar. Set its Name as “lblMessage” and the Text property to be empty.
- Double-click on the ToolBar in the Forms Designer to go to the event handler method of the ToolBar. The tbDemo_ButtonClick() method should look like the following for this demo after adding the code to the method.
private void
tbDemo_ButtonClick(object sender, ToolBarButtonClickEventArgs e)
{
switch(tbDemo.Buttons.IndexOf(e.Button))
{
case 0:
lblMessage.Text =
"Button 1 was clicked on the ToolBar";
break;
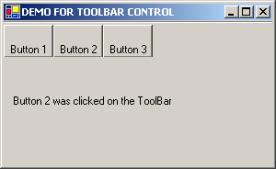
case 1:
lblMessage.Text =
"Button 2 was clicked on the ToolBar";
break;
case 2:
lblMessage.Text =
"Button 3 was clicked on the ToolBar";
break;
}
}
- Build the project and Run the application. The following screen appears. Click on each of the button in the ToolBar to see the corresponding message displayed in the position of the label. This explains the usage of ToolBar control in Windows Form applications.
Initial screen: When Button 1 is clicked:
When Button 2 is clicked: When Button 3 is clicked:

The appearance and behavior of the ToolBarButton controls on the ToolBar can be set to different types and styles as desired by the developer. Also images can be added to the ToolBarButton controls and the text made to appear at different positions on the button controls. These are set using the properties of the ToolBarButton Collection and would be discussed in the section “Working with Properties”.
Text Controls – Label:
The easiest control that could be used in any Windows application is a “Label”. It contains a string that it displays. Labels are passive controls that do not support any interaction with the user. At any point of time, the string that is held by the Label control is accessed using its Text property. In the examples that we had seen so far, we had used label controls in almost all of them. We hope that the reader would have understood the usage of this control well through those examples and hence a separate example for this control is not provided here.
Text Controls – TextBox:
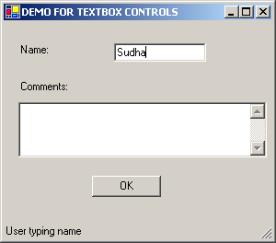
A TextBox control is used whenever user input in an application is required. Typically a TextBox control is used to accept single-line input from the user, but by setting certain properties it could be modified to accept multi-line input and also to accept passwords that would not appear as characters but as an asterix on the screen. Also Horizontal and Vertical Scroll bars could be activated incase of multi-line input.
The following example explains the usage of a single-line and a multi-line TextBox control in any Windows Application.
- Create a Windows Application, Visual C# Project on VS.NET “TextBoxDemo”
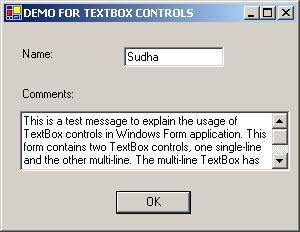
- Set the Name to “tboxFrom” and the Text to “DEMO FOR TEXTBOX CONTROLS” on the properties window of the Form in the Forms Designer.
- Drag and drop two labels ( “lblName” – Name: and “lblComments” – Comments) onto the form to the positions as shown below.
- Drag and drop two TextBox controls onto the form in the positions shown.
Set the properties of each of the TextBox controls as follows:
TextBox control 1 :
Name – tbName
Text – empty
TextBox control 2:
Name – tbComments
Text – empty
Multiline – true
Size – 270, 60
ScrollBars – Vertical
- Add a Button control by dragging and dropping it and set its Name to “btnOK” and its Text to “OK”. Double click on it to go to the Click event handler method, add the following code.
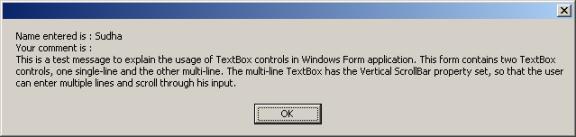
private void
btnOK_Click(object sender, System.EventArgs e)
{
string str = "";
str += "Name entered is : " + tbName.Text +
"\n";
str += "Your comment is : " +
"\n";
str += tbComments.Text;
MessageBox.Show(str);
}
- Build and Run the application. Enter a name in the first text box and some lengthy text in the Comments and click OK. Note that the Vertical scroll bar gets activated once the length of the text exceeds the initial size of the text box. A message box appears displaying all the information typed into the text boxes, as the code in the handler method above has been written so.
This explains the usage of TextBox controls, single-line and multi-line in a Windows Application.
Initial screen in which user input in the TextBox controls are to be entered:
Message box displaying all information entered, to demonstrate that input through text boxes could be read in the application and manipulated using relevant code.
Text Controls - RichTextBox:
The RichTextBox control allows the user to enter and edit text just as a TextBox control, but it provides more advanced formatting features than the standard TextBox control. This control is typically used to provide text manipulation and display features similar to word processing applications such as Microsoft Word. A list of features offered by the RichTextBox control are summarized as follows:
- Text within the control can be assigned character and paragraph formatting.
- Bullets can be created inside the text.
- Color, Font, Font style (regular, bold, italic etc.) and Size of the text can be modified.
- Text can be loaded from a file and the text can be saved to a file
- Hyper-links can be represented in the text and handled through respective handler methods
As the usage of a RichTextBox control is similar to that of a TextBox control explained in the previous section, we skip a separate demo of this control’s usage.
Text Controls – StatusBar:
A StatusBar control is generally added to a Form to display certain useful tips and messages to the user when the application is running. It is added by default to the bottom of the Form as the DockStyle.Bottom is used in the constructor of the StatusBar control.
To exhibit the use of a StatusBar control, let us add a StatusBar to the TextBoxDemo application that was developed before.
- Drag and drop a StatusBar control from the Toolbox onto the Form in the Forms designer. Note that a StatusBar is added to the bottom of the Form. Set its properties as follows:
Name - sbDemo
Text – empty
- Double click on the TextBox control in that accepts name. It takes us to the tbName_TextChanged() handler method. Enter the following code in it.
private void
tbName_TextChanged(object sender, System.EventArgs e)
{
sbDemo.Text = "User typing name";
}
- Double click on the TextBox control that accepts comments. Enter the following code.
private void
tbComments_TextChanged(object sender, System.EventArgs e)
{
sbDemo.Text = "User typing comments";
}
- Build and Run the application. Note the message displayed on the StatusBar when typing the name and the comments. We hope the above example would have demonstrated the usage of a StatusBar control in a Windows Application.
When name is entered: When comments are entered:
![]()
![]()
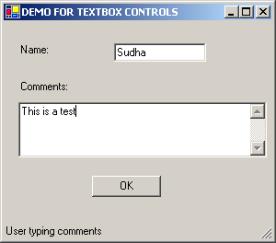
Status bar displaying the messages
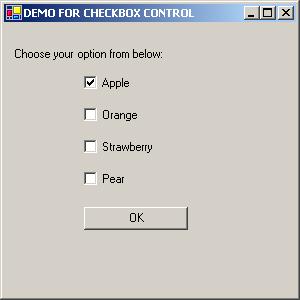
Option Controls – CheckBox:
A CheckBox control is one that is used to give the user an option such as yes or no. It is a combination of a small box and an associated label or image or both that describes the option represented by the CheckBox control. The box can either contain a check mark or not depending on whether the option is turned on or off respectively. The user can change the state of a CheckBox control by clicking on it. A CheckBox control is usually used in places where the user is asked to choose a combination of options from a list. The Checked property of the CheckBox control is used to get or set its value.
To demonstrate the use of CheckBox controls let us consider a simple Windows Form application hereunder:
- Create a new Windows Application as a Visual C# Project in VS.NET by name “CheckBoxDemo”
- To the form in the Forms Designer, add a label from the Toolbox and set its Text as “Choose your options from below:”
- Add four CheckBox controls by dragging and dropping them onto the Form as shown below. Set the Name property of each of them as cb1, cb2, cb3 and cb4 & the Text property as Apple, Orange, Strawberry and Pear respectively in their property window. Set the “Checked” property of “Apple” to “true”. This would mean that when the initial screen appears, all the CheckBox controls except for Apple would be unchecked.
- Add a button by Name “btnOK” and Text “OK” to the form below the CheckBox controls.
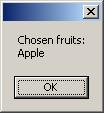
- Double click on the button to go to the Click event handler and add necessary code as shown below.
private
void btnOK_Click(object sender, System.EventArgs e)
{
string str = "Chosen
fruits:\n";
if(cb1.Checked == true) str +=
cb1.Text + "\n";
if(cb2.Checked == true) str +=
cb2.Text + "\n";
if(cb3.Checked == true) str +=
cb3.Text + "\n";
if(cb4.Checked == true) str +=
cb4.Text + "\n";
MessageBox.Show(str);
}
- Build and Run the application. Choose some fruits from the screen by clicking on the check boxes, note that they get checked by clicking on them. Click OK. A message box displaying the fruits checked on the screen appears.
The above example describes the usage of CheckBox controls in Windows Form applications.
Initial screen :
Message Box that appears on OK:
Option Controls – RadioButton:
RadioButton and CheckBox controls have a similar function: they offer choices a user can select or clear. The difference is that multiple CheckBox controls can be selected at the same time, but radio buttons are mutually exclusive. That is only one of the set of radio buttons can be chosen as the option by the user. Radio buttons are to be defined as a group of which one would be chosen. When the user selects one radio button within a group, the others clear automatically.
The following example explains the usage of radio buttons in an application.
- Create a Windows Application as Visual C# Project in VS.NET by name “RadioButtonDemo”
- Set the Form’s Text property to “DEMO FOR RADIO BUTTON CONTROLS”
- Add four RadioButton controls by dragging and dropping them onto the Form as shown below. Set the Name property of each of them as rb1, rb2, rb3 and rb4 & the Text property as Very likely, Likely, Not likely and Definitely Not respectively in their property window. Set the “Checked” property of “Very likely” to “true”. This would mean that when the initial screen appears, “very likely” would be the default choice of the user.
- Add a button by Name “btnOK” and Text “OK” to the form below the RadioButton controls.
- Double click on the button to go to the Click event handler and add necessary code as shown below.
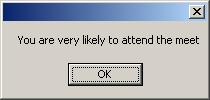
private
void btnOK_Click(object sender, System.EventArgs e)
{
string str =
"";
if(rb1.Checked ==
true) str = "You are very likely to attend the meet";
if(rb2.Checked ==
true) str = "You are likely to attend the meet";
if(rb3.Checked ==
true) str = "You are not likely to attend the meet";
if(rb4.Checked ==
true) str = "You will definitely not attend the meet";
MessageBox.Show(str);
}
- Build and Run the application. Choose an option from the screen by clicking on the radio button, note only one of the four buttons are checked at any point of time unlike the CheckBox controls. Click OK. A message box displaying the option chosen on the screen appears.
The above example describes the usage of RadioButton controls in Windows Form applications.
Initial screen: 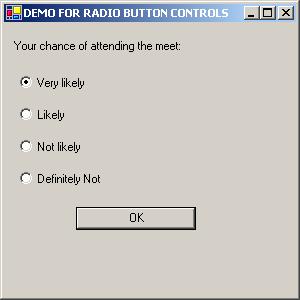
Message on OK:
Option Controls – ListBox:
A ListBox control provides the user with a compact, single or multiple choice, scrollable selection list. The SelectionMode property has three modes single, simple multiple (selects all items clicked) and extended multiple (SHIFT and CTRL keys activated) options. It also has properties when set, would avoid scrolling and display the items in the ListBox in multiple columns. The ListBox class supports three types of Collections that enable us to access the items in the ListBox. They are briefly explained hereunder:
ListBox.ObjectCollection: Contains all the items in the ListBox control. The Add method of this class is used to add items to the ListBox control.
ListBox.SelectedObjectCollection: This contains the objects that have been selected in the ObjectCollection of the ListBox. It represents a subset of the entire set of items in the ObjectCollection, those items that are selected from the list.
ListBox.SelectedIndexCollection: Contains a collection of the selected indices, which is a subset of the indices of the ListBox.ObjectCollection. These indices specify items that are selected.
The following example explains the usage of ListBox controls in Windows Form applications.
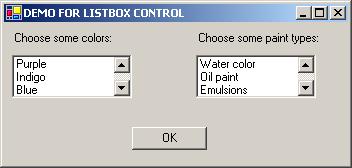
- Create a Windows Application as Visual C# Project in VS.NET by name “ListBoxDemo”. Set the Text of the Form to “DEMO FOR LISTBOX CONTROL”
- Add two labels and set their Text to “Choose some colors:” and “Choose some paint types:” as shown below.
- Add two ListBox controls by dragging and dropping them onto the Form. In the property window of each of the ListBox controls set the following:
ListBox control 1:
Name – lbColors
SelectionMode – MultiSimple
Click on the Collection of the Items property that displays a dialog. Type in some colors one per line and click OK.
Adjust the size of ListBox control lbColors to display only three colors and the rest scrollable.
ListBox control 2:
Name – lbPaint
SelectionMode – MultiExtended
Click on the Collection of the Items property that displays a dialog. Type in some paint types – Oil paint, Cement paint, Emulsions, Plastic coats etc. one per line and click OK.
Adjust the size of ListBox control lbPaint to display only three paint types and the rest scrollable.
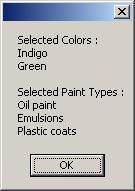
- Add a button name it as btnOK and its Text as OK. Double click on it to go to the Click event handler method. The event handler code is as follows:
private void
btnOK_Click(object sender, System.EventArgs e)
{
string str = "Selected Colors :\n";
foreach (object item in lbColors.SelectedItems)
{
str += item.ToString() +
"\n";
}
str += "\nSelected Paint Types :\n";
foreach (object item in lbPaint.SelectedItems)
{
str += item.ToString() +
"\n";
}
MessageBox.Show(str);
}
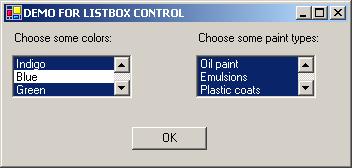
- Build and Run the application. Click some colors in the first list box and some paint types on the other. Observe their behavior and how items are selected. Click OK to display the message box of what have been selected in both the list boxes.
Initial Screen:
When items are selected:
Message box on OK:
Option Controls – CheckedListBox:
A CheckedListBox control is very similar to a ListBox control, except that each item in the list has a check box associated with it that the user can check or uncheck by clicking on it. Also the user can move through the items in the list either using the scroll bars or the keyboard.
Similar to the ListBox control’s Collection types, a CheckListBox control is also associated with three types of collection classes –
CheckedListBox.ObjectCollection, CheckedListBox.CheckedItemCollection and CheckedListBox.CheckedIndexCollection - that accomplish the same tasks as the collection classes of the ListBox.
The following example explains the usage of a CheckedListBox control.
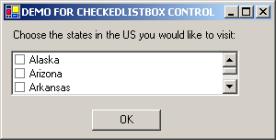
- Create a Windows Application as Visual C# Project in VS.NET by name “CheckedListBoxDemo” ”. Set the Text of the Form to “DEMO FOR CHECKEDLISTBOX CONTROL”
- Add a label and set the Text to “Choose states in the US you would like to visit:” as shown below.
- Add a CheckedListBox control by dragging and dropping it onto the Form. In the property window of the control set the following:
Name - clbStates
Click on the Collection of the Items property that displays a dialog. Type in some name of US states one per line and click OK.
Adjust the size of CheckedListBox control clbStates to display only three states and the rest scrollable.
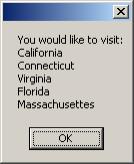
- Add a button name it as btnOK and its Text as OK. Double click on it to go to the Click event handler method. The event handler code is as follows:
private void
btnOK_Click(object sender, System.EventArgs e)
{
string str = "You would like to visit:\n";
foreach (object item in clbStates.CheckedItems)
{
str += item.ToString() +
"\n";
}
MessageBox.Show(str);
}
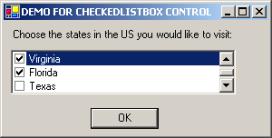
- Build and Run the application. Click some on the list. Observe their behavior and how items are selected. Click OK to display the message box of what have been selected in the list box.
Initial Screen: When some states are selected:
Message Box on OK:
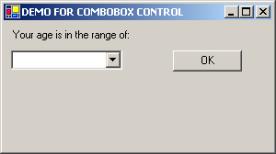
Option Controls – ComboBox:
The ComboBox control is used to create a drop-down list of items from which the user may choose one. When inactive, the control takes the space of displaying one item only that is currently selected. When the user clicks on the arrow of the control, the entire list drops down, from which a new selection could be made. Items could also be added to the list at runtime using the AddRange (multiple items) and the Add (single item) methods.
The following example explains the usage of a ComboBox control.
- Create a Windows Application as Visual C# Project in VS.NET by name “ComboBoxDemo” ”. Set the Text of the Form to “DEMO FOR COMBOBOX CONTROL”
- Add a label and set the Text to “Your age is in the range of:” as shown below.
- Add a ComboBox control by dragging and dropping it onto the Form. In the property window of the control set the following:
Name - cbbAge
Click on the Collection of the Items property that displays a dialog. Type in the ranges of ages as shown below and click OK.
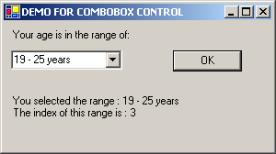
- Add a button name it as btnOK and its Text as OK. Double click on it to go to the Click event handler method. The event handler code is as follows:
private void
btnOK_Click(object sender, System.EventArgs e)
{
string str = "You selected the range : " +
cbbAge.SelectedItem.ToString() + "\n";
str += "The index of this range is : " +
cbbAge.SelectedIndex;
lblMessage.Text = str;
}
- Add another label “lblMessage” with Text as empty to start with below the ComboBox and the Button controls to display the result of the event handler.
- Build and Run the application. Select any range from the list that drops down when the arrow on the ComboBox is clicked. Click OK to display the message of what has been selected and the index of the item in the list (indices start from base as 0).
Initial Screen: When some age range is selected: